

A beginner-friendly guide to choosing, installing, troubleshooting, and removing drywall anchors—plus the moments when a wall stud is the safer answer.
Use a drywall anchor when you cannot fasten the mounting screw into a wall stud and the item’s instructions allow drywall mounting. A small picture may suit a light-duty anchor; shelves, large mirrors, televisions, overhead fixtures, and safety-critical items usually need studs, structural blocking, masonry fastening, or a manufacturer-approved mounting system.
Choose the anchor for the job—not just the package rating
Drywall is a gypsum board panel, not solid lumber. An ordinary screw can grip briefly, then pull out as the hole crumbles. Anchors spread load over a larger area or clamp against the back of the wall. Ratings vary with drywall thickness, wall condition, direction of force, screw size, and installation quality, so treat the manufacturer’s instructions as the final word.
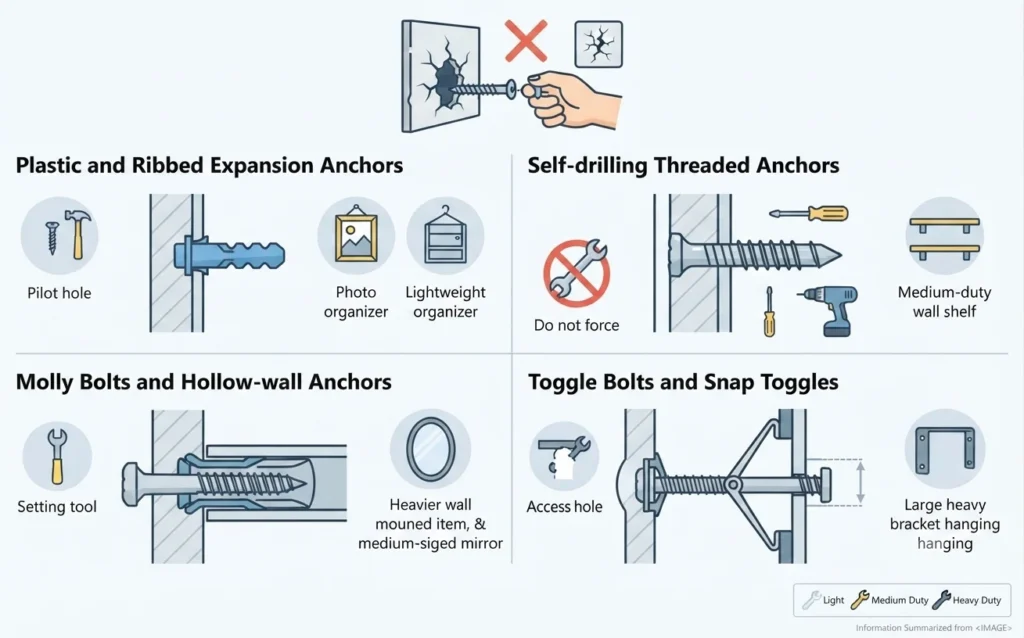
Plastic and ribbed expansion anchors
Best for light items such as small frames, lightweight organizers, and simple décor. Drill the exact specified pilot hole, tap the anchor flush, then drive the matching screw. They are inexpensive, but not a good choice for shelves or valuable items.
Self-drilling threaded anchors
Useful for medium-duty wall-hung items when the package specifically lists drywall use. Screw the anchor in straight with a screwdriver or low-speed drill, then add its compatible screw. Do not force it: overtightening can strip the drywall.
Molly bolts and hollow-wall anchors
These metal sleeves expand behind drywall as the screw is tightened, creating a broader bearing surface. They can suit some medium-duty mounting jobs, but need an accurately sized hole and may require a setting tool.
Toggle bolts and snap toggles
Often the strongest drywall-only option because a bar or wings bear against the back of the wall. They need a larger access hole. Snap toggles keep the channel in place after the bolt is removed, making installation easier for brackets.
A simple rule for shelves and mirrors
When possible, fasten at least one mounting point into a stud. For a shelf, remember that the contents create leverage that pulls the top fastener outward. For a heavy or expensive mirror, follow the mirror manufacturer’s approved mounting instructions rather than relying on a general anchor chart.
Tools and preparation
Before drilling, locate the mounting position with a tape measure and level. Scan for a stud first. Avoid drilling near outlets, switches, plumbing fixtures, or anywhere utilities may run. If you are unsure what is behind the wall, stop and seek qualified help.
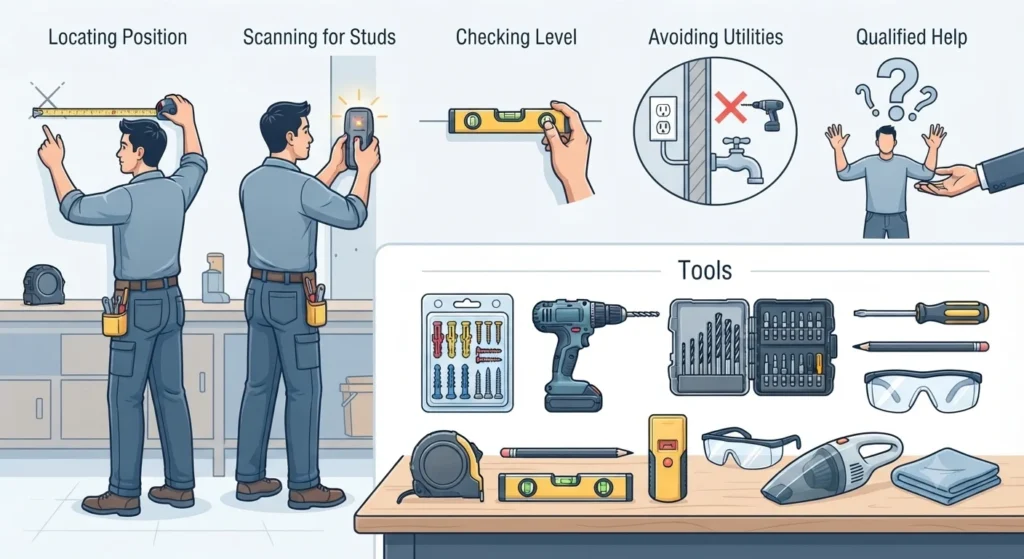
Gather these before you start
Anchor kit with its matching screws • drill and drill bits • screwdriver bit or hand screwdriver • pencil • tape measure • level • stud finder • safety glasses • vacuum or dust cloth. Check the anchor packet for the precise drill-bit size; do not guess from the anchor’s outer rim.
How to install a drywall anchor
These general steps fit many anchors, but the anchor package takes priority. A pilot hole that is too large causes spinning; a hole that is too small can crack drywall or prevent the anchor from seating.
Mark and inspect the location
Hold the bracket or hanger in place, mark each hole, and confirm it is level. Use a stud finder and utility-aware caution before drilling. If you find a stud in the right place, use a suitable wood screw into the stud instead of an anchor.
Match the drill bit to the instructions
For plastic, molly, and toggle anchors, drill the hole size printed on the package. Keep the drill square to the wall and use gentle pressure. Self-drilling anchors often need no pilot hole, unless their manufacturer says otherwise.
Insert the anchor correctly
Push or lightly tap a plastic anchor until its collar sits flush. Threaded anchors should enter straight and stop flush, not sink below the paper face. For toggles, pass the folded mechanism through the hole and pull it snug against the back of the drywall.
Position the item, then drive the screw
Place the bracket or hanging hardware over the anchor. Use the screw supplied with the anchor when possible; its diameter and thread engagement are part of the system. Drive until the item is snug—do not crush the drywall or overtighten the screw.
Check the mount before loading it
Confirm that the hardware is level and does not shift. Add weight gradually and only within the mounted product’s instructions and the anchor manufacturer’s stated conditions. If the anchor turns, pulls forward, or dents the wall, remove the load and correct the installation.
Weight, wall condition, and safety limits
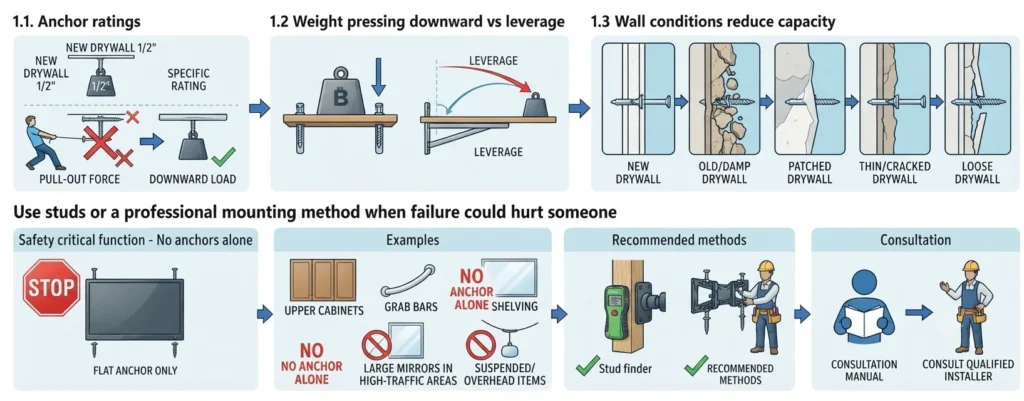
Anchor ratings are not universal promises. A rating may assume new 1/2-inch drywall, a particular screw, a specific spacing pattern, and a downward load. Pull-out force is more demanding than weight pressing downward, and a shelf or arm-mounted object adds leverage. Old, damp, patched, thin, cracked, or loose drywall reduces capacity.
Use studs or a professional mounting method when failure could hurt someone
Do not rely on drywall anchors alone for televisions, upper cabinets, grab bars, heavy shelving, large mirrors in high-traffic areas, suspended or overhead items, or anything with a safety-critical function. Follow the product manufacturer’s installation manual and consult a qualified installer when the wall structure or loading is uncertain.
Troubleshooting, removal, and drywall repair
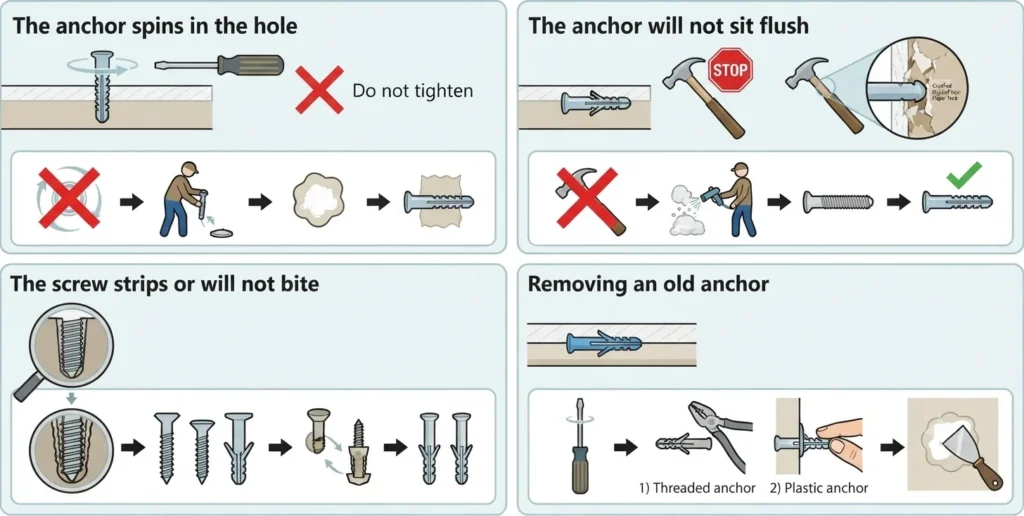
The anchor spins in the hole
The hole is usually oversized or the drywall is damaged. Do not keep tightening. Remove the anchor, patch the hole, and move the fastener or use a correctly sized anchor only after the repair has cured. A larger anchor is not automatically safe.
The anchor will not sit flush
Stop rather than hammering hard. Verify the hole size and clear drywall dust. For threaded anchors, back it out and restart square to the wall. A crushed paper face weakens the mounting point and may need repair.
The screw strips or will not bite
Use the screw specified for that anchor. A screw that is too narrow may not engage; one that is too wide can split or distort the anchor. Replace the damaged anchor rather than forcing a different screw into it.
Removing an old anchor
Back out the screw first. Pull threaded anchors out carefully if they release; for many plastic anchors, push the body slightly into the wall instead of tearing the drywall face. Fill the opening with spackle, let it dry, sand lightly, then prime and paint.
Drywall anchor questions, answered
Can you screw directly into drywall?
A screw driven only into drywall has limited holding power and can pull out, especially under outward force. For a durable mount, fasten into a stud or use an anchor approved for the item, drywall thickness, and intended load.
Do drywall anchors need a pilot hole?
Most plastic expansion anchors, molly bolts, toggle bolts, and snap toggles require a drilled hole. Self-drilling threaded anchors may not, but some still specify a pilot hole. Always use the manufacturer’s stated bit size.
Do you put the screw into the anchor before installing it?
Usually no for standard plastic and threaded anchors: install the anchor first, position the mounting hardware, then drive the screw. Toggle systems are different because the bolt often passes through the item or bracket before the toggle goes through the wall. Follow that product’s sequence.
Can you reuse a drywall anchor hole?
Only if the hole and drywall remain sound and the new anchor is specifically designed for that exact opening. If an anchor spun, pulled out, or enlarged the hole, patch it and choose a nearby location or use a stud. Never trust a damaged hole for a heavy item.