
Know when to reach for a general pry bar, heavy-duty pry bar, ripping bar, pinch bar or plastic pry tool—before a simple repair turns into damaged trim, bent material or a risky lift.
Use a slim general-purpose pry bar for everyday separation and nail pulling, a ripping bar for demolition and board removal, and a heavy-duty pry bar or pinch bar when the load needs more leverage. Use a plastic pry tool, not steel, around painted trim, dashboards, clips and delicate panels.
What is a pry bar?
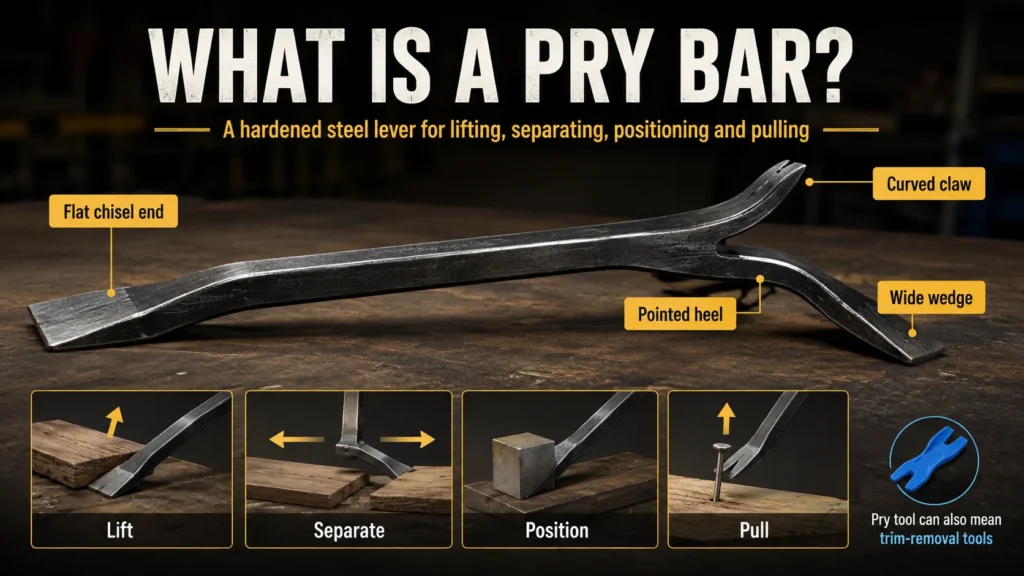
A pry bar is a hardened steel lever with one or two shaped ends for lifting, separating, positioning or pulling materials apart. Depending on the design, it may have a flat chisel end, a curved nail-pulling claw, a pointed heel, or a broad wedge for spreading force over a larger area.
You may also see the term pry tool used for both steel bars and smaller trim-removal tools. “Ply bar” is a common misspelling of pry bar, not a separate tool category. The important decision is not the name on the label: it is whether the tool gives enough leverage without crushing, scratching or overstressing the material around it.
The main types of pry bars and what they do
Many pry bars overlap in purpose, but their shape changes how they enter a gap, how much leverage they generate and how likely they are to mark a surface. Common designs include flat bars, rolling-head bars for controlled lifting, indexing or aligning bars with tapered points, and demolition bars with nail slots. Start with the lightest tool that can do the job safely, then step up in size or strength only when the workpiece calls for it.
General-purpose pry bars
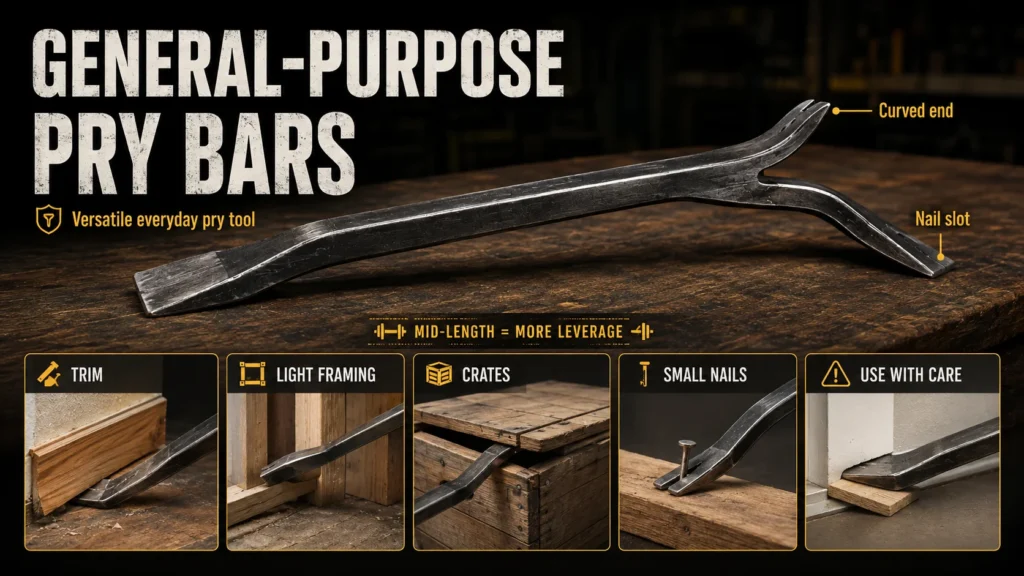
A general-purpose pry bar is usually a flat steel bar with a curved end and nail slot. Short versions are useful for trim, light framing adjustments, opening crates and removing small nails. Mid-length bars offer more leverage for lifting boards or separating materials. They are versatile, but a thin edge can dent finished timber or drywall if used directly against the surface.
Ripping bars
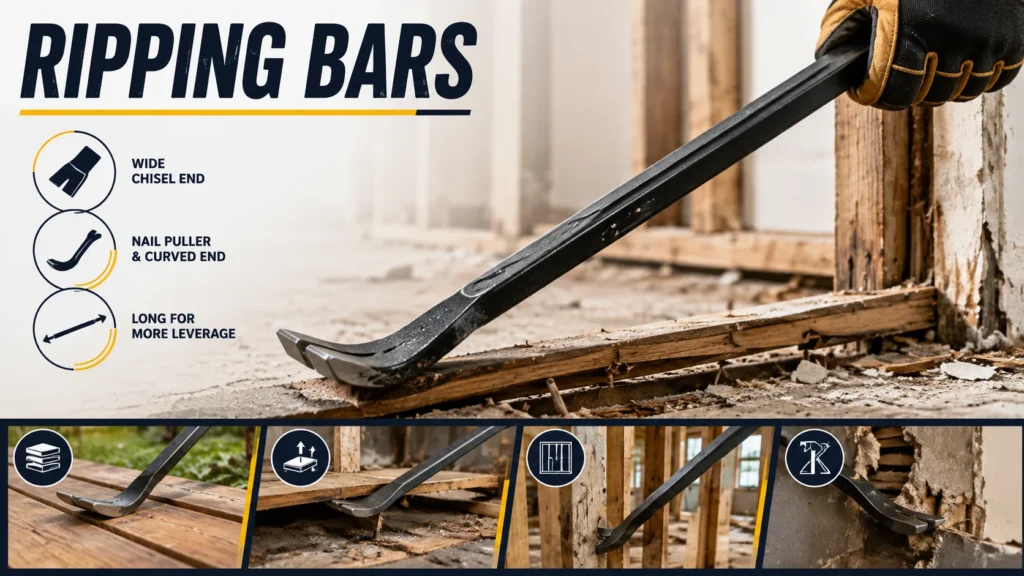
Ripping bars are demolition-focused pry bars, often long and shaped with a wide chisel end, nail puller and curved levering end. They are well suited to pulling decking, lifting subflooring, removing framing boards and dismantling rough construction. Their broad ends help open seams, while their length lets you work with more leverage and a safer standing position. They are not the first choice for precision trim work.
Heavy-duty pry bars
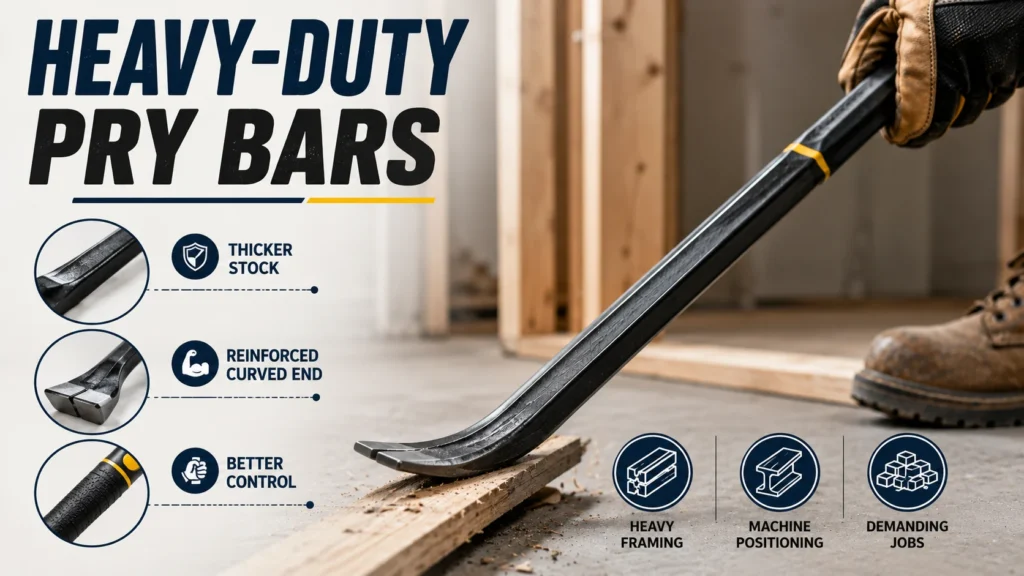
A heavy duty pry bar has thicker stock, a more robust shaft and often a larger curved end or reinforced striking surface. It is made for stubborn framing members, machinery positioning, larger timber, compacted materials and other tasks where a slim trim bar could bend. Look for forged or heat-treated spring steel when repeated flex and recovery matter; the steel should return to shape without visible kinks. Some models add an ergonomic grip for control, but more strength does not make a bar safer around finished surfaces: its leverage can damage material quickly, so use a wood block or purpose-made protector under the fulcrum.
Pinch bars
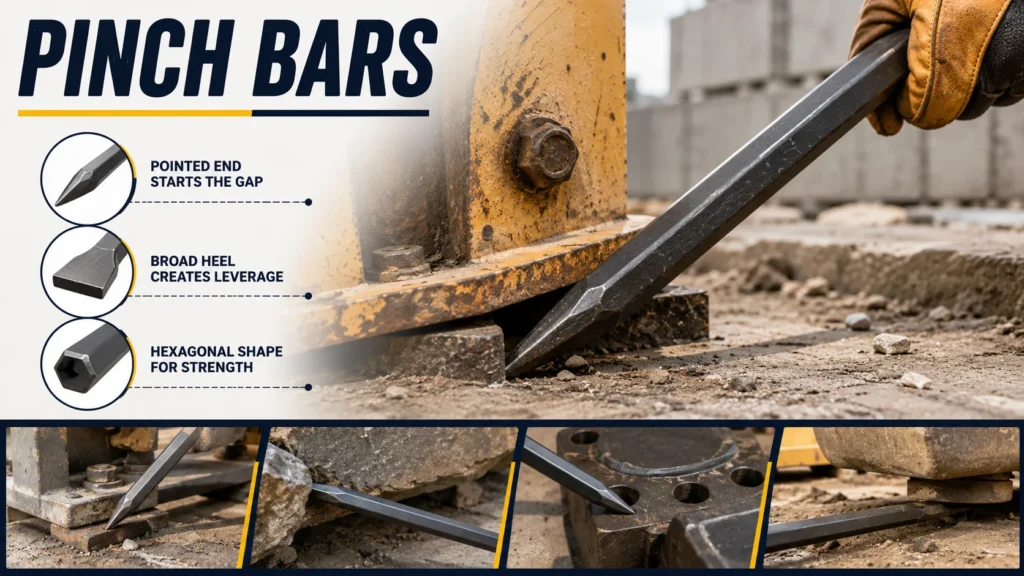
A pinch bar is usually a long, round or hexagonal steel bar with a pointed or tapered end and a broad heel. The pointed end starts a gap or reaches under an edge; the heel creates leverage. Indexing and aligning bars use that tapered point to line up bolt holes, machinery and structural parts before fasteners are installed. Rolling-head bars can then lift or shift material while the rounded head helps the load move smoothly. These tools are useful for stone, equipment and heavy materials, but they are positioning tools—not substitutes for rated lifting equipment or safe support stands.
Plastic pry tools
A plastic pry tool is a non-marring wedge or lever designed for clips, trim and light panels. Automotive DIYers use them for door cards, dashboard trim, console pieces and weatherstrip retainers because the softer material is far less likely to scratch paint, leather, vinyl or soft plastic. They can still break clips or crack a panel if used carelessly, but they are much safer than a screwdriver or steel pry bar on finished surfaces.
Pry bar types at a glance
Use this comparison as a starting point. Exact bar shape, steel thickness and handle length vary by manufacturer, so inspect the working ends rather than choosing by product name alone.
| Pry tool | Best for | Watch out for |
|---|---|---|
| General-purpose pry bar | Nails, light lifting, trim removal and everyday repairs | Can mark finished surfaces or flex under heavy loads |
| Heavy-duty pry bar | Stubborn timber, heavy components and forceful separation | Too aggressive for delicate work; leverage can cause sudden damage |
| Ripping bar | Demolition, decking, framing boards and embedded nails | Bulky in tight spaces and not intended for clean finish work |
| Pinch bar | Starting gaps, aligning and shifting heavy material | Never use it as a support for a suspended load |
| Plastic pry tool | Automotive trim, electronics housings and delicate clips | Not for structural lifting, seized fasteners or demolition |
A screwdriver may seem convenient, but it is a poor replacement for a proper pry tool. Its narrow shaft concentrates force, slips easily and can gouge a surface or snap at the tip. Choose a tool with an end shape that actually fits the gap and spreads the load.
How to choose the right size, leverage and material
Bar length is leverage. A longer bar generally needs less hand force to move the same load, but it also gives you less fine control and creates more room for a sudden release. Short bars around 7 to 12 inches are useful for close, controlled work. Bars around 15 to 24 inches cover many household and workshop jobs. Longer ripping bars and pinch bars are better reserved for demolition, heavy materials and jobs with enough clear space.
Match length to the job
If a short bar will not move the work, switch to a longer, stronger bar instead of slipping a pipe over the handle. Makeshift extensions can overload the tool, reduce control and turn a manageable pull into a dangerous release.
Protect the contact point
Place a thin wood shim, wide block or purpose-made protector under a steel bar when preserving trim, flooring or painted material. On automotive interior panels, start with a plastic pry tool and work close to the clip rather than flexing a large area.
For steel bars, look for forged or hardened alloy steel with a straight shaft, clean working edges and no visible cracks. Typical sizes run from compact 12-inch bars for close work through 24- to 36-inch general-purpose bars, with ripping and heavy-duty models reaching 48, 60 inches or more when the job allows room for the swing and release path. A striking cap is useful only when the manufacturer specifically designs the bar for hammer blows. Reject a bar that is bent, deeply gouged, mushroomed at a striking face or damaged around the nail slot. A deformed pry bar can slide or fail when loaded.
Practical pry bar examples by job
The safest choice is usually obvious once you identify whether the work is rough demolition, controlled separation, heavy positioning or finish-sensitive trim removal.
For boards, framing and demolition
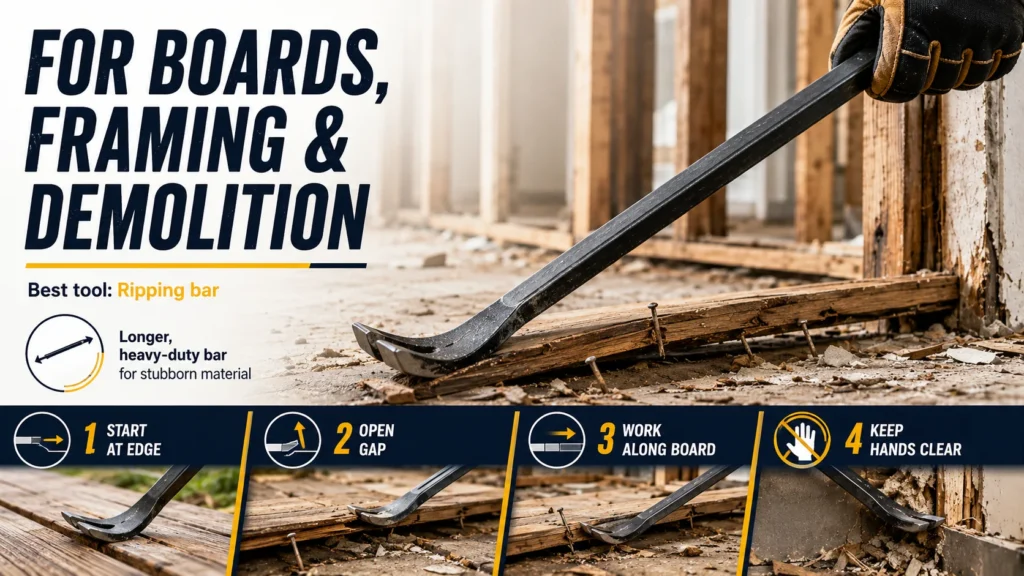
Choose a ripping bar when removing nailed boards, old decking, rough trim or framing members. Start at an accessible edge, open the gap gradually and work along the board rather than trying to force it free in one pull. A longer heavy-duty bar can help with stubborn material, but avoid standing directly in the bar’s travel path or placing your free hand where the board may snap back.
For automotive panels and finished trim
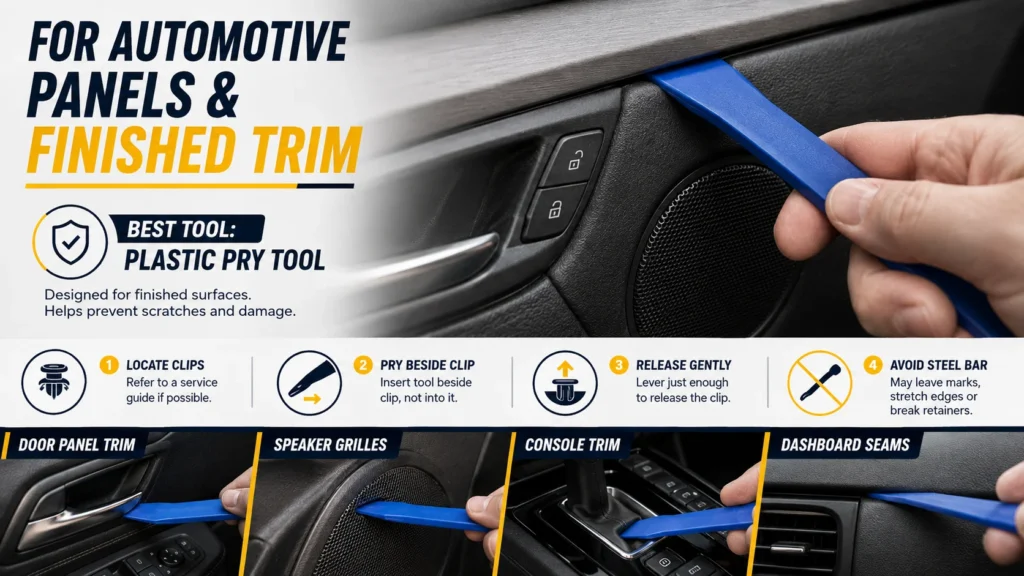
Use a plastic pry tool for interior vehicle trim, door panels, speaker grilles, console inserts and light plastic housings. Locate clips from a service guide if possible, then insert the tool beside each clip and lever only enough to release it. A steel pry bar is usually the wrong choice here: even if the panel comes off, it may leave permanent marks, stretched edges or broken retainers.
How to use a pry bar safely
Pry bars store force as the material bends and shifts. When a nail pulls, a board cracks or a load moves, the release can be sudden. Good body position and controlled force matter as much as the bar itself.
Use steady pressure—never a blind heave
Wear eye protection, inspect the bar first and keep your face and hands away from the likely release path. Seat the end fully, brace the fulcrum on a stable surface and pull with a balanced stance. Do not use a damaged tool, do not strike a bar unless it is designed for striking, and do not use a pry bar to support a load that could fall.
If the bar begins to twist, the workpiece starts splitting unpredictably or the tool keeps slipping, stop and reset. Reposition closer to the fastener or clip, add surface protection, use a bar with a more suitable end shape, or change the removal method. More force is not always the solution.
A sensible starter pry bar set
For most DIY users, a small selection works better than one oversized bar. Buy for the jobs you actually expect to do, then add a specialist tool when your work becomes more demanding. After use, wipe away dirt and moisture, inspect the edges and striking area, and store bars dry so corrosion does not weaken the steel or dull the working ends.
- Keep a compact flat pry bar for controlled jobs, light nail pulling and getting into narrow gaps.
- Add a mid-length general-purpose pry bar for household repairs, small framing tasks and board separation.
- Choose a ripping bar or heavy-duty pry bar if you regularly remove decking, framing or embedded nails.
- Keep a plastic pry tool set with several wedge shapes for automotive interiors, appliance panels and other finished surfaces.
Frequently asked questions
What is the difference between a pry bar and a ripping bar?
A ripping bar is a type of pry bar designed mainly for demolition and pulling nailed boards apart. It usually has a longer body and wider working ends than a general-purpose pry bar, giving it better leverage for rough construction materials.
When should I use a heavy duty pry bar?
Use a heavy duty pry bar when a normal bar is too short or likely to flex, such as when separating heavy timber, moving a component slightly or handling stubborn demolition work. Make sure the bar is sized for the task and protect any surface that must remain undamaged.
Can a pry bar damage the material I am working on?
Yes. Steel pry bars can dent wood, chip paint, crease sheet metal and crack plastic when force is concentrated at one spot. Use a wood shim or protector under the fulcrum, pry near clips or fasteners, and switch to a plastic pry tool for trim, panels and other finished surfaces.