
Standard masking tape is a poor bet inside a powder-curing oven. A missed hole or flange is worse than an untidy edge: once the coating builds on a functional surface, a bolt may need its threads chased, a sealing face may need rework, or the whole finish may have to come off. Masking begins before the gun is triggered, with a decision about which part belongs in a home project at all.
This guide covers removable, non-safety metal pieces. Brake parts, wheels, suspension parts, and steering parts are outside its steps; whether any particular one can be recoated depends on its manufacturer and application.
Pick the Right Parts First
Apply four checks before considering color or finish. The part must be metal. It must not carry a driving load or perform a safety function. It must come apart into a bare piece that can be cleaned and coated. And its maker must not forbid recoating or the heat involved. If you cannot find the maker’s instructions, do not use that uncertainty as permission to proceed. The same goes for a bracket: “bracket” is not enough of a description until you know what it holds.
A valve cover shows why those checks matter. MAHLE describes covers made of thermoplastic or a thermoplastic-and-aluminum mix, sometimes with oil-separation and pressure-control parts built in. Leave those assemblies alone. For the job in this guide, picture a PML as-cast aluminum cover: PML offers its unfinished castings for customers who want local powder coating. Use that specific part as the running example.
Even a metal part needs a substrate check. Prismatic Powders flags magnesium as a material that calls for special attention to heat tolerance. If you cannot strip the part to clean bare metal or remove its seals, inserts, and integrated components, choose another project. Put the bare cover on the bench before cleaning and mark the flange, bolt holes, breather openings, and any electrical contacts. A quick photo gives you a reference when those details disappear under powder.
What Happens If You Skip a Spot
Powder can reach around exposed corners, which is why “I will avoid spraying that spot” is not a masking plan. Decide which surfaces must stay free of coating before you spray. Threads, bearing and press-fit areas, ground contacts needed when the part is back on the vehicle, and gasket faces all have functional reasons to remain clear.
The cured coating adds thickness. Unlike paint, powder won’t wear in. Coated threads may need to be chased; a coated mating face may need sanding or a fresh start. Mask those areas even if nobody will see the edge. On the cover, a clean gasket flange matters more than a perfectly sharp color line on a visible corner. Work out which surfaces need a seal or a snug fastener fit before you decide where the decorative edge should run.
There is a separate problem in deep recesses and sharp bends: the Faraday-cage effect can make powder difficult to deposit there. That is not the same thing as powder leaking under a lifted tape edge. One is a coverage problem in the shape of the part; the other is a boundary problem where the mask failed to seal.
What You Need
Start with a powder gun and a dedicated electric curing oven. Eastwood’s equipment instructions specify an electric oven and rule out gas ovens, food-preparation ovens, and ovens in living areas. Curing releases mildly toxic fumes. Keep a NIOSH-approved respirator, goggles, nitrile gloves, degreaser, and stripping or blasting tools at the bench. Set out a clean hook or rack and a way to check the metal’s temperature during curing. You should be able to move the cover into the oven without bumping off the fresh powder.
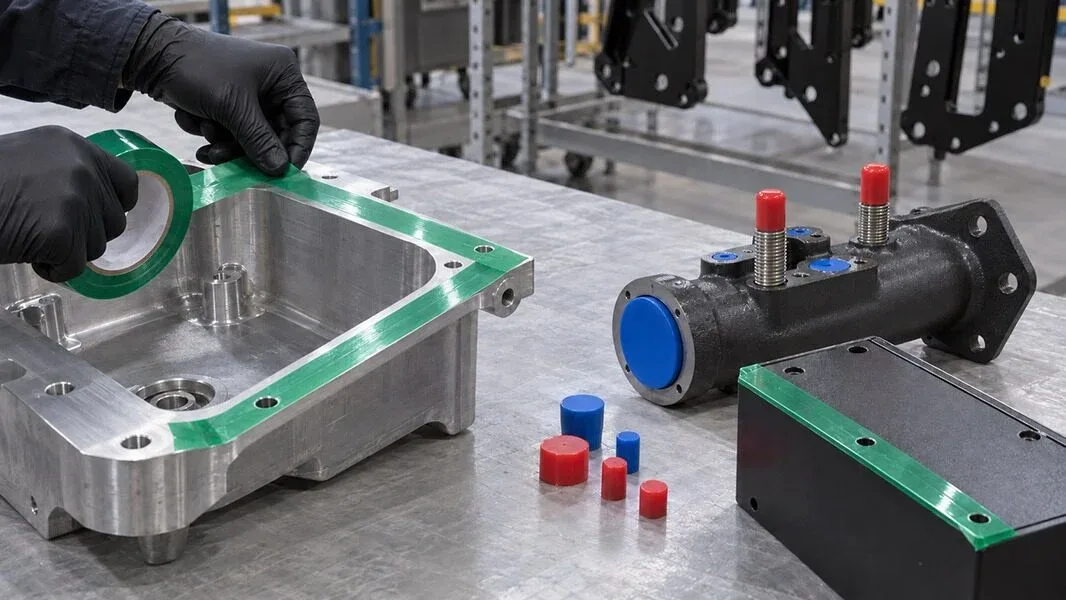
Keep silicone plugs for holes, caps for studs, silicone tubing for longer studs, and foil for awkward shapes. Check each masking product’s specification against the heat it will actually see; a generic “high-temperature” label is not enough.
The gun also needs a dry, steady air supply. Follow the equipment manual for the compressor and moisture control. Keep the curing rack clean, and rehearse the trip from the spray area to the oven with the bare part. You want a clear path when the powder is still loose.
Work in a well-ventilated area with powder-dust control and no nearby ignition sources. Follow the gun and oven manuals for setup and operation.
Prep Before You Mask
Remove old coating, rust, grease, and other contamination until the surface is clean bare metal. Masking adhesive will not seal well over oil or blasting debris, and the new coating also depends on that preparation. Look into the cover’s bolt holes and ports as you clean; trapped grime there can end up back on the surface. Plan how the part will be supported during coating and curing so you do not have to improvise around a fresh powder layer. A dry run with the clean, uncoated part also shows whether your hook reaches the chosen ground point without touching the sealing flange.
Cast aluminum may need a separate outgassing pre-bake. Prismatic’s part-preparation guidance explains that trapped contaminants can leave a casting when heated and create bubbles as the coating sets. That preparation is not the same as the later powder cure; its appropriate conditions depend on the substrate and the relevant instructions. Do not use the powder label as a substitute for the pre-bake requirements. Before heating the cover, check that it is completely stripped and dry, including the recesses around its ports and bolt holes. Remove nonmetal fittings before that separate preparation step.
For the cast-aluminum cover, let the pre-bake finish and cool the part enough to handle safely. Wipe away the contamination that heat brought to the surface, then let the metal dry and cool as directed. Check the flange and the mouths of the ports again. If oil has emerged, clean it off before fitting any mask. Put on clean gloves before masking so fingerprints stay off the prepared metal.
Plugs, Caps or Tape
On the cast-aluminum cover, press suitable silicone plugs into the bolt holes. Cap any breather or pipe ports; silicone tubing can sleeve a longer stud. Check that each piece sits firmly and that the opening’s edge is covered where the final fit requires bare metal. Foil can cover a shape that does not suit a flat strip. For a flat boundary, use tape whose stated rating covers your cure cycle; choosing high-temperature masking comes down to the heat, the edge you need, and how cleanly it has to come off.
Apply tape to clean metal and press the edge down. Eastwood warns that stretched tape can lift during curing. Overlap slightly around a complex contour; use a plug or cap instead of bridging a hole.
The finished cover may need an uncoated contact that remains conductive after installation. Spraying needs a separate ground. Hang the cover from a hidden spot that does not affect sealing or fit, and connect the gun’s clamp or a clean, uncoated hook to bare metal there. Tape or cured powder between the hook and the part can break the circuit. Tug the hook gently before spraying and check that it has not slipped onto a masked or coated patch.
Pre-cut tape for the cover’s sealing flange before you stick it down. Do not run a blade across the metal. If coating bridges the edge, separate it carefully during removal without scoring the face. A scratch on a gasket surface can become a leak path.
Curing and Pulling the Masking
Follow the cure schedule on the powder’s label. A heavy casting heats more slowly than a thin bracket, so the oven reaching its setting does not mean the cover has reached the required condition. Keep the outgassing pre-bake separate from curing, and confirm that each plug and tape suits the heat it will actually see.
Eastwood’s masking guide favors peeling while safely warm; its home-coating guide permits removal after cooling. Try the planned method on a representative piece with similar substrate and mass, powder, mask, heat cycle, and removal state.
Pull slowly at a low angle, keeping any blade away from the sealing face. Leftover adhesive is worth diagnosing before you coat the next part. Tape residue after the bake often traces back to surface cleaning, heat exposure, or removal timing. The earlier trial helps you choose a method, but it does not guarantee a clean pull on the finished cover.
Common Mistakes
Ordinary masking tape, an edge left unpressed, and a hidden threaded hole left open are familiar ways to create rework. On the cover, check the small bolt holes and the full gasket flange before spending time on cosmetic edges. If powder refuses to settle in a recess, inspect the part’s shape and ground path; if bubbles appear on the casting, review cleaning and outgassing. Those problems call for different fixes. A trial on a thin scrap piece may give false confidence about removal from the heavy cover.
Before spraying, check the oven, ventilation, dust control, protective gear, and ground connection again. If powder is not landing on the cover, stop and inspect the conductive path from clamp to bare metal rather than turning up the gun and hoping for better coverage.
Bottom Line
On the cast cover, check the bolt holes, capped ports, sealing flange, and spray-ground contact before powder goes on. After curing and removal, inspect those functional areas again before the cover goes back on the engine.