
A vernier caliper is a precision measuring tool used to measure external dimensions, internal openings, and depths. Its main and sliding scales provide finer readings than a standard ruler.
This guide explains its parts, how to read measurements, calculate least count, and avoid common errors. You’ll also learn practical automotive applications and when specialized tools are needed for brake inspection.
A vernier caliper is a precision measuring instrument that uses a fixed main scale and a sliding vernier scale to measure dimensions more precisely than a typical ruler.
To read one, identify the main-scale value immediately before the vernier zero, find the correctly aligned vernier division, multiply that division by the instrument’s least count, and add the two values. Apply a zero-error correction if required.
The exact reading method depends on the graduations printed on the particular caliper.
What Is a Vernier Caliper?
A vernier caliper is a mechanical measuring instrument designed to measure dimensions using a fixed scale and a movable secondary scale.
It is commonly made from stainless steel and has a sliding assembly connected to precision measuring jaws.
Unlike a basic ruler, which often requires estimating between graduation marks, a vernier scale provides a systematic way to determine smaller increments.
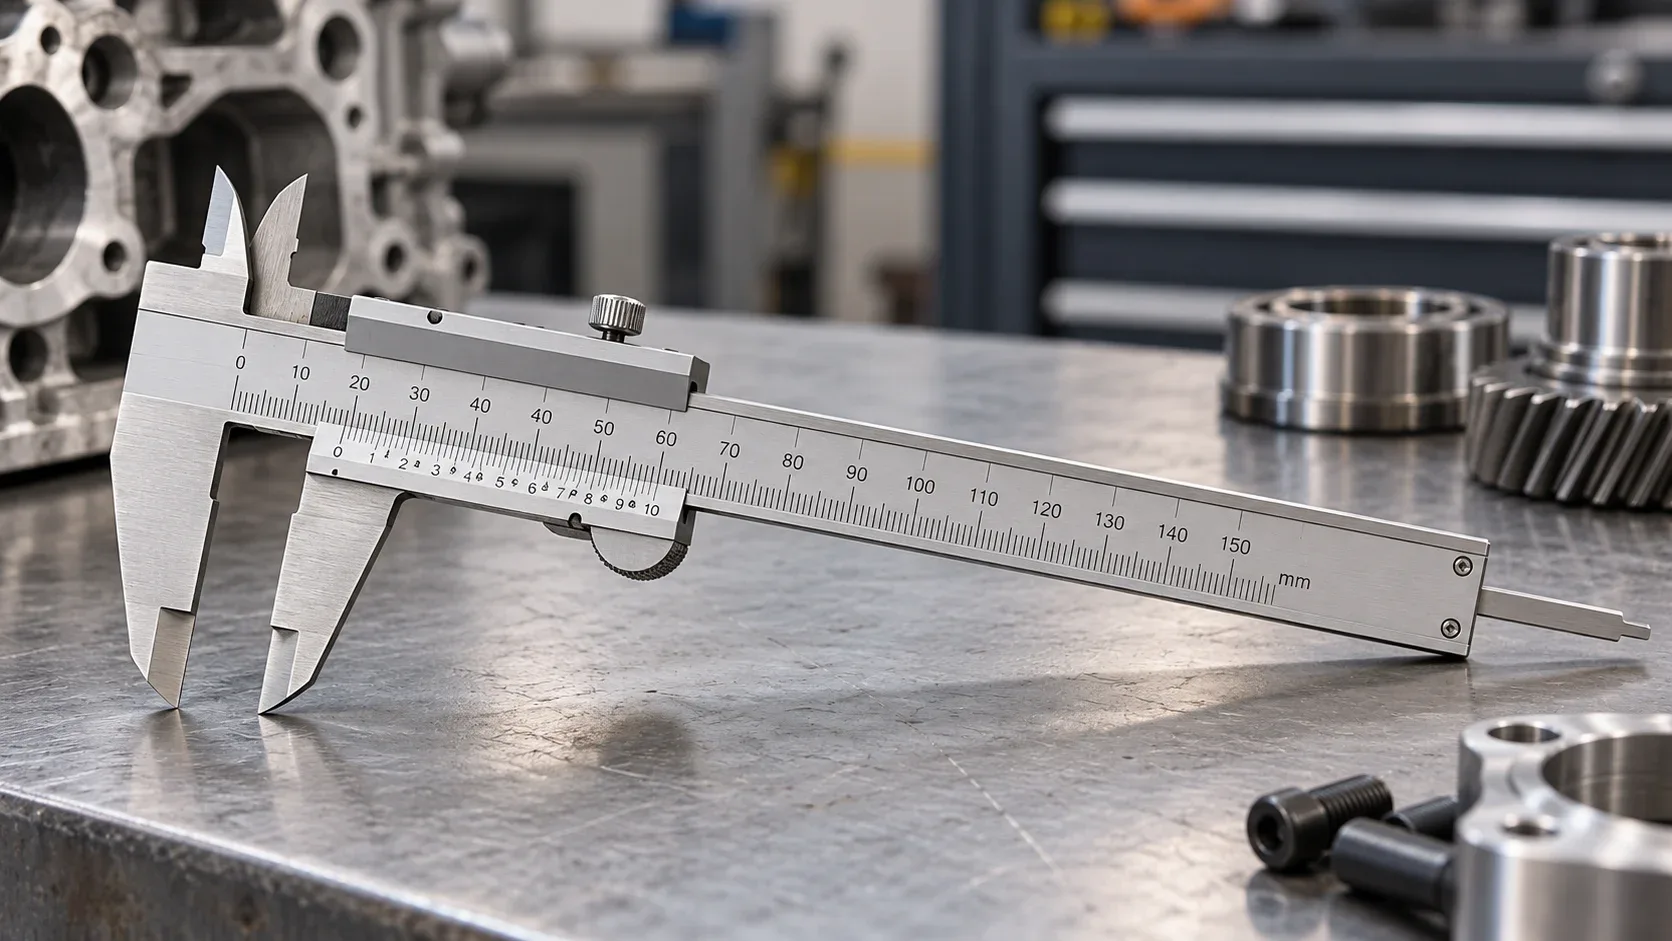
Traditional vernier calipers do not require batteries or electronic displays. The measurement is obtained by interpreting the engraved graduations.
What Can a Vernier Caliper Measure?
- External diameters and thicknesses
- Internal openings and diameters
- Hole and slot depths
- Step heights on suitable instruments
- Small mechanical component dimensions
The actual measuring range, resolution, accuracy, and available functions depend on the instrument’s design.
Important distinction: A vernier caliper is a type of caliper. Digital and dial calipers are alternative designs that display measurements differently.
Parts of a Vernier Caliper and Their Functions
Understanding the parts of a vernier caliper makes it easier to choose the correct measuring surfaces and interpret readings.
Most general-purpose manual vernier calipers include the following components.
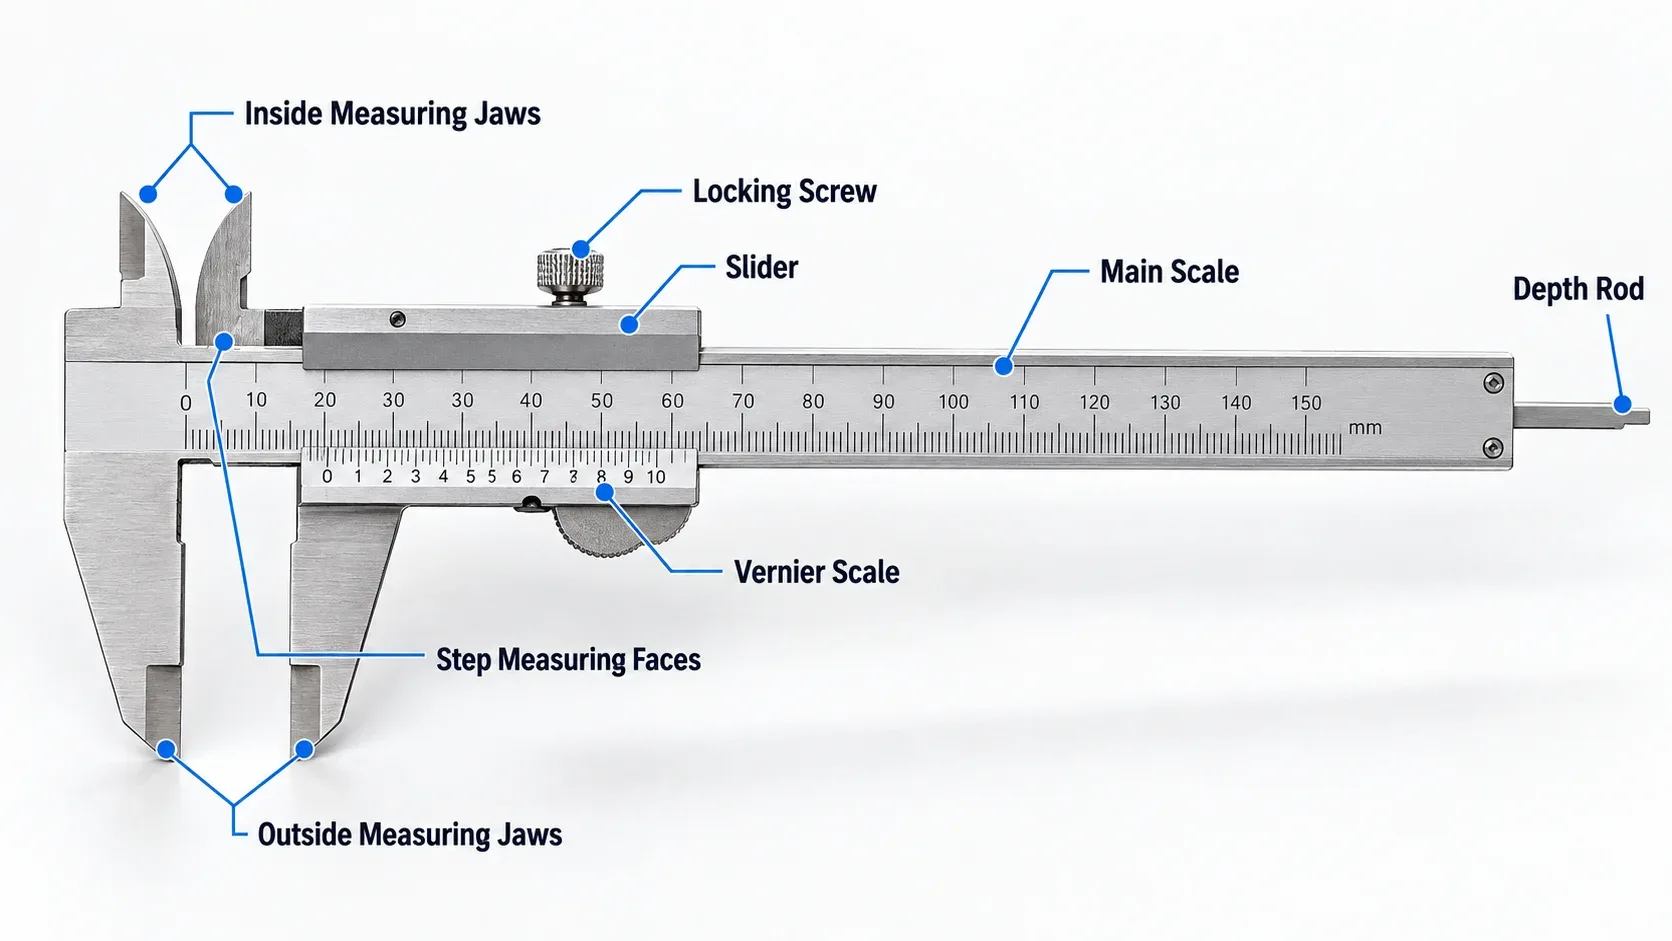
Outside Measuring Jaws
The larger jaws measure external dimensions such as a shaft diameter, bolt diameter, or component thickness.
Inside Measuring Jaws
The smaller jaws measure internal dimensions, such as suitable holes and openings.
Main Scale
The fixed graduated scale provides the main portion of the reading.
Vernier Scale
The sliding scale indicates the fractional part of the measurement.
Slider
Moves along the main beam and changes the jaw separation.
Locking Screw
Helps hold the slider in position while the measurement is read. Not every design uses identical hardware.
Depth Rod
Extends from the end of the beam to measure hole or recess depth on instruments equipped with one.
Step Measuring Faces
Allow certain instruments to measure the height difference between two adjacent surfaces.
Always inspect the measuring surfaces before use. Dirt, wear, damage, or incorrect contact can affect the final reading.
How Does a Vernier Caliper Work?
A vernier caliper works by combining two graduated scales: the fixed main scale and the sliding vernier scale.
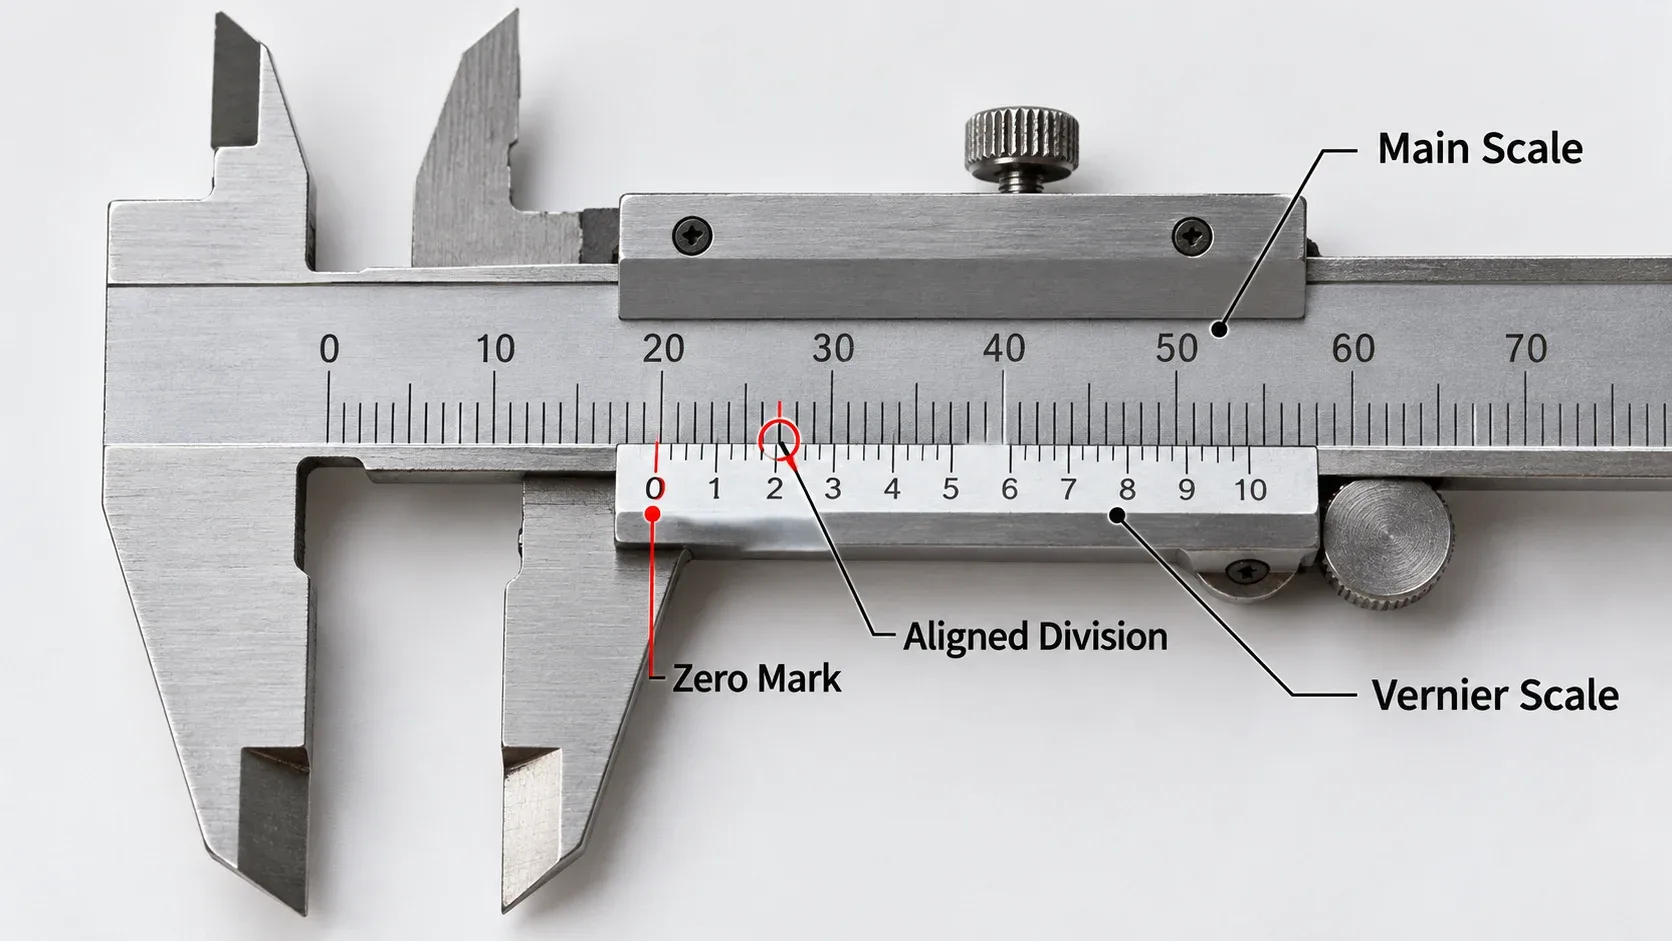
When the jaws move, the vernier scale moves along the main scale. The position of its zero mark identifies the whole-scale portion of the measurement.
One of the vernier graduations then aligns with a graduation on the main scale. That alignment indicates the additional fractional amount.
Understanding Scale Alignment
The graduations are deliberately spaced so that different vernier marks align with the main scale at different jaw positions.
By identifying the correct alignment, the user can determine a measurement smaller than the spacing of the main-scale graduations.
This is the basic principle behind the vernier mechanism.
Remember: A manual vernier caliper does not calculate measurements electronically. The user determines the reading from the alignment of engraved marks.
How to Read a Vernier Caliper: Step by Step
Learning to read the main and vernier scales is the most important skill for using a manual vernier caliper.
The procedure below uses a hypothetical metric instrument with a least count of 0.02 mm and no zero error.
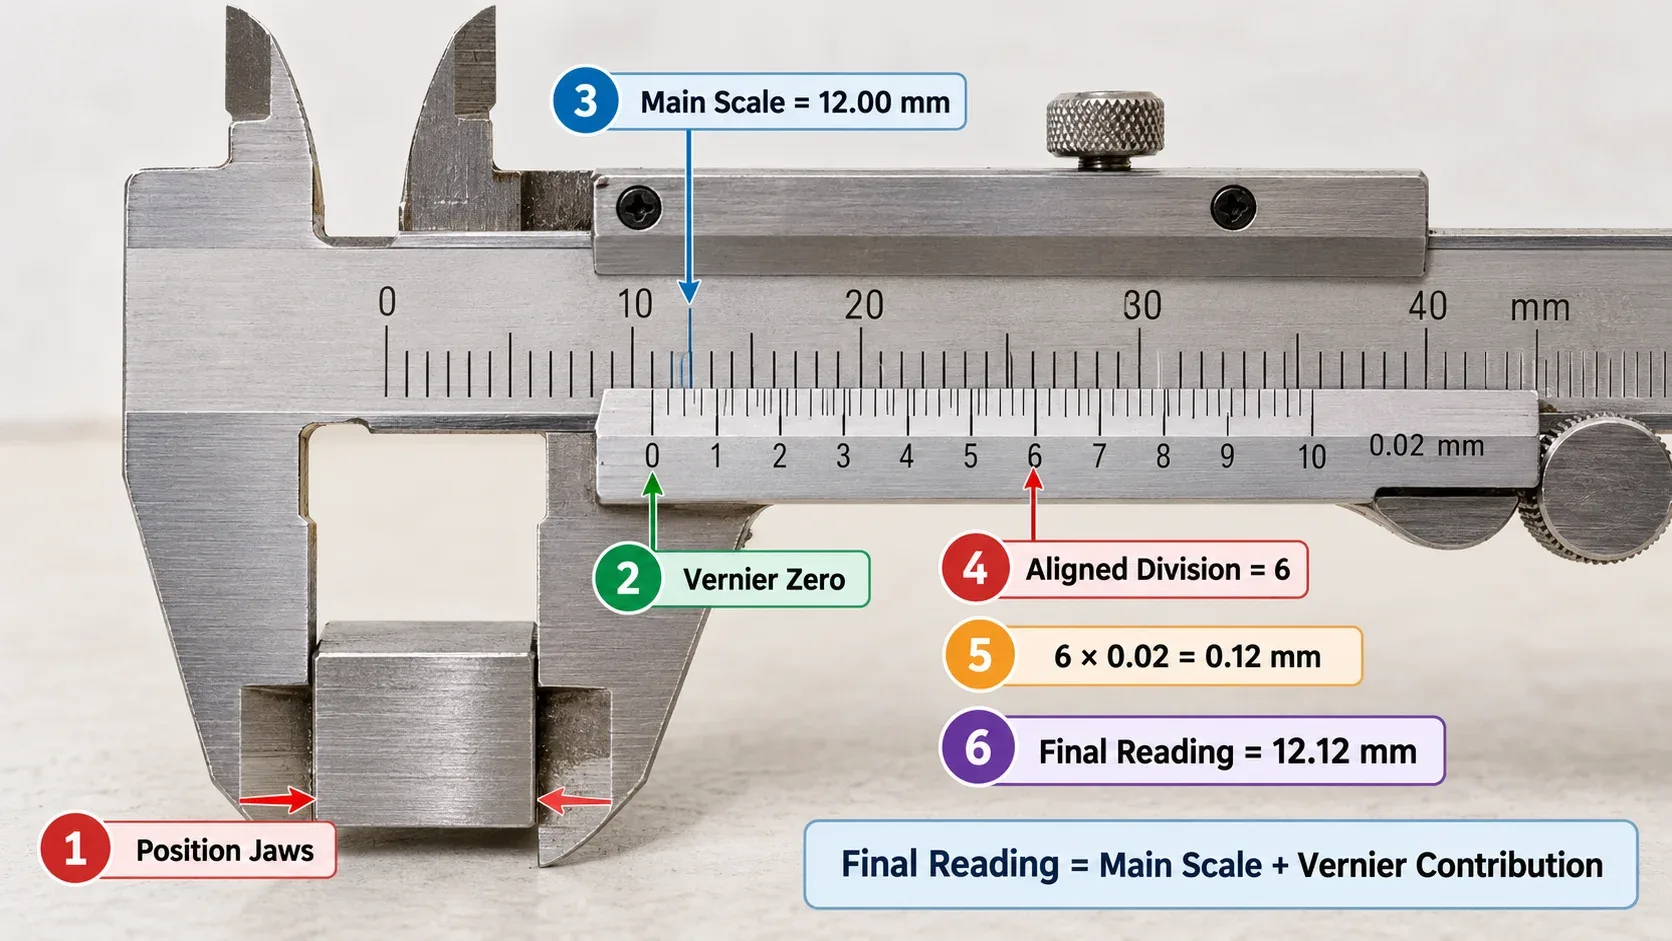
Position the Measuring Jaws
Place the appropriate jaws around or inside the object. Ensure the measuring faces contact the intended surfaces with light, consistent force.
Locate the Vernier Zero
Find the zero mark on the sliding vernier scale. Observe where it falls along the fixed main scale.
Read the Main Scale
Record the main-scale graduation immediately before the vernier zero. For this example, assume the main-scale reading is 12.00 mm.
Find the Aligned Vernier Division
Look for the vernier graduation that aligns most accurately with a main-scale mark.
Assume the sixth division aligns in this example.
Calculate the Vernier Contribution
Multiply the aligned division number by the instrument’s least count.
6 × 0.02 mm = 0.12 mm.
Add the Two Readings
Combine the main-scale reading and the vernier contribution.
12.00 mm + 0.12 mm = 12.12 mm.
12.00 mm + (6 × 0.02 mm) = 12.12 mm
Worked Example
| Measurement Element | Value |
|---|---|
| Main scale reading | 12.00 mm |
| Aligned vernier division | 6 |
| Least count | 0.02 mm |
| Vernier contribution | 0.12 mm |
| Final reading | 12.12 mm |
This example assumes a conventional numbered scale in which the sixth graduation represents six least-count increments. Always follow the actual markings on your instrument.
Measurement note: If the caliper has a zero error, the appropriate correction must also be applied to obtain the corrected reading.
Vernier Caliper Least Count Explained
The least count is the smallest increment represented by the instrument’s graduation system. It is often called the instrument’s resolution.
For a conventional direct vernier, the least count can be calculated from the difference between one main-scale division and one vernier-scale division.
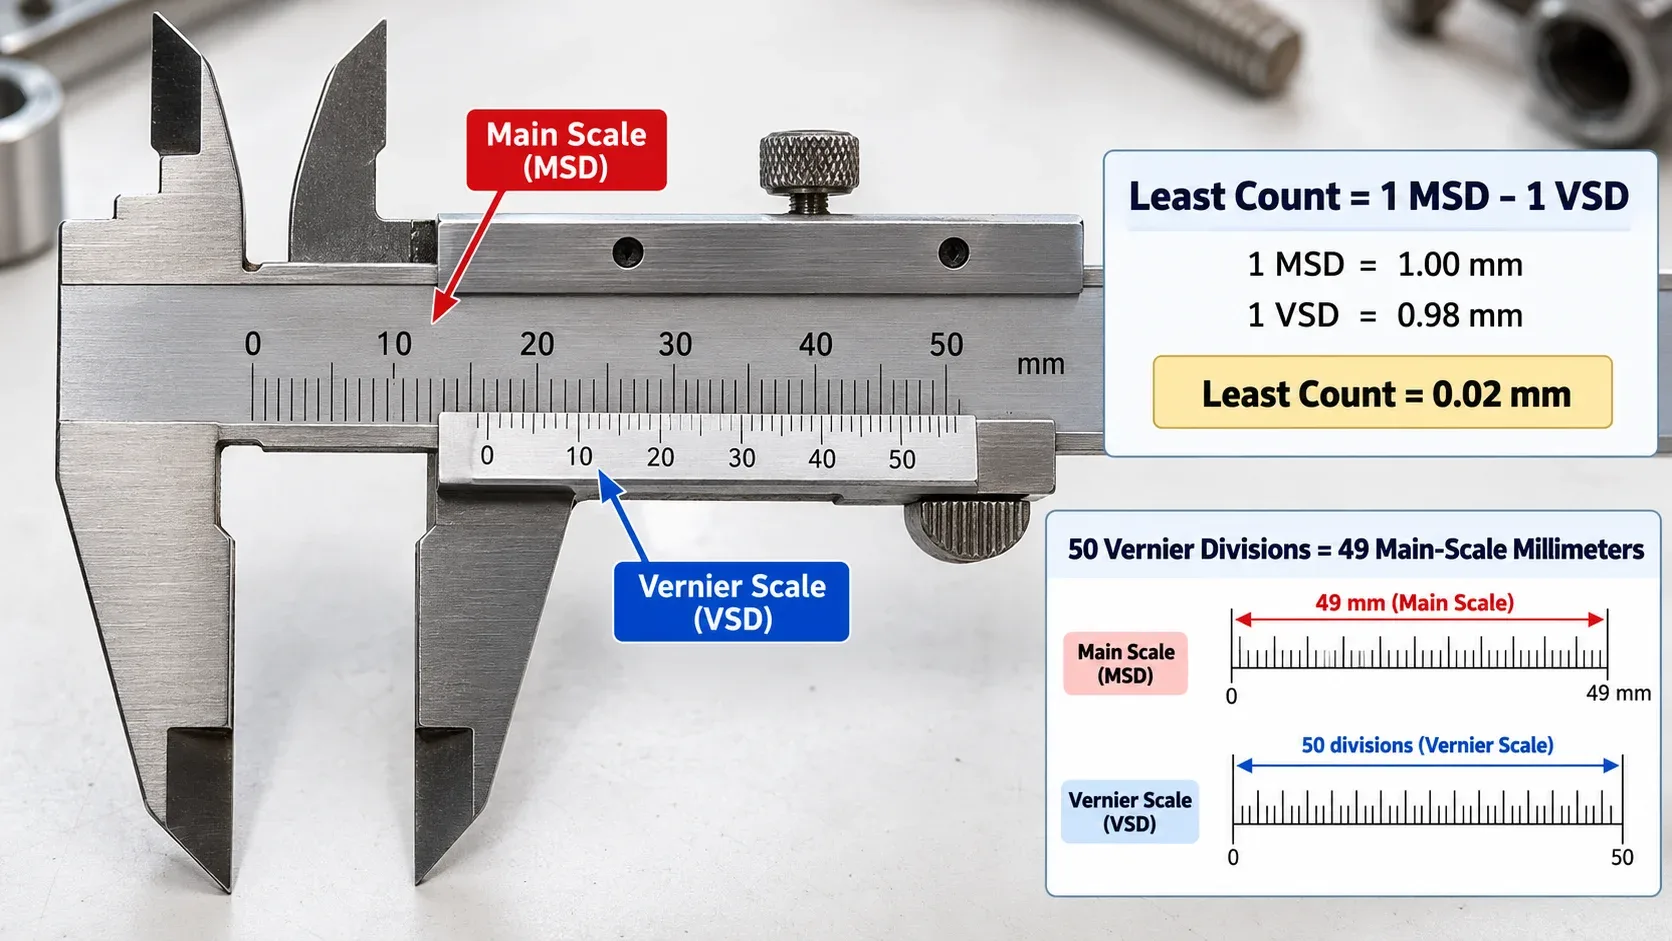
MSD = Main Scale Division; VSD = Vernier Scale Division.
Example: A 0.02 mm Vernier Caliper
Consider a conventional metric vernier where 50 vernier divisions occupy the same length as 49 main-scale millimeters.
One main-scale division equals 1 mm, while one vernier-scale division equals 49/50 mm, or 0.98 mm.
The difference is:
Least count = 0.02 mm
Common Vernier Caliper Resolutions
| Graduation | Measurement Increment |
|---|---|
| 0.1 mm | One tenth of a millimeter |
| 0.05 mm | Five hundredths of a millimeter |
| 0.02 mm | Two hundredths of a millimeter |
Different calipers may use different graduation arrangements, including metric and inch scales.
Resolution is not accuracy. A caliper with 0.02 mm graduations does not necessarily measure every dimension to an accuracy of ±0.02 mm. Actual accuracy depends on the instrument specification, condition, technique, and measurement setup.
How to Use a Vernier Caliper Correctly
Even a high-quality vernier caliper can provide an incorrect reading when used with poor technique.
Before measuring any automotive or engineering component, prepare the tool and workpiece.
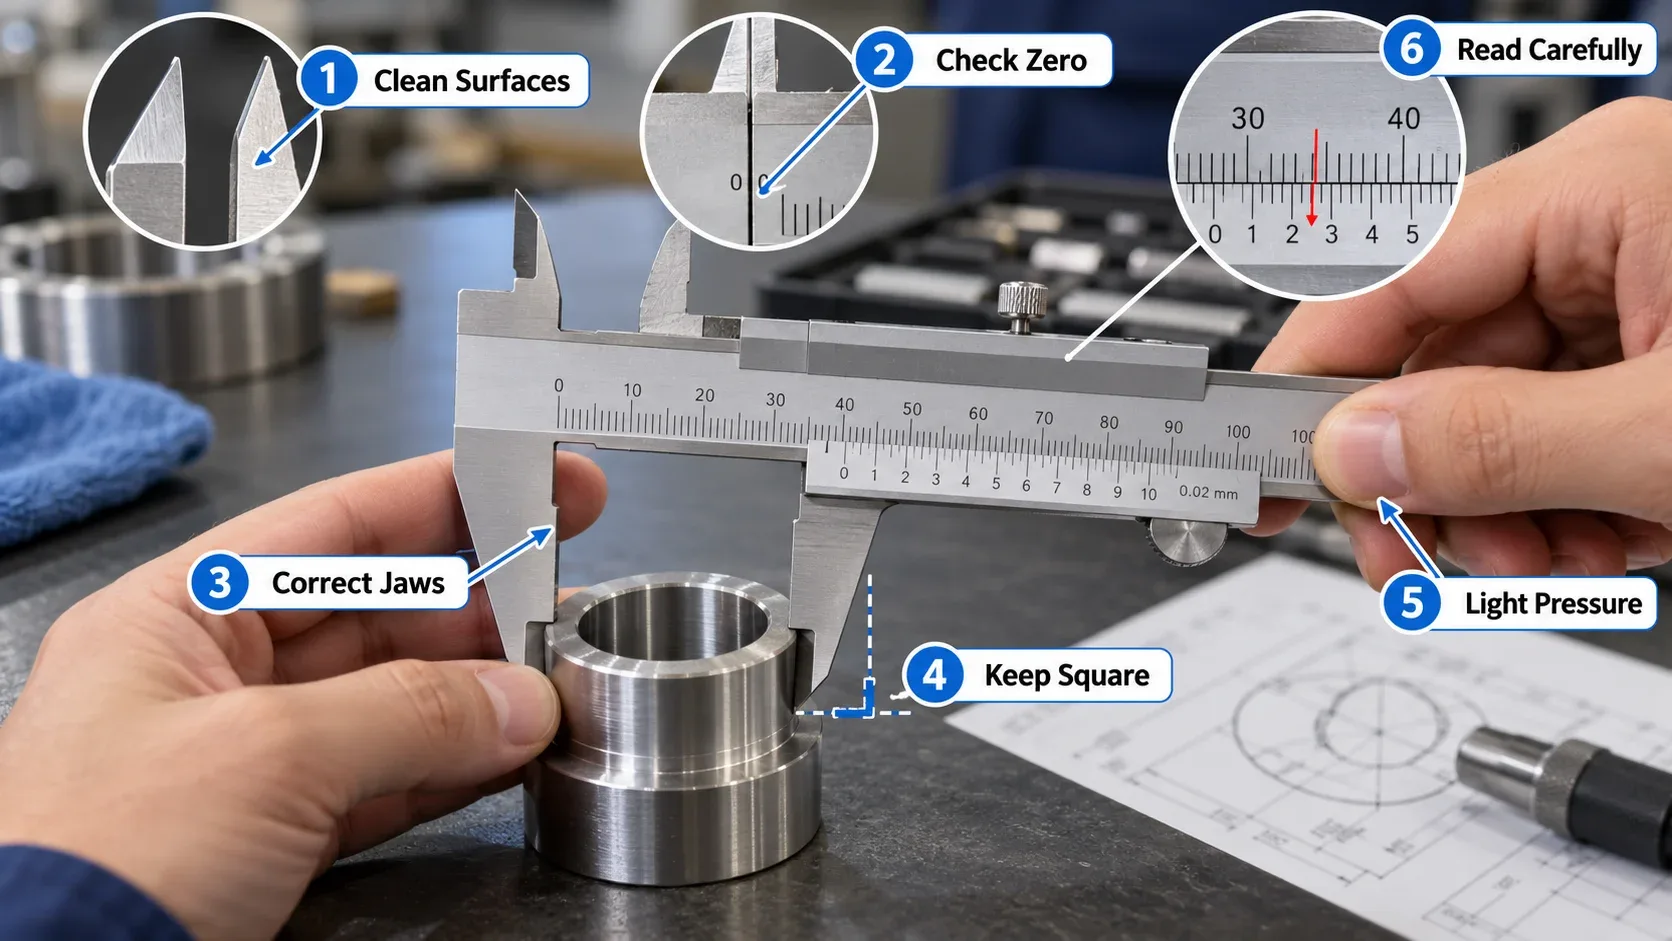
Clean the Measuring Surfaces
Remove dirt, oil residue, and debris that may interfere with correct contact.
Check the Zero Position
Gently close the clean outside jaws and examine the zero marks. They should align correctly on an instrument without zero error.
Select the Correct Measuring Surfaces
Use outside jaws for suitable external dimensions, inside jaws for openings, and the depth rod for supported depth measurements.
Position the Tool Squarely
Keep the caliper aligned with the dimension being measured. Tilting the jaws can produce incorrect readings.
Apply Light Measuring Force
Close the jaws until they make proper contact. Avoid excessive pressure that may distort the workpiece or alter the reading.
Read the Scale Carefully
View the scale as directly as possible to reduce parallax error. Record the measurement and units.
For critical measurements, repeat the reading and confirm that the instrument is suitable for the required tolerance.
Four Types of Vernier Caliper Measurements
Many general-purpose vernier calipers can measure external dimensions, internal dimensions, depths, and steps.
Each measurement requires the correct surfaces and alignment.
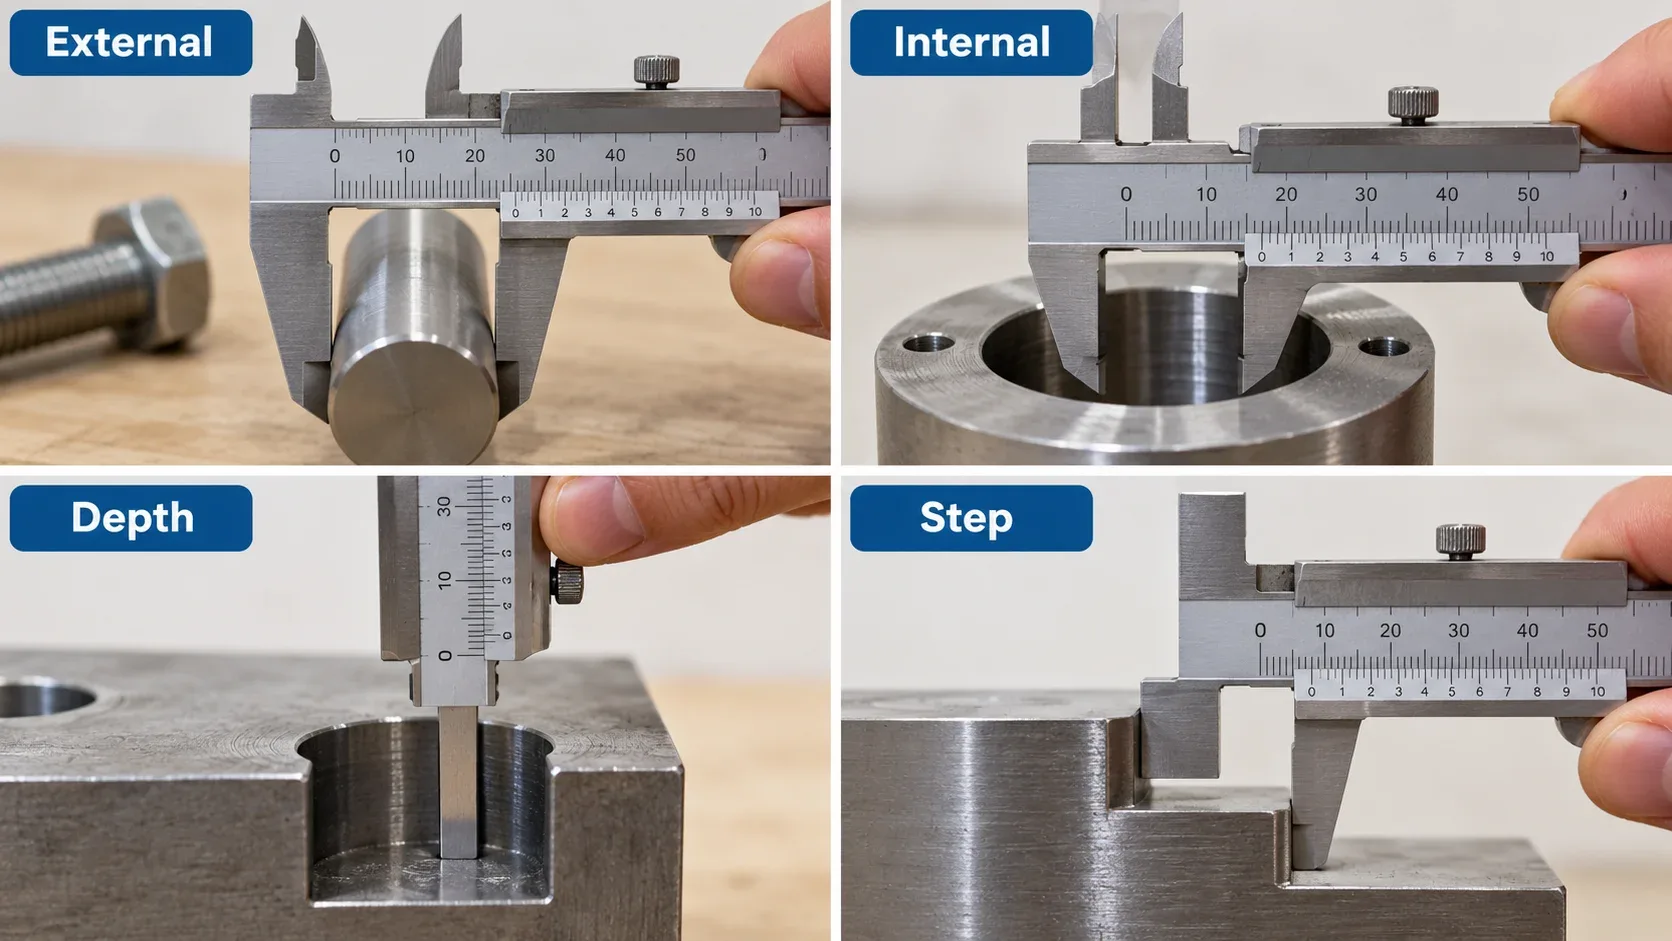
1. External Measurements
The large outside jaws measure the external dimensions of a part.
Examples include the diameter of a bolt, a cylindrical pin, or the thickness of a suitable metal component.
Keep the measuring faces square to the required dimension and avoid excessive jaw pressure.
2. Internal Measurements
The smaller inside jaws can measure the width of suitable openings and internal diameters.
Open the jaws until they contact the intended internal surfaces. Correct alignment is important, particularly when measuring a circular bore.
For tight-tolerance bores, a dedicated bore gauge or other specialized instrument may be more appropriate.
3. Depth Measurements
A depth rod allows certain calipers to measure the distance from a reference surface to the bottom of a hole or recess.
Rest the end of the caliper beam on the reference surface and extend the rod carefully.
The rod should contact the bottom without excessive force or tilting of the caliper.
4. Step Measurements
Some calipers have rear measuring faces designed for step measurements.
These surfaces can measure the height difference between two adjacent levels.
Confirm the instrument supports this function before attempting to use it.
What Is Zero Error in a Vernier Caliper?
Zero error occurs when the caliper indicates a nonzero measurement even though its measuring jaws are properly closed against each other.
Before assuming the instrument has an offset, inspect the jaws for dirt, burrs, or damage.
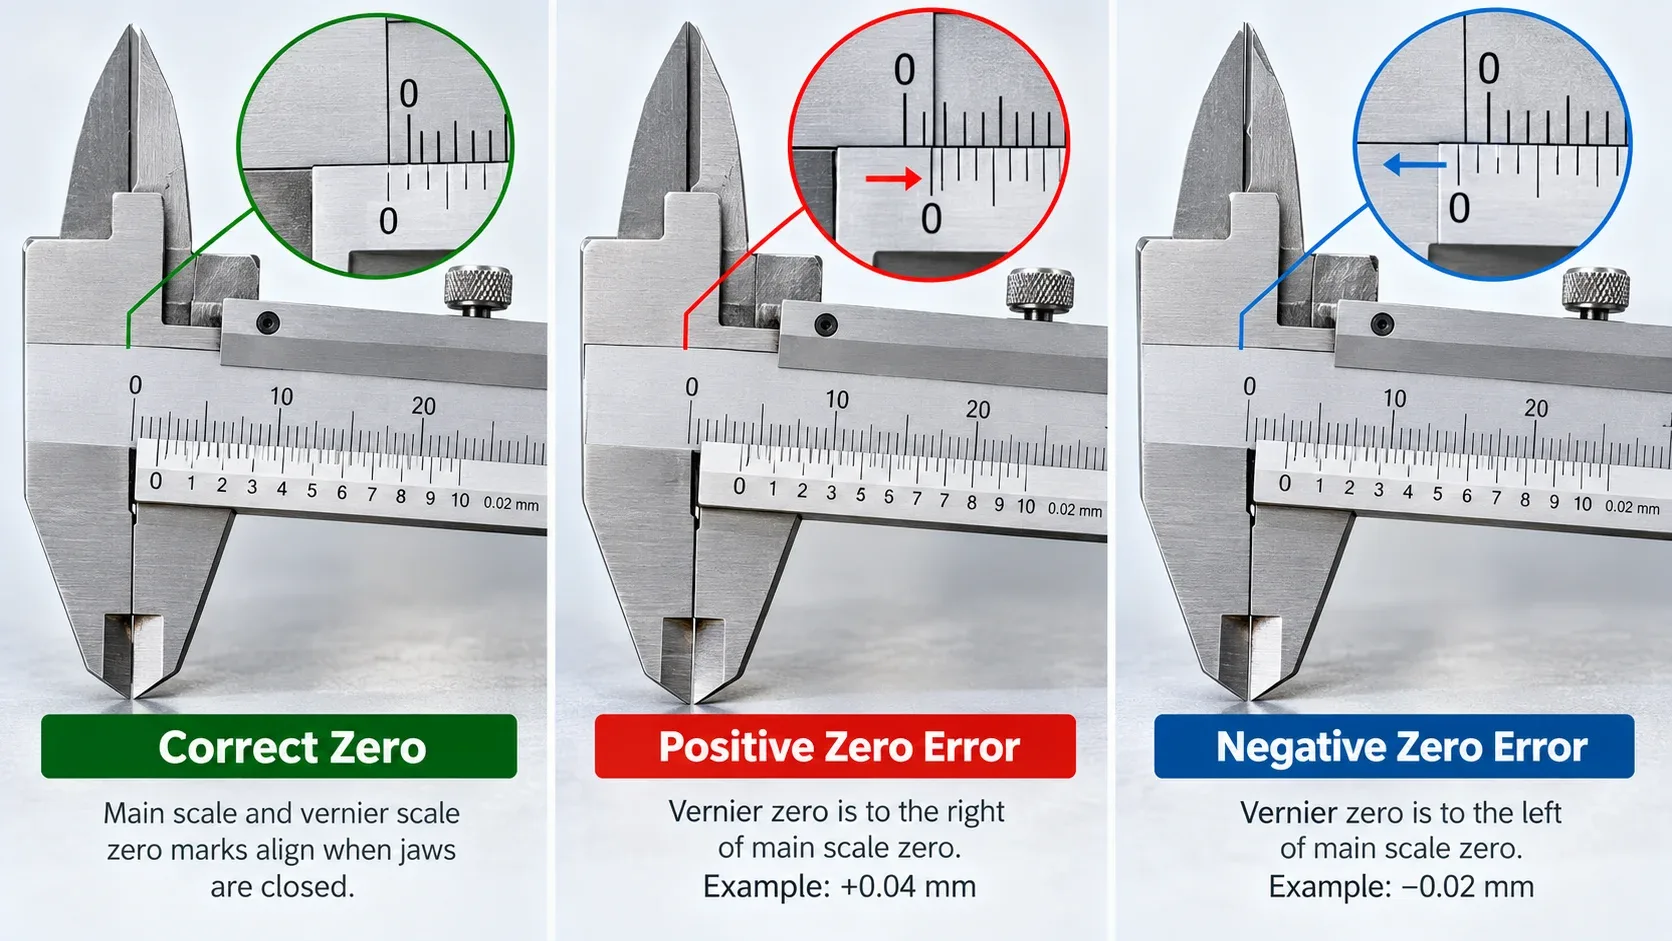
Positive Zero Error
A positive zero error means the instrument reads above zero when the appropriate measuring faces are closed.
For example, if the instrument has a positive offset of 0.04 mm, the corrected result is obtained by subtracting 0.04 mm from the observed reading.
Negative Zero Error
A negative zero error means the instrument indicates a value below zero in the zero-check condition.
If the offset is −0.02 mm, subtracting that negative offset adds 0.02 mm to the observed measurement.
Zero Correction Examples
| Observed Reading | Zero Error | Corrected Reading |
|---|---|---|
| 15.24 mm | +0.04 mm | 15.20 mm |
| 15.24 mm | −0.02 mm | 15.26 mm |
| 15.24 mm | 0.00 mm | 15.24 mm |
These are illustrative correction examples. For a specific mechanical vernier design, follow its scale convention and calibration instructions.
An instrument with unexplained or excessive zero error may need adjustment, servicing, or replacement.
Common Vernier Caliper Mistakes
Many measurement mistakes are caused by tool positioning or scale-reading errors rather than defects in the instrument itself.
1. Reading the Wrong Vernier Division
The correct division is the one that aligns with the appropriate main-scale graduation. Guessing can introduce an error equal to one or more least-count increments.
2. Parallax Error
Viewing the engraved marks from an angle may make the graduations appear misaligned. Read the scale directly where possible.
3. Excessive Jaw Pressure
Forcing the jaws against a part can distort delicate workpieces or affect the instrument’s measurement geometry.
4. Measuring at an Angle
A tilted caliper may measure a diagonal distance instead of the intended dimension.
5. Dirty Measuring Faces
Small particles trapped between the jaws and workpiece can change the result.
6. Ignoring Zero Error
A repeatable offset affects measurements unless properly corrected or the instrument is serviced.
7. Mixing Units
Some calipers include both metric and inch graduations. Always confirm which scale is being read.
8. Using the Wrong Instrument
A caliper may be unsuitable for the required accuracy, contact geometry, or safety importance of a measurement.
Good practice: When a measurement matters, repeat it using consistent technique and compare the result with the required specification and tolerance.
How Vernier Calipers Are Used in Automotive Work
Vernier calipers are useful for general mechanical measurements in an automotive workshop.
Their versatility makes them helpful when identifying parts, checking dimensions, and comparing components.
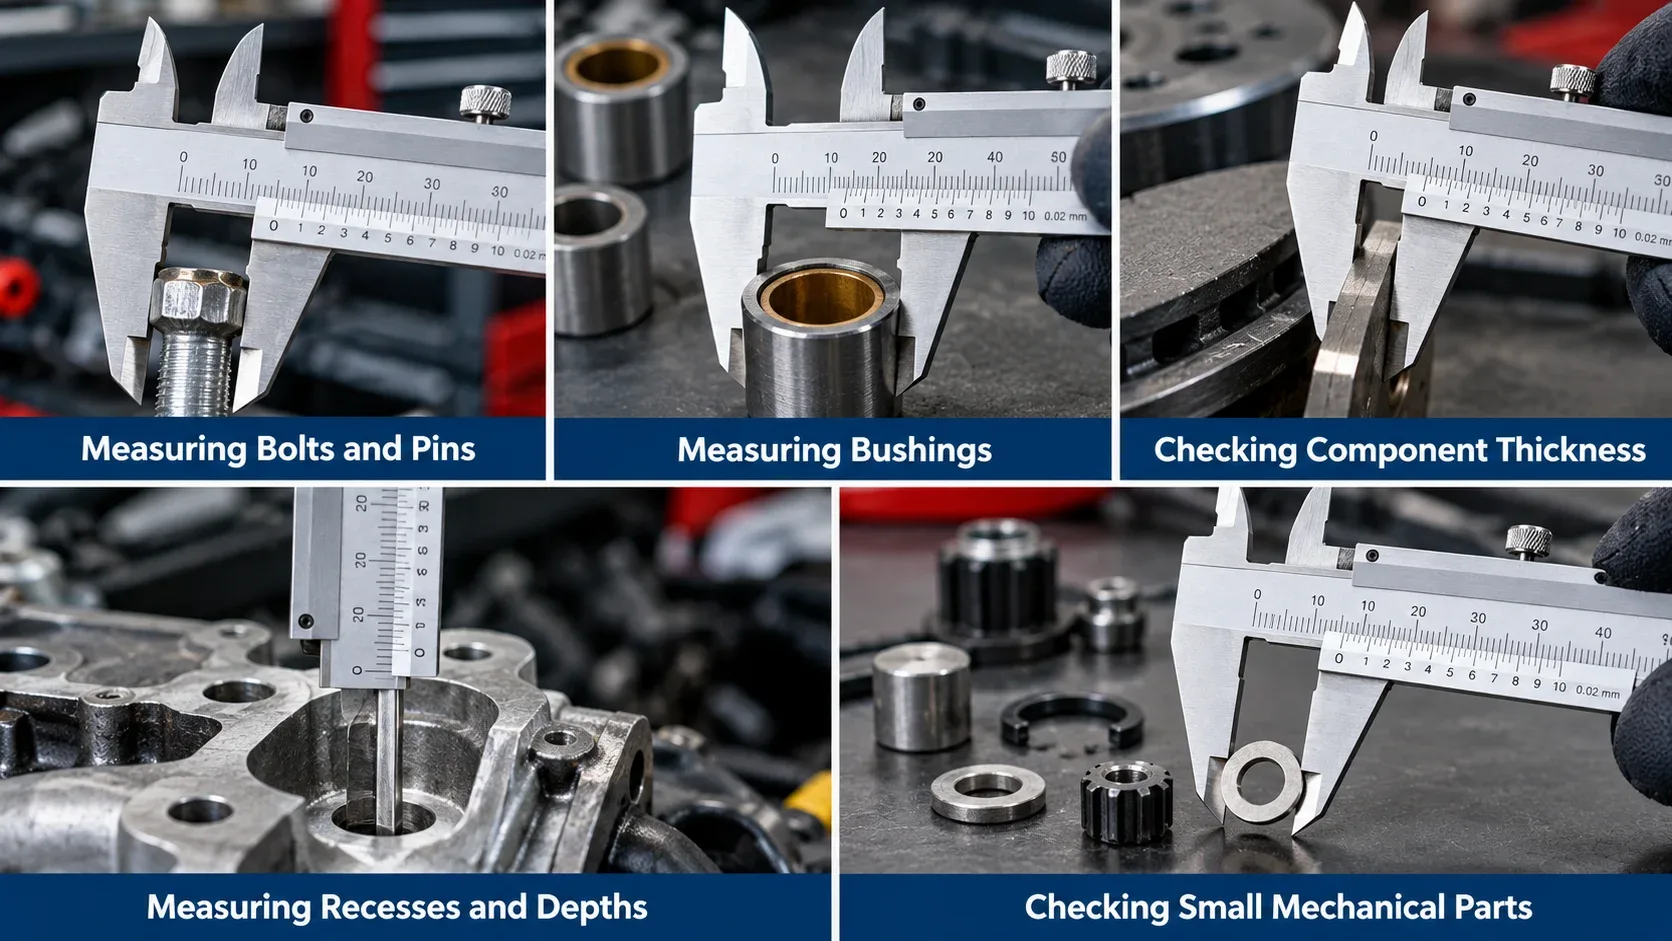
Measuring Bolts and Pins
A vernier caliper can measure the external diameter of suitable bolts, pins, and cylindrical parts.
This can help identify component sizes, although thread pitch and fit may require separate gauges.
Measuring Bushings
Calipers can be used for general outside and inside diameter checks on suitable bushings and sleeves.
For high-precision fit or wear analysis, a micrometer, bore gauge, or another specialized instrument may be necessary.
Checking Component Thickness
The outside jaws can measure the thickness of suitable flat parts.
The workpiece must provide clean, accessible, and appropriate contact surfaces.
Measuring Recesses and Depths
The depth rod can assist with general recess or hole depth measurements when the instrument and geometry are suitable.
Checking Small Mechanical Parts
Vernier calipers can also help compare dimensions of washers, spacers, pins, sleeves, and other workshop components.
Automotive measuring principle: Choose the measuring instrument based on the dimension, required tolerance, part geometry, and manufacturer’s specified method.
Can You Measure Brake Rotor Thickness With a Vernier Caliper?
A vernier caliper can measure thickness, but an ordinary caliper is not always suitable for evaluating brake rotor wear.
Brake rotor inspections require the correct measurement location, appropriate measuring surfaces, and vehicle-specific specifications.
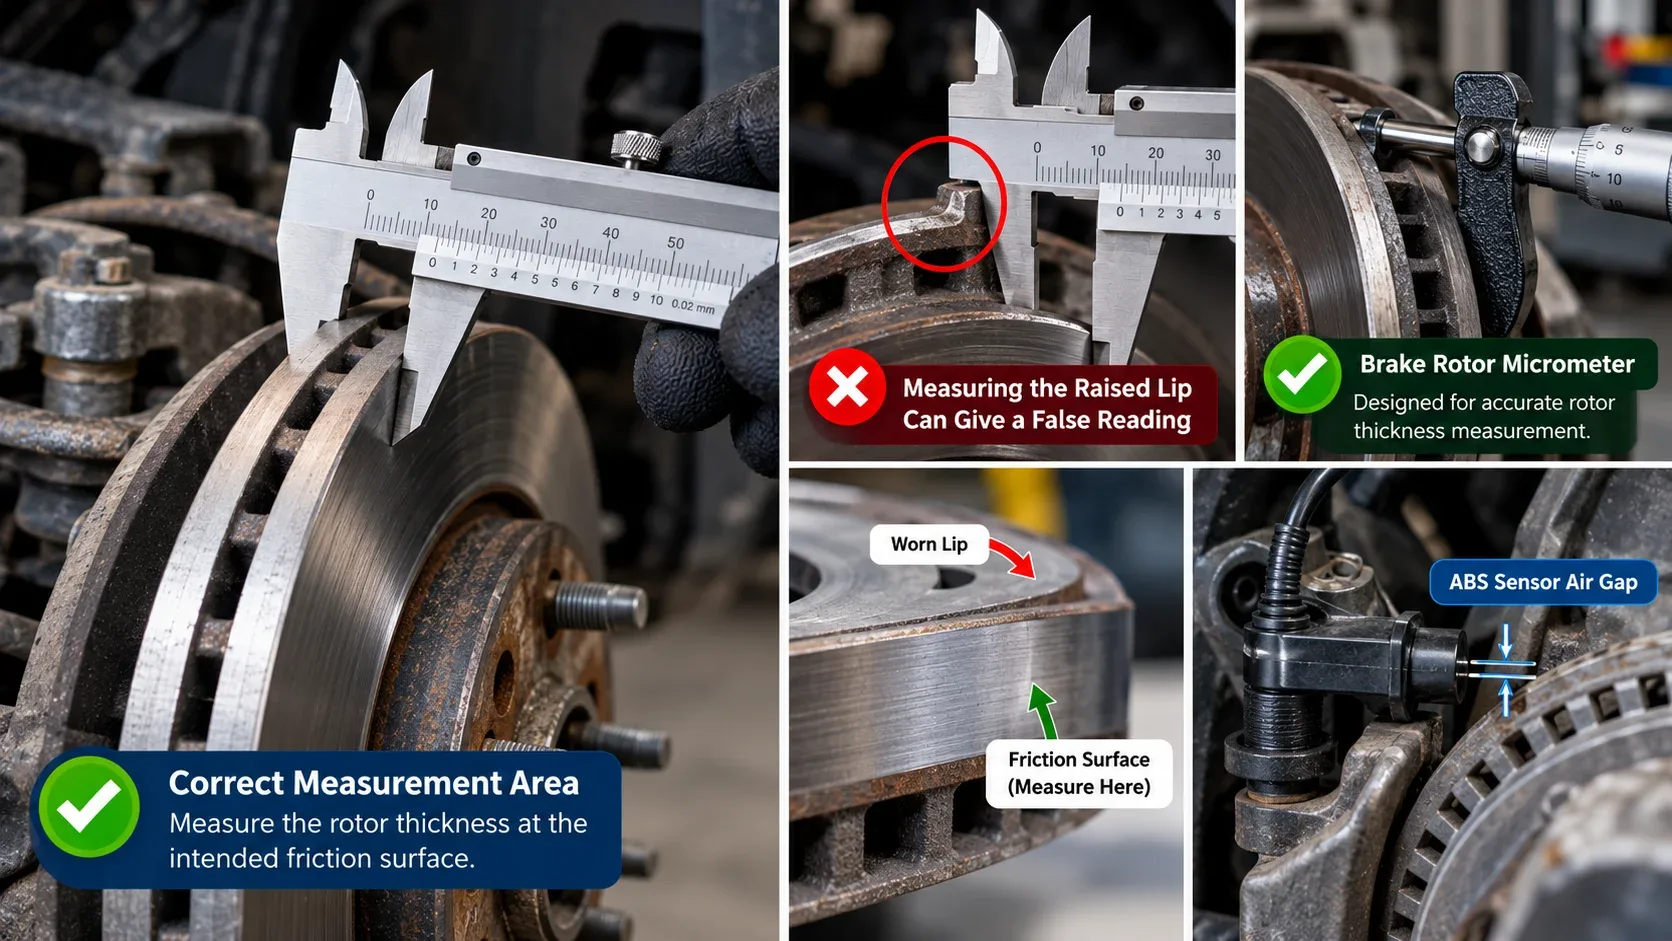
Why Ordinary Calipers Can Be Misleading
A worn rotor may develop a raised lip around the outer edge of its friction surface.
If a conventional caliper contacts that lip instead of the intended swept area, the reading may not represent the actual worn rotor thickness.
Surface condition, grooves, variation in thickness, and caliper jaw geometry can also affect measurement.
When to Use a Brake Rotor Micrometer
A suitable brake rotor micrometer can provide the necessary contact geometry and precision for inspecting rotor thickness at specified positions.
The exact procedure depends on the vehicle and brake system. Multiple measurement locations may be required.
Checking Manufacturer Specifications
Brake rotors have relevant thickness specifications, including a minimum service or discard thickness.
Do not assume a single minimum thickness applies to all vehicles. Use the applicable manufacturer service information and inspect the correct specification for the component.
Brake safety: Do not approve continued use of a worn rotor based solely on a convenient outside-edge caliper reading.
Use the recommended measuring tool and procedure, and compare the measured results with the correct specifications.
What About ABS Components?
Certain ABS-related mechanical components may have dimensional checks specified by the manufacturer, such as an applicable sensor air gap or mounting dimension.
However, not all ABS systems use the same design or measuring method. Electronic wheel-speed sensor diagnosis generally requires appropriate electrical or diagnostic procedures.
A vernier caliper does not replace proper ABS diagnostic equipment or manufacturer service instructions.
Vernier Caliper vs. Dial Caliper vs. Digital Caliper
Manual vernier, dial, and digital calipers can perform many of the same dimensional measurements.
Their main differences involve how readings are displayed, how they are operated, and what features they offer.
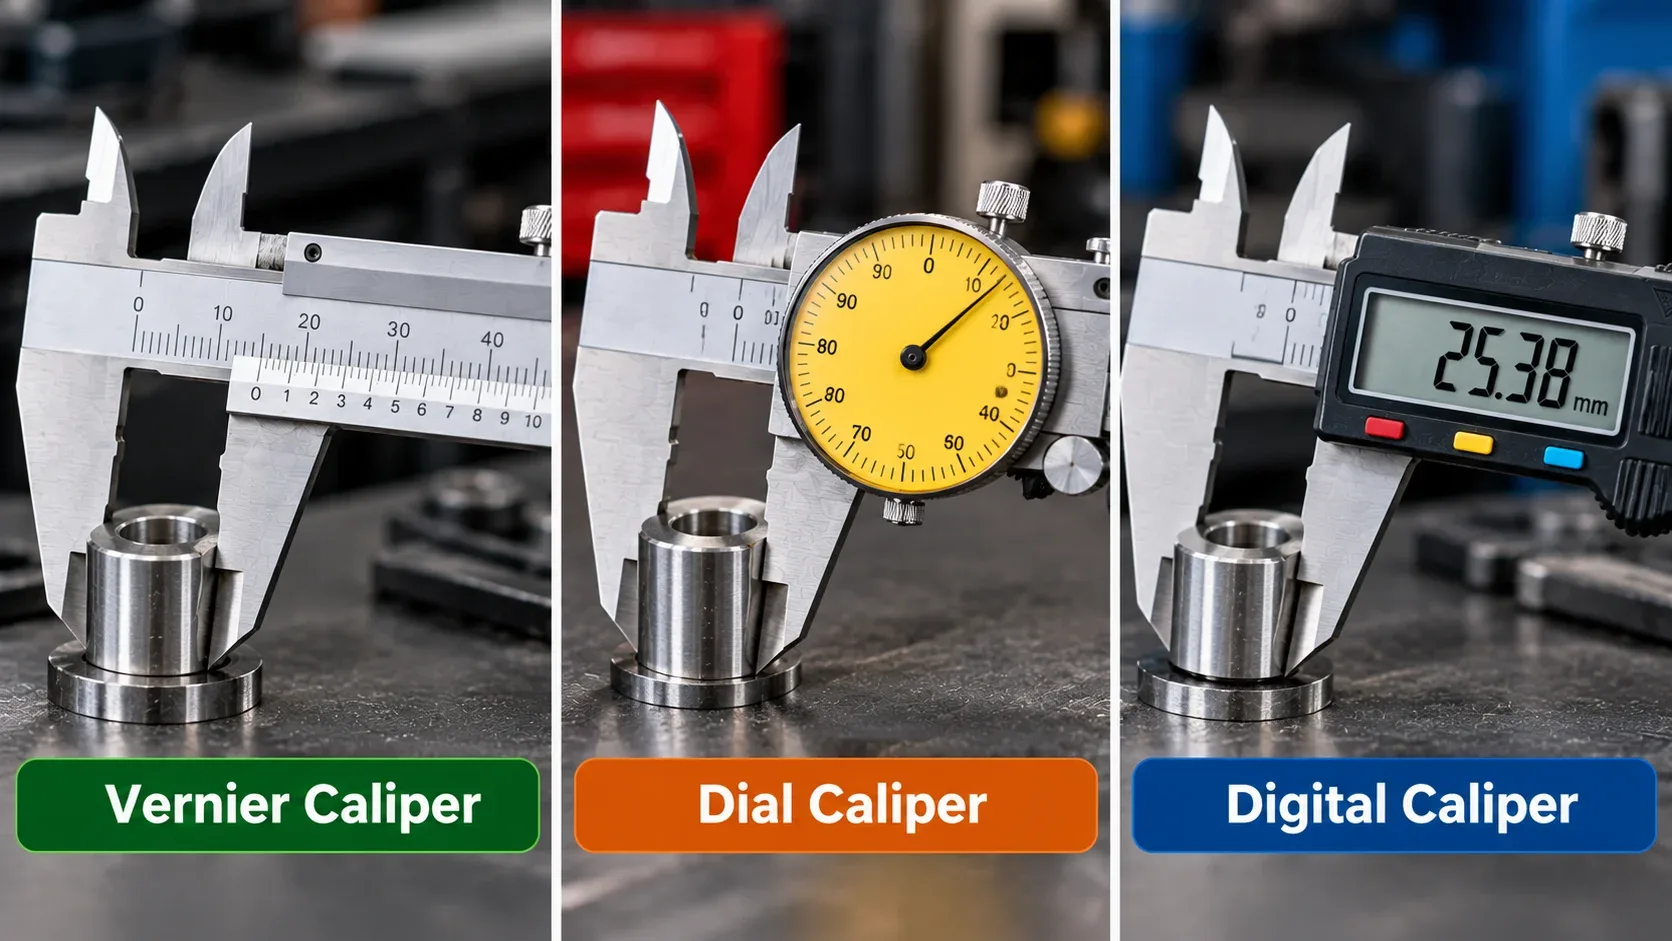
| Feature | Vernier | Dial | Digital |
|---|---|---|---|
| Display | Engraved scales | Dial indicator | Electronic screen |
| Battery | Not required | Not usually required | Usually required |
| Reading method | Scale alignment | Beam plus dial | Displayed number |
| Ease of reading | Requires practice | Often straightforward | Usually convenient |
| Potential concern | Reading errors | Mechanical damage | Battery or electronic faults |
| Accuracy | Model-dependent | Model-dependent | Model-dependent |
Which Type Is Best for Beginners?
A digital caliper is often easier for beginners to read, while a vernier caliper helps develop a direct understanding of mechanical scale measurement.
Neither design is automatically more accurate in every situation. Instrument quality, calibration, and correct use matter.
Vernier Caliper vs. Micrometer: Which Is More Suitable?
A vernier caliper is versatile because it can measure several types of dimensions with one tool.
A micrometer is generally designed for a more specific measurement task and may offer finer resolution and more controlled measuring force.
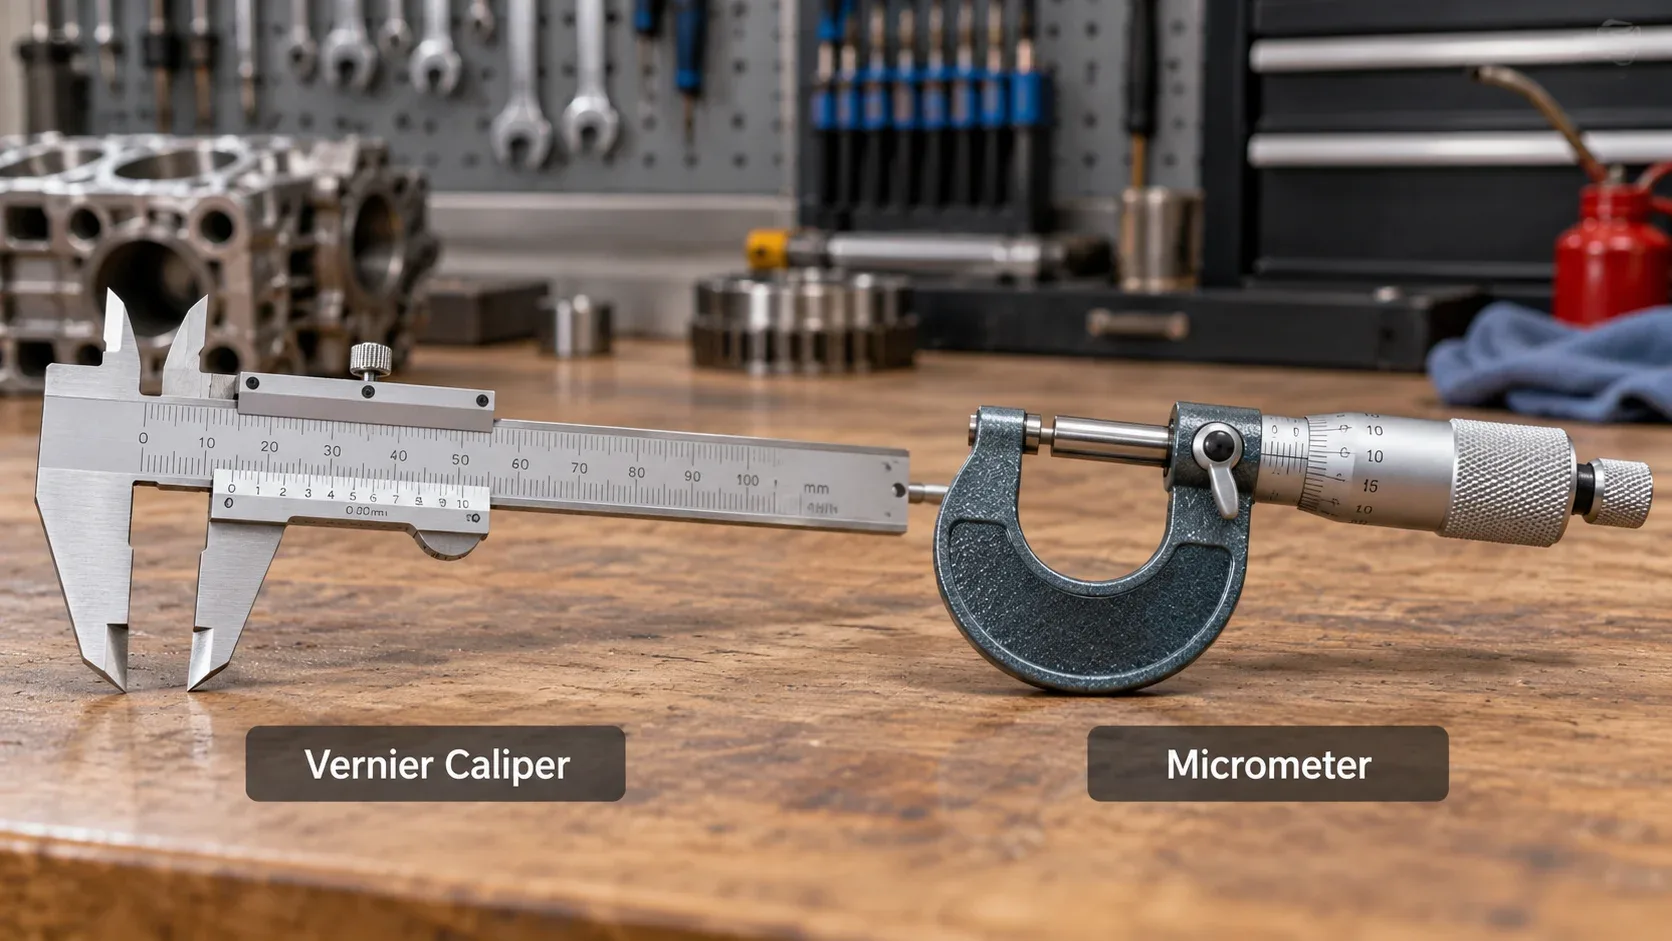
| Feature | Vernier Caliper | Micrometer |
|---|---|---|
| Main function | Versatile dimensional measurement | Specialized precision measurement |
| Typical measurements | Outside, inside, depth, step | Depends on micrometer design |
| Measurement range | Often broad within instrument capacity | Often narrower per instrument |
| Resolution | Model-dependent | Can be finer, depending on model |
| Measuring force | User-controlled jaw contact | Some designs have controlled-force mechanisms |
| Brake rotor inspection | Ordinary models may be unsuitable | Suitable rotor micrometer often preferred |
When Should You Choose a Micrometer?
A micrometer may be the better instrument when a narrow, high-precision dimension needs to be verified.
Examples can include certain shaft measurements, component thickness checks, or brake rotor measurements using a suitable specialized model.
Practical rule: The best measuring tool is not simply the one with the finest display increment. It is the one that can meet the required tolerance using the correct contact geometry and method.
Understanding Accuracy, Precision, and Calibration
Several measurement terms are often used interchangeably, even though they describe different properties.
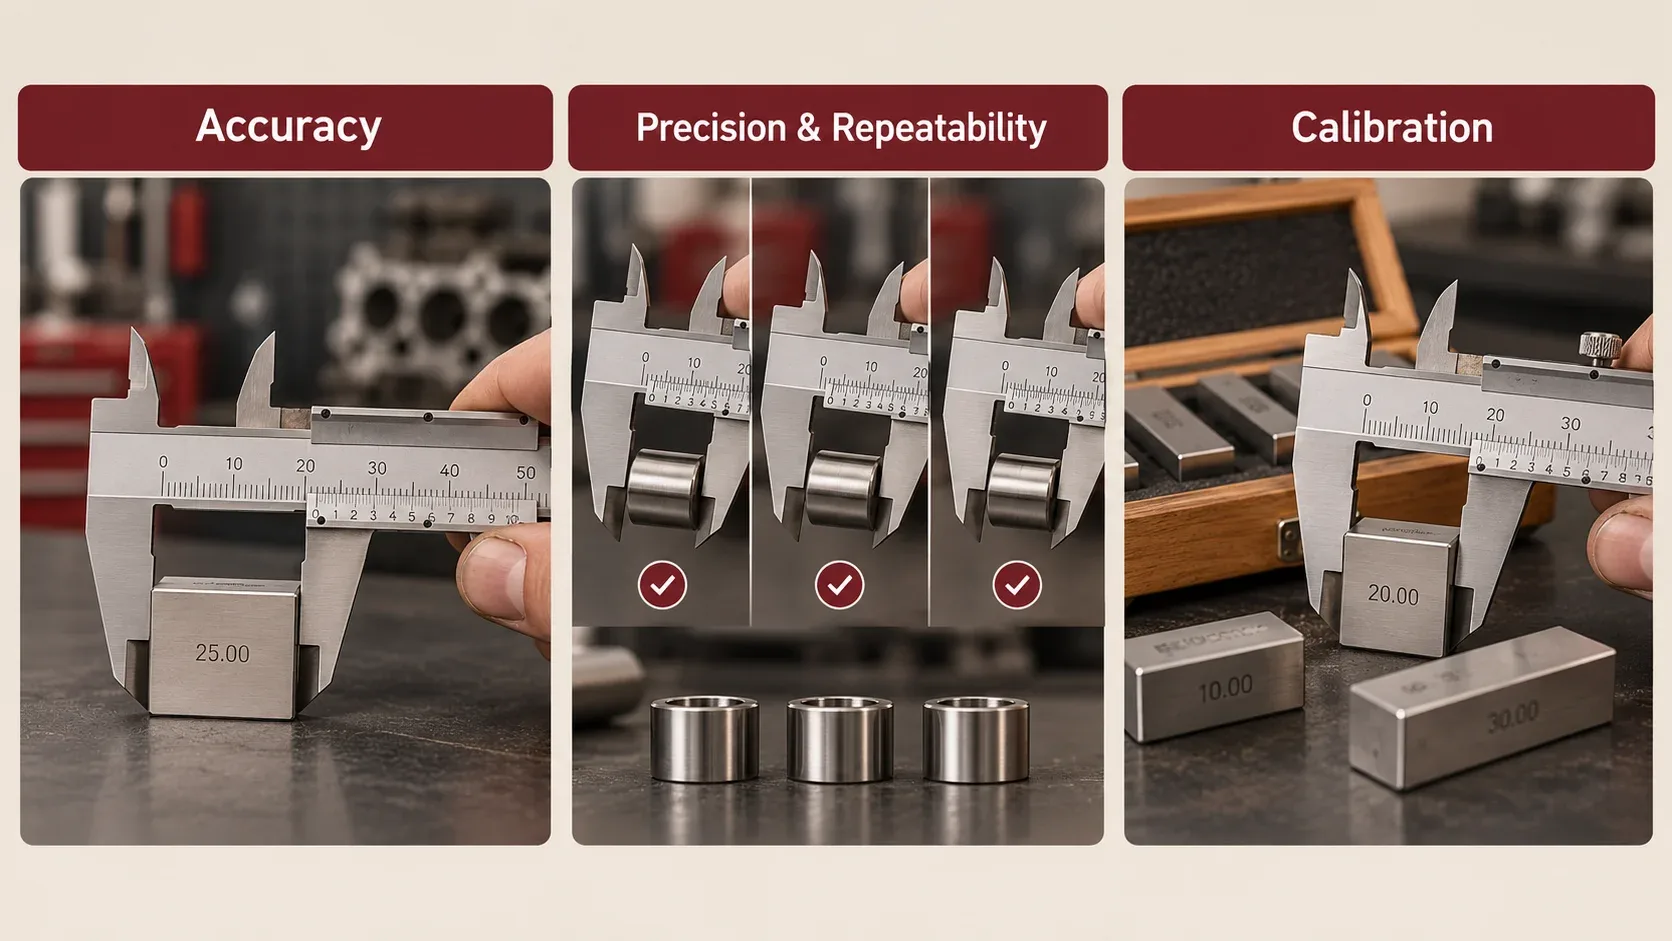
Resolution
Resolution is the smallest increment the instrument can display or indicate.
Accuracy
Accuracy describes how close the measured value is to the true or accepted reference value of the dimension.
Precision and Repeatability
Precision concerns the agreement between measurements under specified conditions.
Repeatability describes how consistently measurements agree when repeated under the same defined conditions.
Calibration
Calibration involves comparing an instrument’s indications with appropriate reference standards under controlled conditions.
The resulting information helps establish measurement error and uncertainty over relevant points in the instrument’s range.
Checking a Caliper Before Use
Before a precise measurement, inspect the measuring faces, confirm the slider operates smoothly, and verify the instrument’s zero indication.
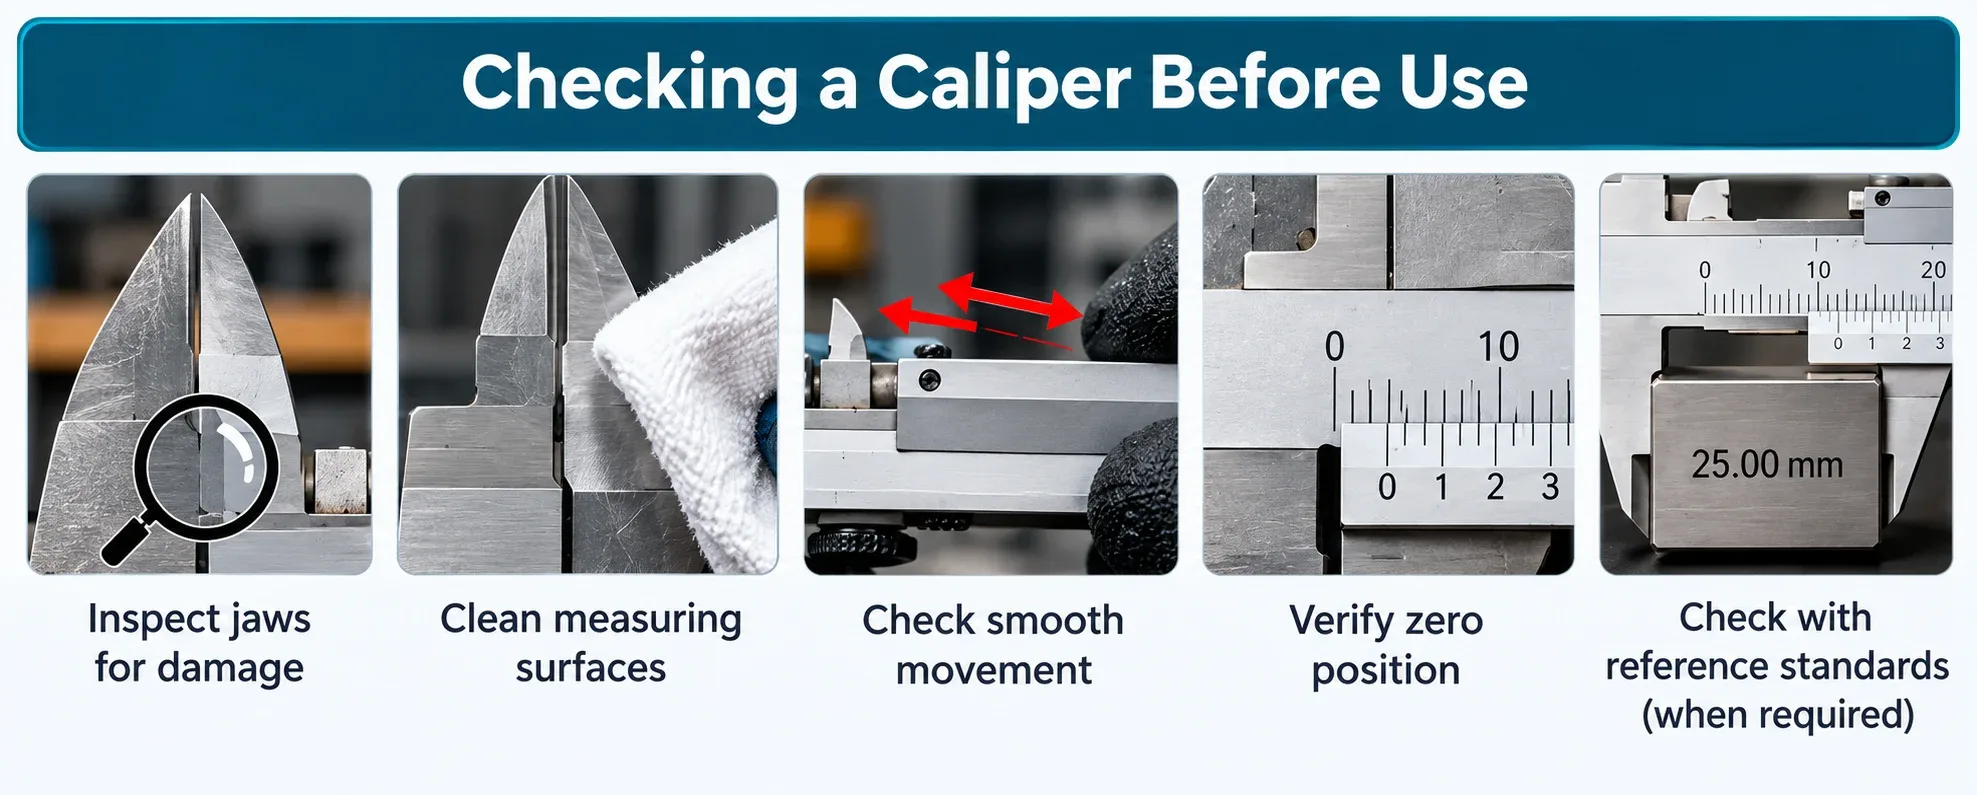
- Inspect the jaws for visible damage.
- Remove dirt or debris from measuring surfaces.
- Check that the slider moves smoothly.
- Verify the zero position.
- Check against appropriate reference standards when required.
- Follow the manufacturer’s inspection and calibration recommendations.
For professional or safety-critical measurements, a valid calibration system and appropriate measurement uncertainty may be necessary.
How to Clean, Store, and Maintain a Vernier Caliper
Proper maintenance helps protect the measuring surfaces and preserve the instrument’s usability.
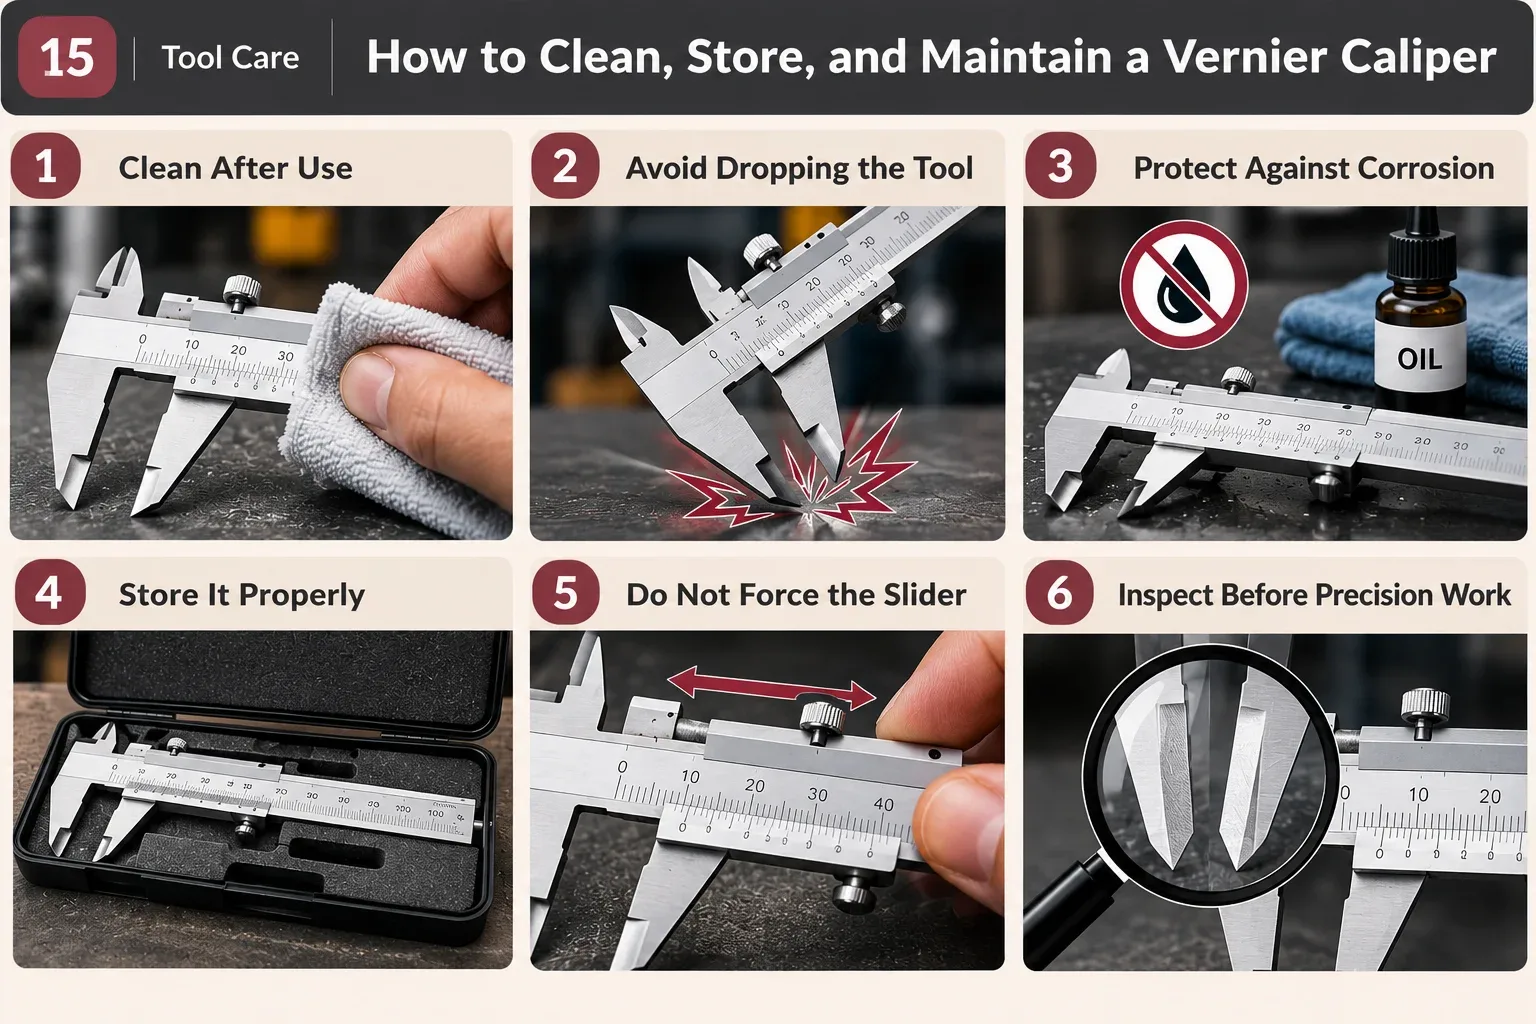
Clean After Use
Remove dust, metal particles, and residue with a suitable soft cloth or cleaning method recommended by the manufacturer.
Avoid Dropping the Tool
Impacts can damage the jaws, beam, or sliding mechanism, affecting future measurements.
Protect Against Corrosion
Keep the instrument dry and follow manufacturer recommendations for corrosion protection. Avoid contaminating measuring faces with heavy residue.
Store It Properly
Use a protective case and avoid placing heavy objects on top of the caliper.
Do Not Force the Slider
The slider should move smoothly. A jammed or damaged mechanism should be inspected rather than forced.
Inspect Before Precision Work
Even a carefully stored instrument should be checked before measurements requiring high confidence.
Frequently Asked Questions About Vernier Calipers
What is a vernier caliper used for?
A vernier caliper measures suitable external dimensions, internal dimensions, depths, and steps, depending on its design. It is used in engineering, automotive work, manufacturing, and technical education.
How do you read a vernier caliper?
Read the main scale immediately before the vernier zero. Find the correctly aligned vernier division, calculate its contribution using the least count, and add the values. Apply any required zero correction.
What is the least count of a vernier caliper?
The least count depends on the instrument’s graduation system. Common metric manual vernier calipers include resolutions such as 0.1 mm, 0.05 mm, and 0.02 mm.
What is zero error in a vernier caliper?
Zero error is an offset indicated when the appropriate measuring surfaces are in their zero position. It should be investigated and corrected according to the instrument’s design and instructions.
Can a vernier caliper measure depth?
Yes, if the instrument is equipped with a depth rod or another suitable depth measuring feature. Correct positioning and a stable reference surface are essential.
Is a digital caliper more accurate than a vernier caliper?
Not automatically. Accuracy depends on the specific instrument, its condition, calibration, and measurement procedure. Digital calipers are often easier to read but are not universally more accurate.
Can you measure brake rotor thickness with a vernier caliper?
A caliper can measure thickness, but an ordinary vernier caliper may not measure a worn rotor correctly because of wear lips and contact geometry. A suitable brake rotor micrometer and manufacturer-specified procedure are often preferred.
What is the difference between a vernier caliper and a micrometer?
A vernier caliper is a versatile instrument for several measurement types. A micrometer is more specialized and may provide finer resolution and better measuring-force control for particular dimensions.
Why does my vernier caliper show an incorrect reading?
Possible causes include dirt between the jaws, zero error, tilted positioning, incorrect scale interpretation, excessive measuring pressure, or instrument damage.
Do vernier calipers need batteries?
Traditional manual vernier calipers do not need batteries. They use mechanical graduations to indicate measurements.
How to Get Reliable Vernier Caliper Measurements
Before using a vernier caliper for automotive or engineering measurements, follow a consistent measurement routine.
- Select the correct instrument for the required dimension.
- Verify its measuring range and resolution.
- Inspect the measuring surfaces.
- Clean the tool and workpiece.
- Check the zero position.
- Select the appropriate jaws or measuring feature.
- Position the instrument squarely.
- Apply suitable measuring force.
- Read the main and vernier scales correctly.
- Apply any required zero-error correction.
- Record the result with correct units.
- Repeat the measurement when appropriate.
- Compare the value with the correct specification.
- Use specialized tools when accuracy or geometry requires them.
A careful, repeatable process is more valuable than simply obtaining a reading quickly.