
A practical, safety-first guide to finding the cause of a loose bicycle chain and making the right adjustment for single-speed, internal-gear, and derailleur-equipped bikes.
A chain that slaps the chainstay, skips while climbing, or falls off the chainring can turn an ordinary ride into a greasy roadside problem. The important detail is that not every bike chain is tightened the same way. Many riders first encounter this after a noisy commute or when a child’s bike chain begins falling off, but the correct repair depends on the drivetrain. This guide uses the same checks a careful home mechanic would make: confirm the bike type, inspect the chain, adjust only what is designed to move, and test before riding in traffic.
Is your bike chain actually too loose?
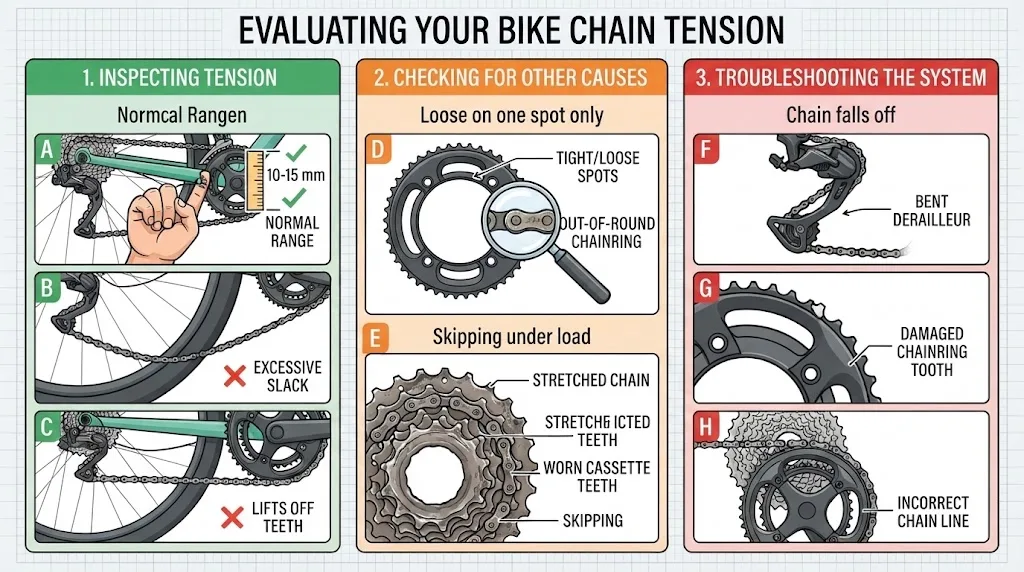
Start with the bike upright and shifted into an easy gear if it has gears. On a single-speed or coaster-brake bike, press the lower run of chain midway between the front and rear sprockets. A small amount of movement is normal; roughly 10–15 mm up and down is a useful starting point for many bikes, but the manufacturer’s specification takes priority. A chain that hangs visibly low, climbs off a sprocket, or can be lifted far away from the chainring needs attention. On a derailleur bike, the rear derailleur spring normally keeps the chain under tension, so slack is a symptom to investigate rather than a cue to slide the wheel backward.
Loose on one spot only
Rotate the cranks slowly. Tight and loose areas can indicate an out-of-round chainring, a worn sprocket, or uneven chain wear.
Skipping under load
A skip while pedalling uphill may be a stretched chain or worn cassette teeth, not a simple tension adjustment.
Chain falls off
Check for a bent derailleur, damaged chainring tooth, incorrect chain line, or a loose rear wheel before assuming the chain alone is at fault.
Do not test a repair by riding immediately into traffic. After any drivetrain adjustment, turn the cranks by hand first, make sure the rear wheel is secure, then perform a gentle test ride in a clear, low-risk area. Keep fingers away from the chain and sprockets while the cranks are moving.
Tools you may need before tightening a chain
For most single-speed bikes, you need the correct axle wrench or socket, plus a way to support the bicycle safely. A 15 mm wrench is common but not universal. A geared bicycle may need hex keys for derailleur checks and a chain-wear gauge for an accurate diagnosis. Work with the bike clean enough to see the chain and axle position clearly. Gloves can make greasy jobs more comfortable, but avoid loose fabric that could catch in the drivetrain.
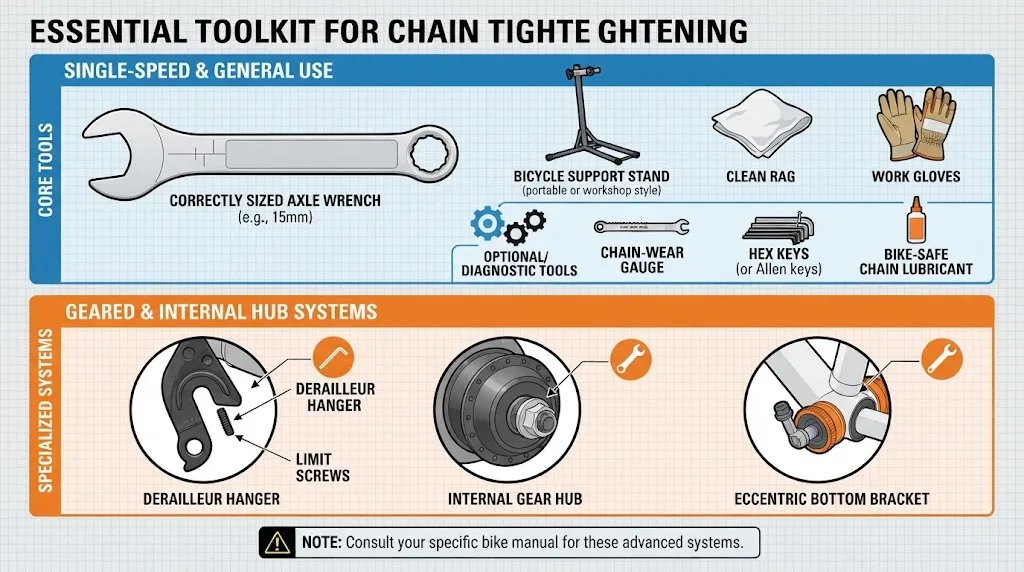
A useful home-mechanic kit
Use a correctly sized axle wrench, clean rag, bike-safe chain lubricant, and ideally a chain-wear checker. A chain tool is useful for replacing or sizing a chain, but it is not normally the tool that tightens a healthy single-speed chain. Consult your bike manual if it uses an internal gear hub, belt drive, eccentric bottom bracket, or through-axle system.
How to tighten a chain on a single-speed bike
First, shift no components and avoid turning the cranks while your hands are near the chain. Loosen both rear axle nuts just enough for the wheel to slide in the horizontal dropouts. Pull the wheel back gradually and evenly, keeping it centered between the frame stays. Check chain movement at several crank positions because a chain can feel tighter at one point in its rotation. When the chain has a modest amount of free play and does not bind, hold the wheel straight and tighten both axle nuts firmly and evenly. Recheck that the brake is aligned and the wheel spins freely before riding.
Too tight is not better. An over-tightened chain can feel stiff, create drag, overload bearings, and wear sprockets quickly. The chain should move freely without sagging or coming away from the sprocket teeth.
Why you usually do not tighten a chain on a geared bike
On a multi-speed bike, the rear derailleur cage takes up chain slack as you shift across different sprocket sizes. Pulling the rear wheel backward can interfere with wheel alignment, brake position, and shifting, and it does not solve the underlying issue. If the chain appears slack, inspect whether it is routed correctly through the derailleur pulleys, whether the derailleur cage moves freely, and whether the chain is excessively worn or too long. A damaged derailleur hanger or bent derailleur is a reason to pause the repair and seek help from a qualified bicycle mechanic.
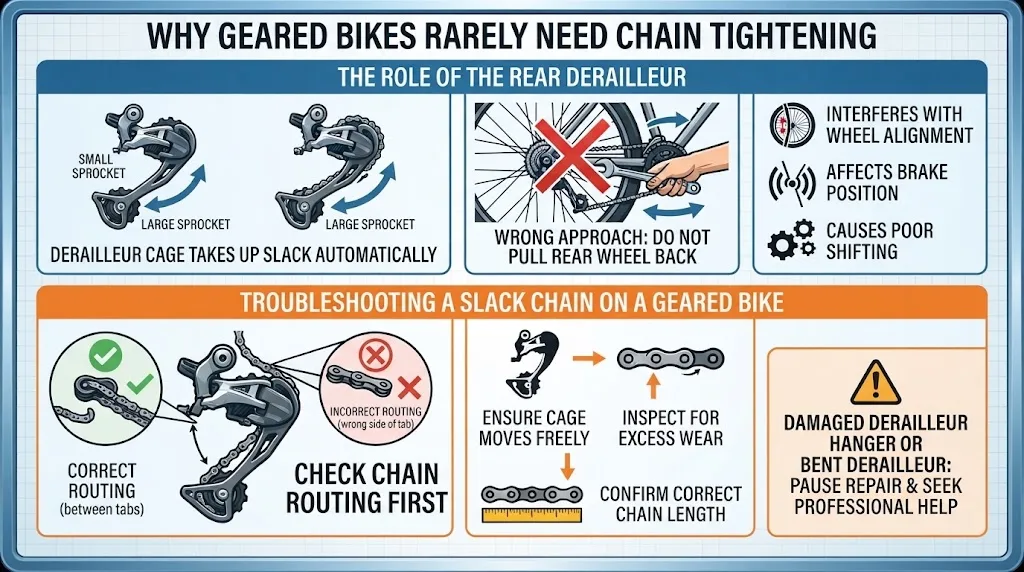
Check chain routing before changing parts
A chain accidentally routed on the wrong side of a derailleur tab can look unusually slack and shift poorly. Compare the routing with the diagram in your derailleur or bicycle manual. If the routing is correct but the chain still hangs loose, avoid shortening it until you have confirmed the bike uses the correct chain length and the derailleur is functioning normally.
A worn chain needs replacement, not endless tightening
Bicycle chains do not literally stretch like elastic. Their pins and bushings wear, increasing the pitch between links. That wear can cause poor shifting and accelerate wear on the cassette and chainrings. A chain-wear gauge is the simplest reliable check. Many manufacturers recommend replacement around 0.5% wear for some modern narrow drivetrains and around 0.75% for others, but use the threshold specified by your component maker. Replacing a worn chain in time is usually cheaper than replacing the chain, cassette, and chainrings together.
When to stop and get professional help
Seek a bicycle mechanic if the chain has cracked links, seized links that will not free up, repeated skipping after a new chain, a visibly bent derailleur, damaged teeth, or a rear wheel that will not remain centered and secure. These are component-condition issues, not routine tension adjustments.
Which chain-tightening method fits your bike?
Use this comparison as a quick diagnostic guide. Your bike’s manual and the parts fitted to your bike should always guide the final repair method.
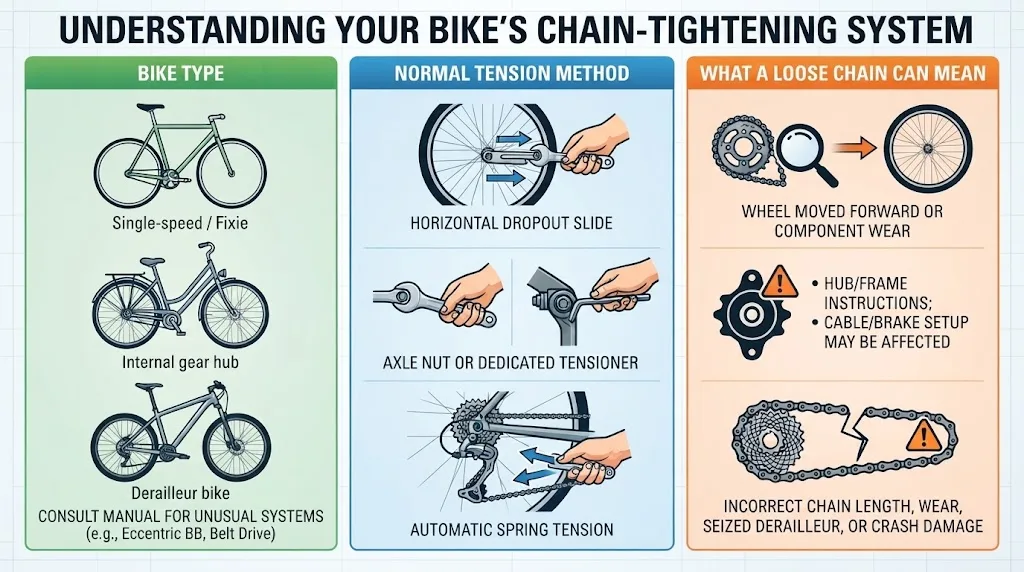
| Bike type | Normal tension method | What a loose chain can mean |
|---|---|---|
| Single-speed / fixie | Slide the rear wheel evenly in horizontal dropouts, then secure axle nuts. | Wheel has moved forward, chain is worn, or sprockets and chainring need inspection. |
| Internal gear hub | Often adjusted at the rear axle or with dedicated chain tensioners. | Use the hub and frame manufacturer instructions; cable or brake setup may be affected. |
| Derailleur bike | Rear derailleur spring manages chain tension automatically. | Incorrect chain length, wear, bad routing, seized derailleur, or crash damage. |
Some bikes use unusual systems such as eccentric bottom brackets, sliding dropouts, or belt drives. These need their own manufacturer-approved procedure.
Bike chain questions, answered
How tight should a bike chain be?
For a typical single-speed bike, the chain should have a modest amount of movement rather than being rigid. Check it at several crank positions because the tightest point determines the final adjustment. The chain must run freely without sagging, binding, or pulling hard on the bearings.
Can I tighten a derailleur bike chain by moving the rear wheel?
Usually, no. On derailleur-equipped bicycles, the rear derailleur is designed to manage chain tension. Moving the wheel backward can create alignment and braking problems while leaving the true cause unresolved. Inspect chain wear, routing, derailleur movement, and chain length instead.
Why does my chain skip even after I tighten it?
Skipping often means the chain has worn beyond its service limit or that the cassette, freewheel, or chainring teeth are worn. It can also be caused by poor derailleur adjustment or a bent derailleur hanger. A chain-wear gauge and a close inspection are more reliable than tightening alone.