
A practical, least-damage-first guide to removing stripped, burred, rusted, and seized screws from furniture, fixtures, machinery, and more.
To remove a stripped screw, first stop using the slipping bit. Clean the recess, try the exact driver type and size with firm downward pressure, then move through grip methods, pliers, a tapped-in Torx bit, a new slot, an extractor, or drilling only as needed.
First, identify what has gone wrong

A stripped screw has a damaged drive recess, so the screwdriver cannot grip. A burred screw has rough or rounded edges. A seized screw may still have a good head, but its threads are stuck by corrosion, dirt, heat, or overtightening. Check whether the head is exposed or recessed, identify the drive type—Phillips, Pozidriv, Torx, hex, slotted, or square—and consider the surrounding material before choosing a method.
Protect the work before you start
Disconnect electrical equipment, secure the workpiece, and check for hidden wires, batteries, pipes, or fuel lines. Wear eye protection for drilling, cutting, or striking. Use gloves around sharp metal—but keep them clear of rotating tools.
How to remove a stripped screw without making it worse
Try one method at a time and inspect the screw after each attempt. If the head is becoming rounder, stop and move to the next suitable option rather than forcing the same tool.
Use the correct bit and clean the recess
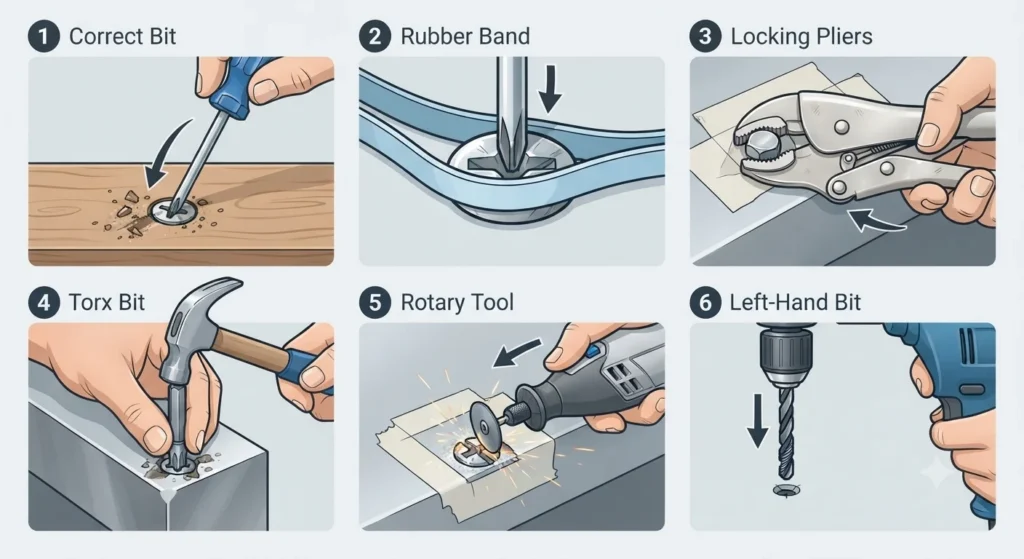
Best for: slight damage or a driver that keeps camming out. Brush out paint, rust, or debris, then try a fresh, correctly sized manual screwdriver. Phillips and Pozidriv are not interchangeable. Press straight down, turn slowly, and stop if the bit slips again.
Add friction with a rubber band or abrasive material
Best for: shallow, lightly rounded recesses. Lay a wide rubber band over the screw head and press the driver firmly into it. A small amount of abrasive paste can also help in some metal applications. This is not a cure for a deeply damaged screw, so do not keep spinning the driver.
Grip an exposed head with locking pliers
Best for: raised pan, hex, or round heads with enough edge to grab. Clamp locking pliers tightly around the outside of the head, then turn slowly counter-clockwise. Protect painted or soft surfaces with tape. This will not work well on recessed or countersunk screws.
Tap in a slightly larger Torx bit
Best for: a stripped Phillips screw in metal or sturdy wood. Choose a Torx bit that is just larger than the damaged recess. Tap it in gently with a hammer to create new gripping points, then turn by hand. Avoid this method near fragile plastic, glass, or delicate electronics.
Cut a new slot in the screw head
Best for: accessible heads where sparks and heat are safe. Use a rotary tool with a cutting disc to make one straight slot, then use a wide flat-head screwdriver. Shield nearby paint and wiring. Wear eye protection and stop if the disc begins to wander into the surrounding surface.
Try a left-hand drill bit before an extractor
Best for: screws that are flush or recessed. Center-punch the screw, drill a small pilot hole at slow speed in reverse, and maintain a straight angle. The reverse-cutting bit can sometimes bite and unscrew the fastener without needing an extractor.
Pliers need a proud head
If you cannot clamp the outer edge securely, switch to a method that works inside the screw head instead of damaging the surrounding material.
How to remove seized or rusted screws
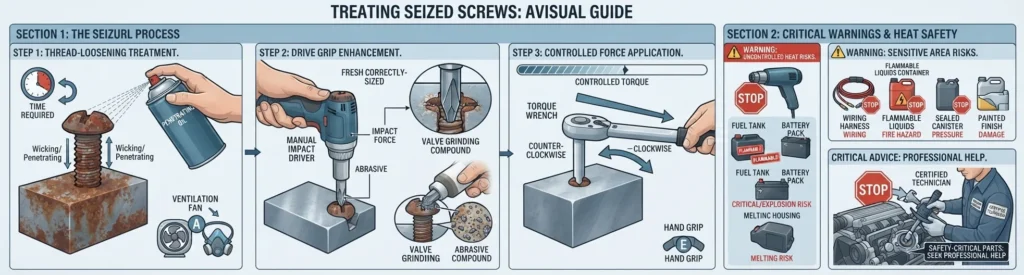
A seized screw needs thread-loosening treatment as well as drive grip. Penetrating oil can help dissolve or creep into corrosion, but it needs time and should be used with ventilation according to the manufacturer’s instructions.
Never apply uncontrolled heat near fuel, batteries, plastics, wiring, flammable liquids, sealed containers, or sensitive finishes. If the part is safety-critical, professional help is safer than continued force.
Use a screw extractor carefully
Best for: a badly damaged screw that cannot be gripped externally. Drill a centered pilot hole using the extractor maker’s recommended size, insert the correct extractor, and turn slowly in reverse while keeping it aligned. Do not force it: hardened extractors can snap, and a broken extractor is exceptionally difficult to drill out. Stop immediately if it flexes or binds.
Drill out the screw only as a final option
The aim is often to drill away only the head, separate the parts, and then remove the remaining shaft with pliers. Start with a small centered bit and increase size gradually. Clamp the work securely, keep the drill aligned, and protect the surface around the screw. Replace the damaged fastener with the correct type and size afterward.

Prevent stripped screws next time
- Match the exact driver type and size, and replace worn bits before they slip.
- Keep the bit square to the screw and maintain steady downward pressure.
- Use low drill speed and stop as soon as you feel the bit cam out.
- Pre-drill hard materials where appropriate and avoid overtightening; use anti-seize only where the application allows it.
Common questions about removing stripped screws
How do I remove a stripped Phillips screw?
Start with a new Phillips bit of the exact size and firm downward pressure. If it still slips, try a rubber band, a tapped-in Torx bit, or a screw extractor depending on how damaged and accessible the head is.
Can penetrating oil remove a stripped screw?
Penetrating oil helps with seized threads, not a damaged drive recess. Use it when corrosion or overtightening is holding the screw, then pair it with a method that restores grip.
When should I call a professional?
Stop when the screw is in a safety-critical vehicle part, near electrical or fuel systems, embedded in an expensive component, or when an extractor begins to bend or bind. Further force can turn a simple repair into a larger one.