Stand-alone puncture repair without removing your wheel. Master the proven technique
Understanding Tubeless Tire Punctures
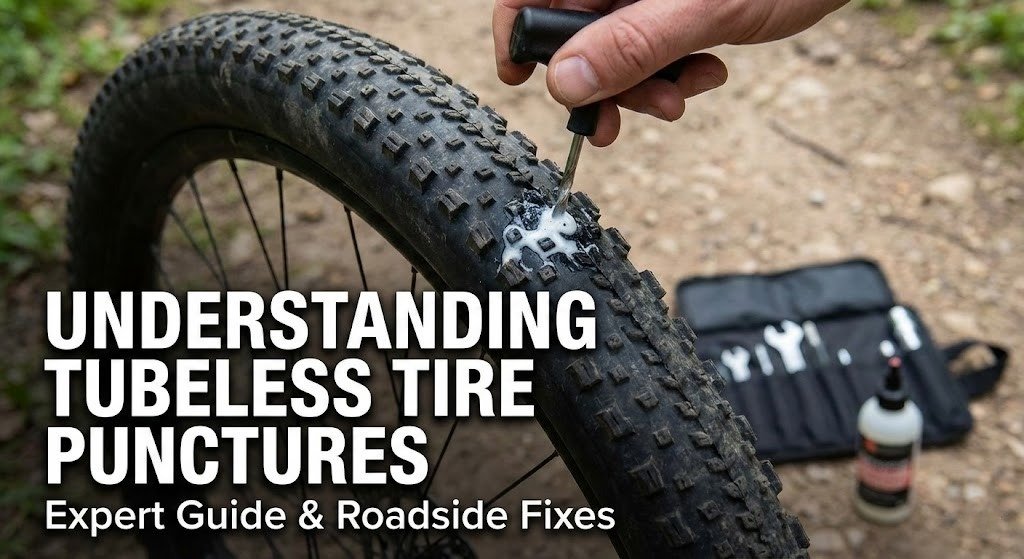
Tubeless tire technology has revolutionized cycling by eliminating pinch flats and allowing lower pressures for better traction. However, many riders feel unprepared when they experience their first tubeless puncture on the road. This comprehensive guide draws from three decades of professional mechanical experience to walk you through the exact process used by elite mechanics.
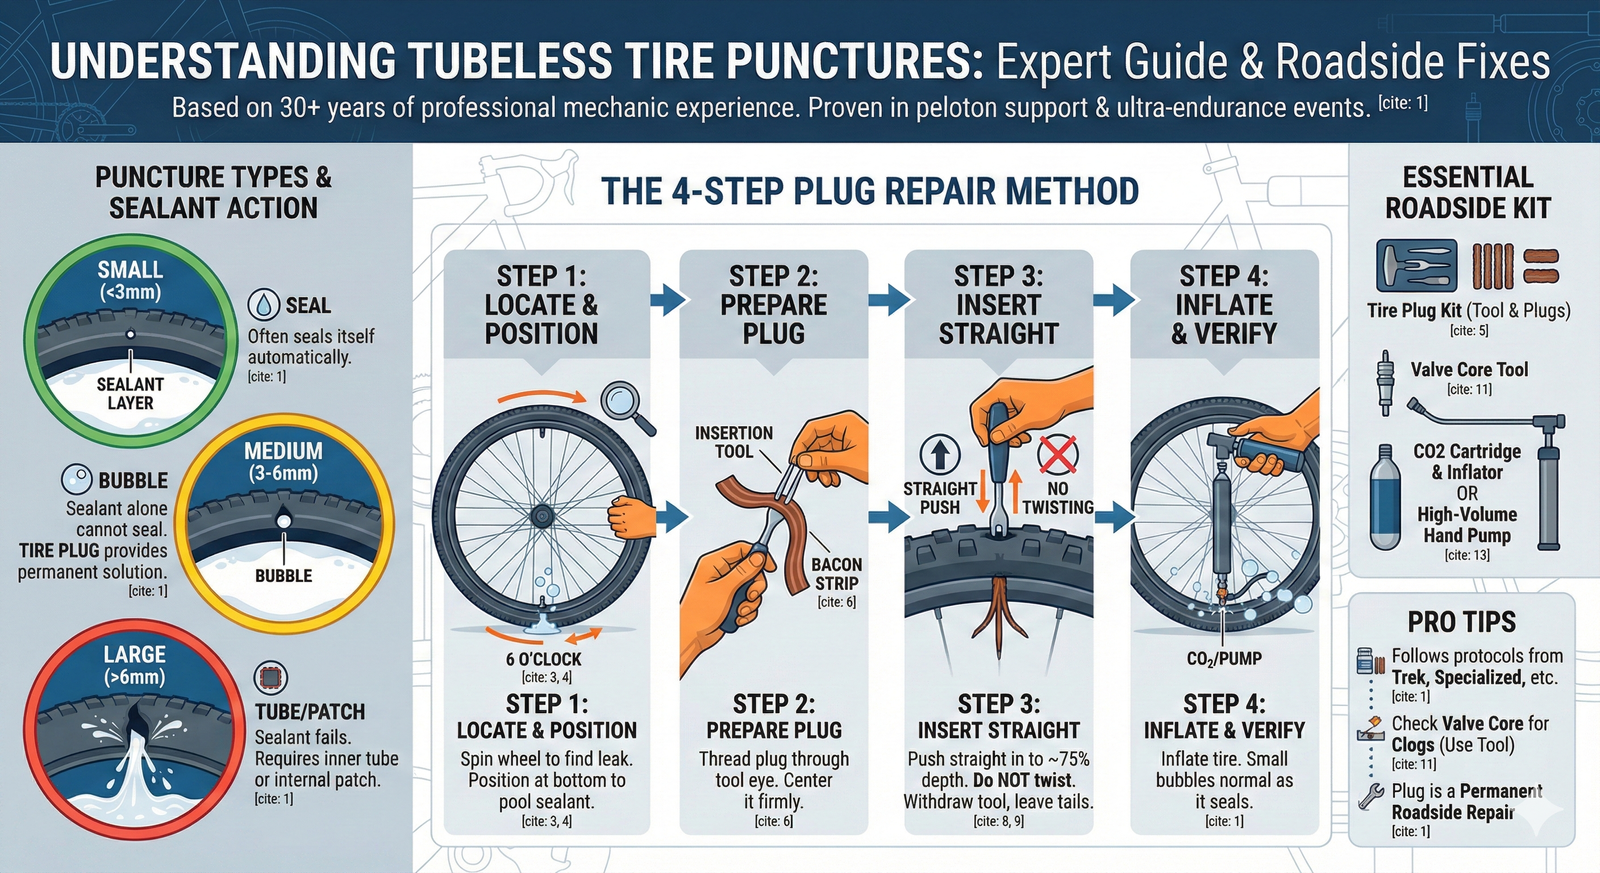
The key advantage of tubeless systems is that small punctures often seal themselves through the sealant layer. When sealant alone cannot seal the hole—typically punctures larger than 6mm—a tire plug provides a permanent, roadside-repairable solution that keeps the tire mounted on the rim.
Expert Insight: This method follows the same protocols recommended by Trek, Specialized, and other major manufacturers in their official tubeless maintenance documentation. The technique has been proven effective in professional peloton support teams and ultra-endurance racing events.
Essential Tools & Materials
Before heading out on your next ride, ensure you have these items in your saddlebag or seat pack. Each serves a critical purpose in the repair process:
Tire Plug Kit
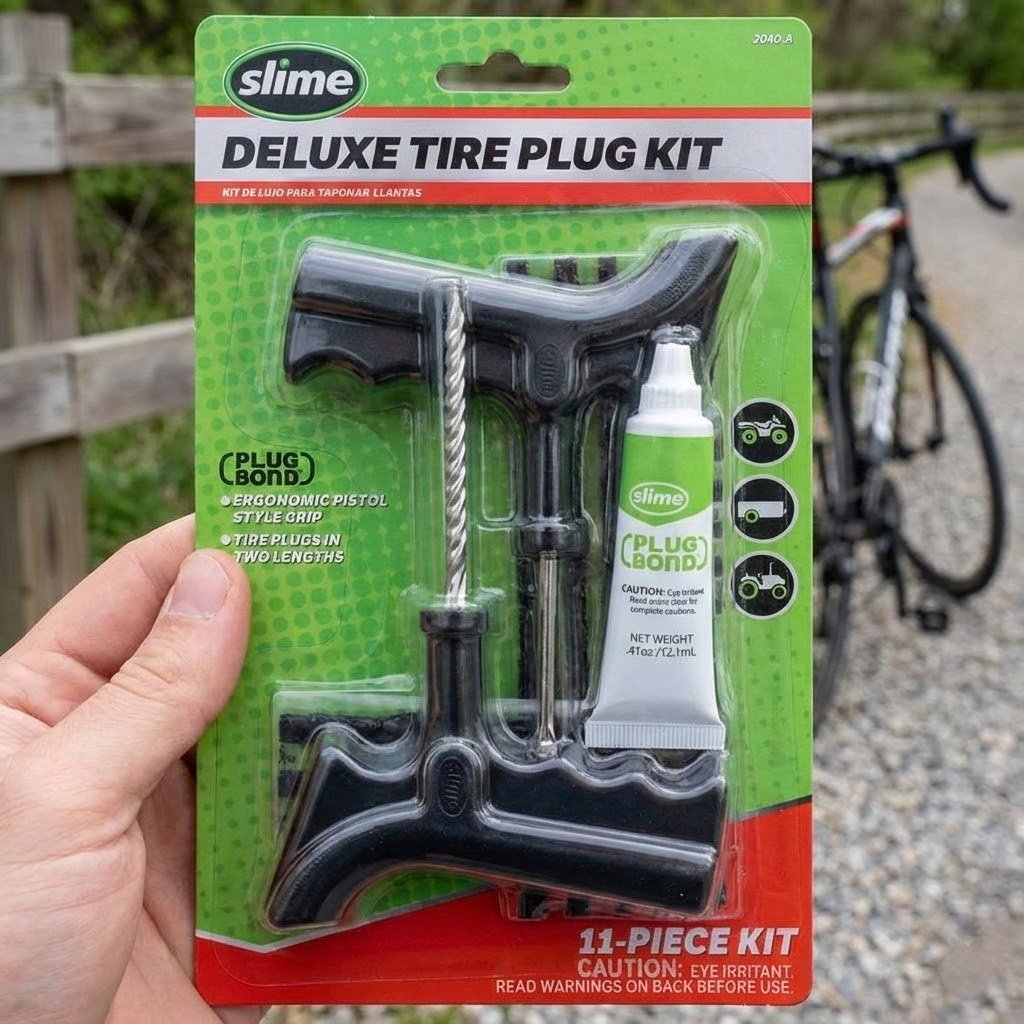
Includes rubber “bacon strip” plugs and the threaded insertion tool. Quality brands: Dynaplug, Meteor, Caffelatex.
Recommended: 3-5 plugs per kit for redundancy
Valve Core Tool
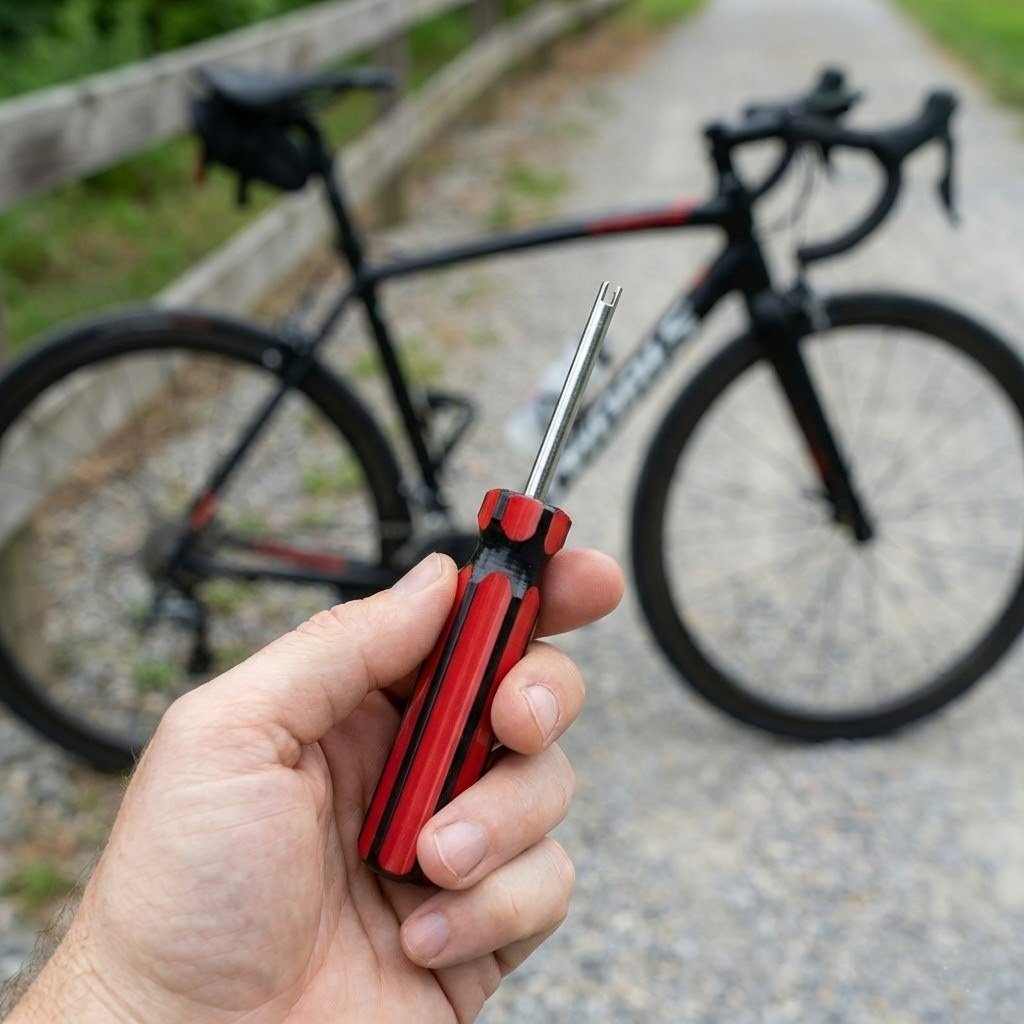
Multi-purpose tool for removing/installing valve cores and cleaning clogged sealant. Often integrated into modern pumps.
Weight: Less than 1 oz | Built into most mini pumps
Inflation Method
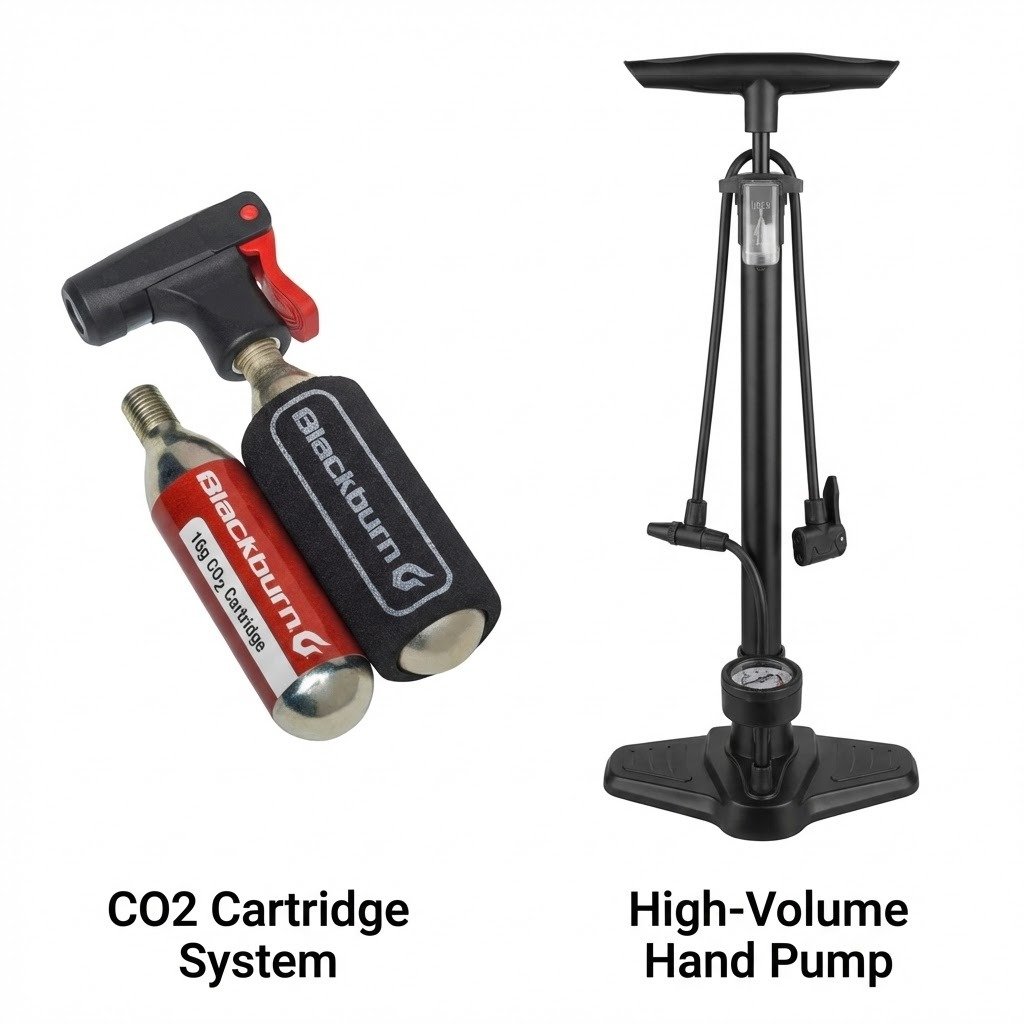
CO2 cartridges (fastest bead seating) or high-volume hand pump (unlimited air supply). See comparison below.
Pro setup: One CO2 + one hand pump
Supporting Items
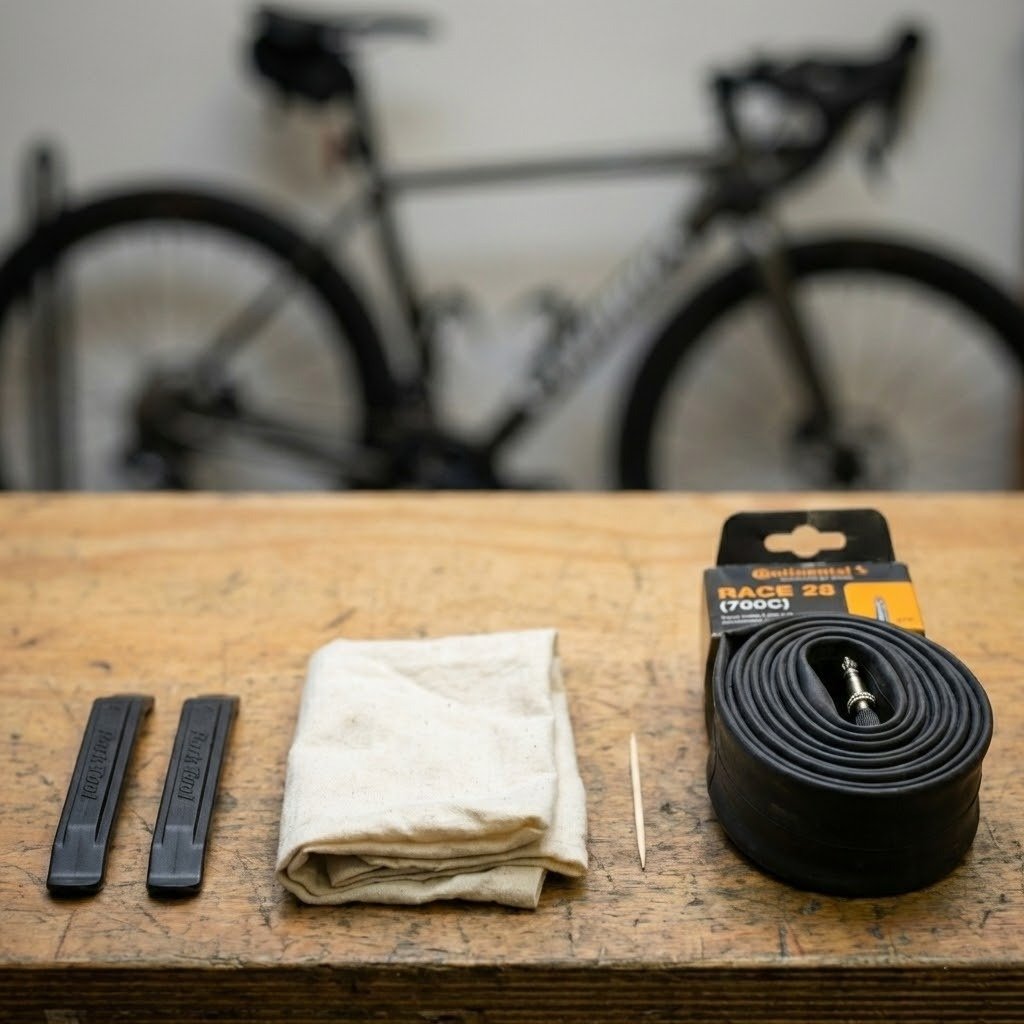
- Tire levers (plastic, to avoid rim damage)
- Cotton gloves or small rag
- Toothpick (for valve cleaning)
- Emergency tube (correct size)
Step 1: Assess the Puncture Type
Not all punctures are created equal. Your repair approach depends entirely on the type and location of damage. Take 30 seconds to properly diagnose the problem before selecting your repair method.
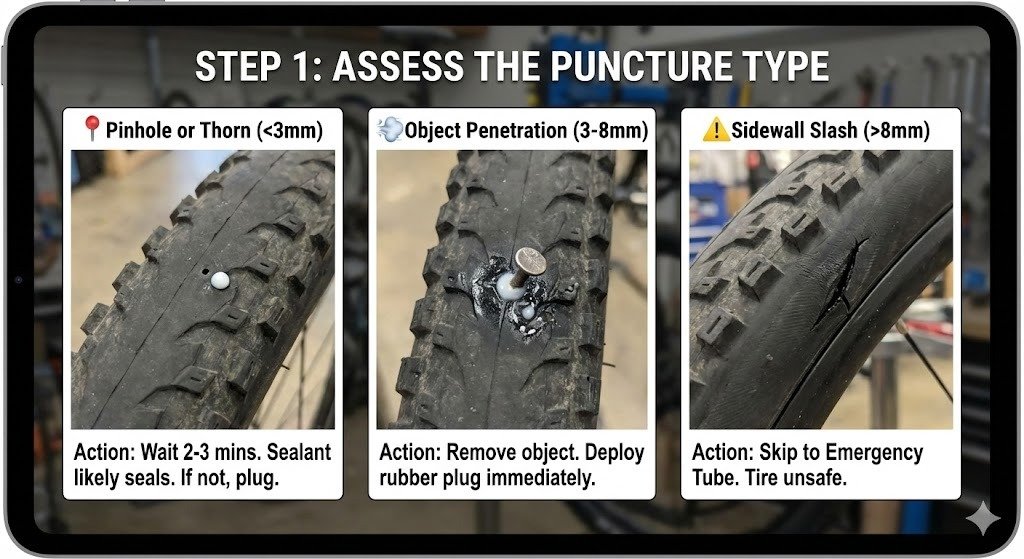
📍Pinhole or Thorn Puncture (<3mm)
Small hole with minimal sealant spray. You’ll hear a slight hiss.
Action: Wait 2-3 minutes. Sealant will likely seal this automatically. If not, proceed with plug method.
💨Object Penetration or Large Puncture (3-8mm)
Hole large enough to see sealant bubbling or hear continuous hissing. Object may still be embedded.
Action: Remove object if present. Deploy rubber plug immediately using method detailed below.
⚠️Sidewall Slash or Large Tear (>8mm)
Damage to the tire’s sidewall or damage so severe the plug cannot effectively seal.
Action: Skip to Emergency Tube section. Tire is unsafe to ride at normal pressure.
The Plug Repair Method: Complete Process
Locate & Position the Puncture
Spin the wheel slowly while looking for sealant bubbles or listening carefully for the hissing sound. Once located, rotate the wheel so the puncture sits at the bottom of the tire (the 6 o’clock position). This positioning is critical because it allows sealant to pool around the hole and provides the best angle for plug insertion.
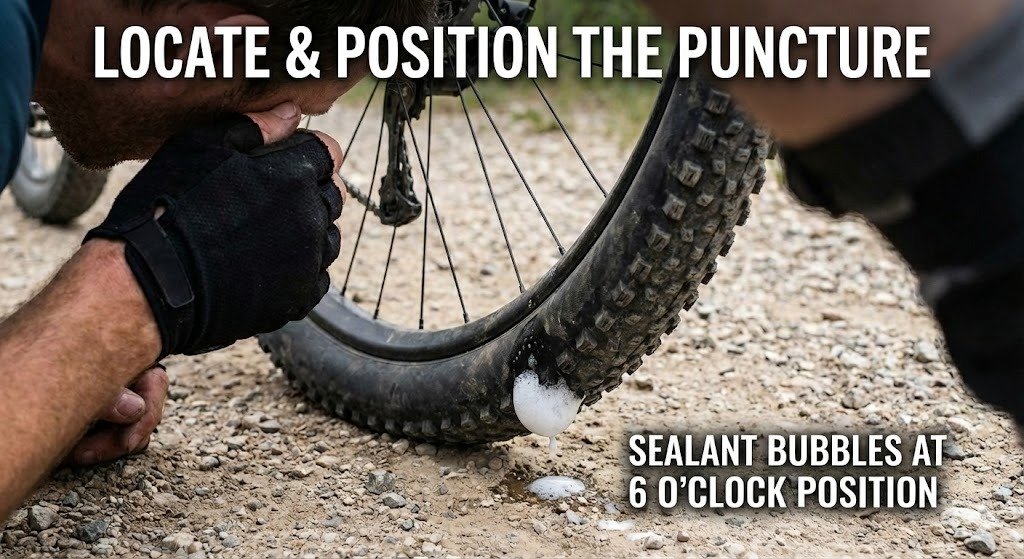
Technical Note: Sealant works with gravity. Positioning the hole at the bottom ensures maximum sealant concentration at the repair site, improving long-term seal integrity.
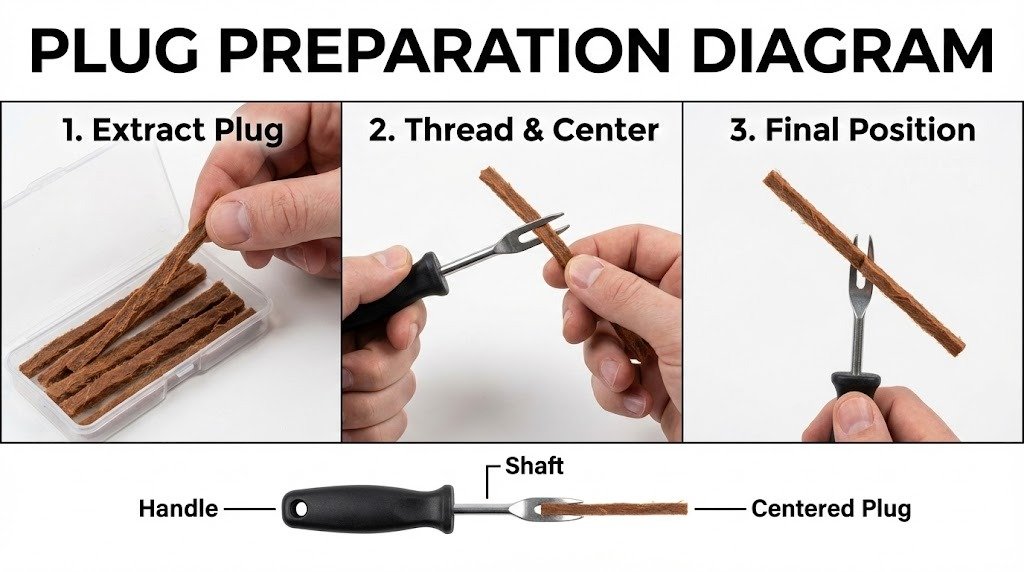
Prepare the Plug
Extract one rubber plug strip from your kit. Thread it through the eye of the insertion tool, centering it so approximately equal lengths protrude from both sides. The plug should be seated firmly in the tool’s fork but not over-tightened.
Insert the Plug
Position the insertion tool directly over the puncture hole, ensuring the fork is perpendicular to the tire surface. Push the tool in with firm, steady pressure until approximately 75% of the tool’s depth has penetrated. You will feel resistance as the rubber plug fills and seals the hole. This resistance confirms proper engagement. Do not use twisting motions—only push straight in.
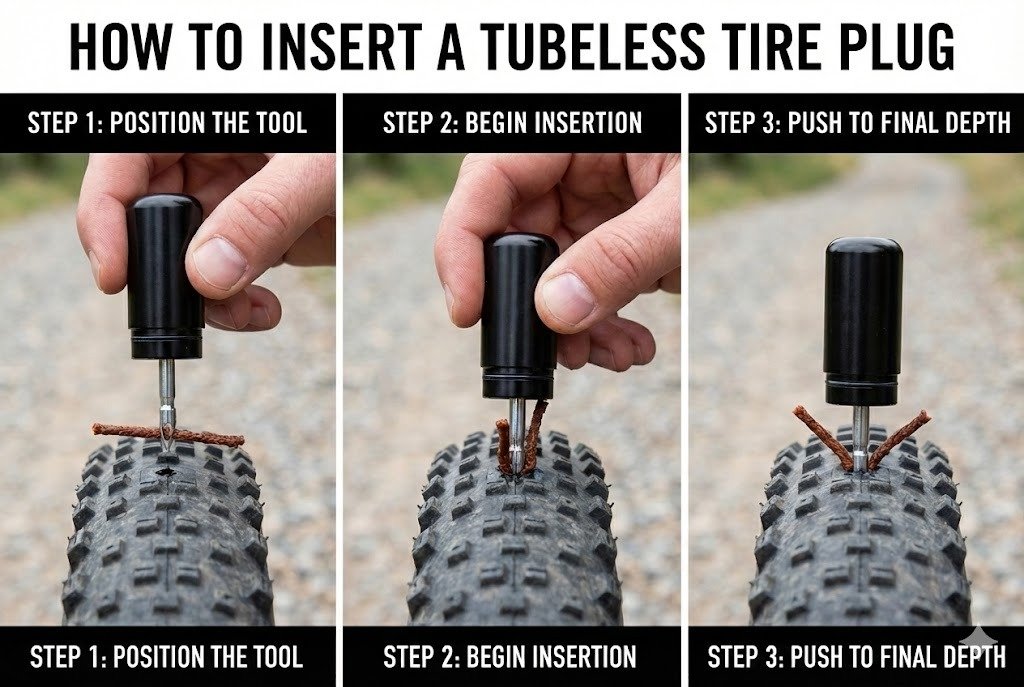
Critical: Do not twist the tool. Twisting motion enlarges the hole and reduces seal effectiveness. Straight insertion only.
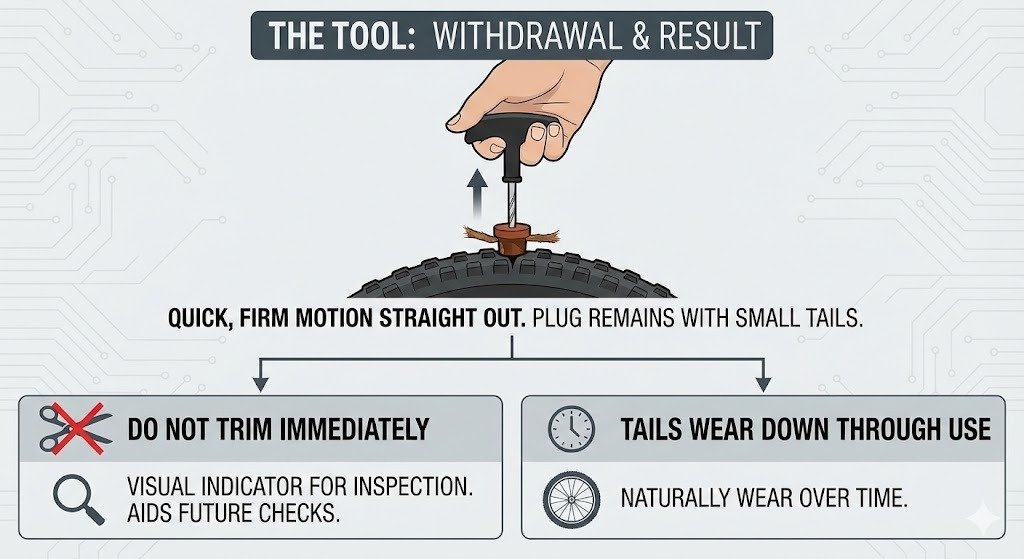
The Tool
Withdraw the tool with a quick, firm motion straight out from the tire. The rubber plug remains inside the puncture hole, with small tails extending outward. Do not trim these tails immediately—they serve as a visual indicator of the repair location and aid in future inspection. The tails will naturally wear down through use.
Inflate & Verify
Inflate the tire to your normal pressure using CO2 or hand pump. Slowly rotate the wheel to allow sealant to distribute around the repair area. Observe for any continuing air loss. A small amount of sealant bubbling around the plug area is normal and indicates the system is sealing properly. You should not hear any hissing after 30 seconds of inflation.
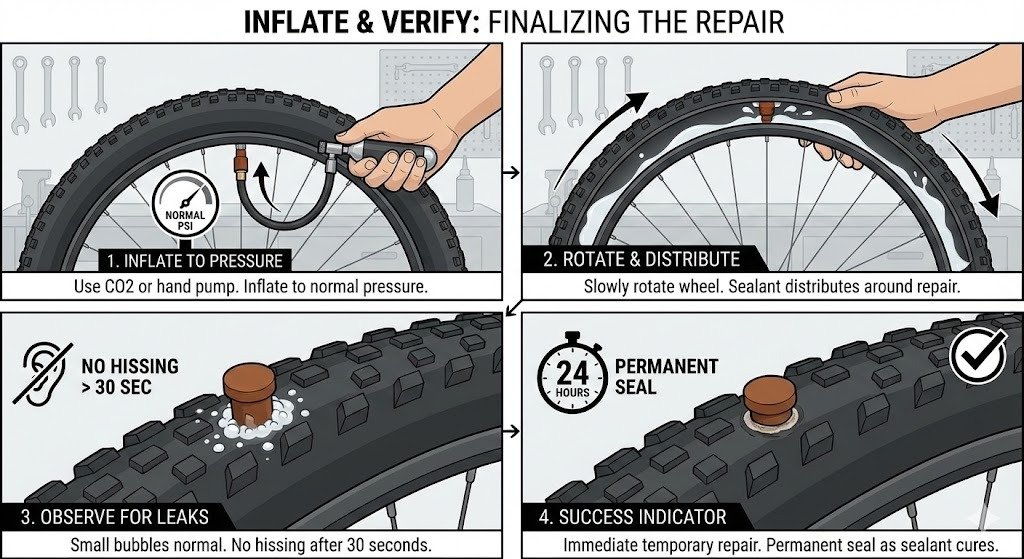
Success Indicator: The plug + sealant combination creates an immediate temporary repair and a permanent seal within 24 hours as sealant fully cures around the plug.
🔧Troubleshooting: Clogged Valve Core
If you’re unable to inflate the tire despite connecting your pump correctly, the valve core is likely clogged with dried sealant. This is a common issue after several months of riding. Here’s how to diagnose and fix it:
How to Remove & Clean the Valve Core
- Use the valve core tool (built into most modern pumps or included in your plug kit)
- Position the tool on the valve core at the center of your tire’s valve stem
- Turn counterclockwise until the valve core loosens and comes free
- Inspect the core for white or amber sealant buildup
- Clean with a toothpick to remove sealant material from the small holes
- Reinstall clockwise with moderate pressure (don’t overtighten)
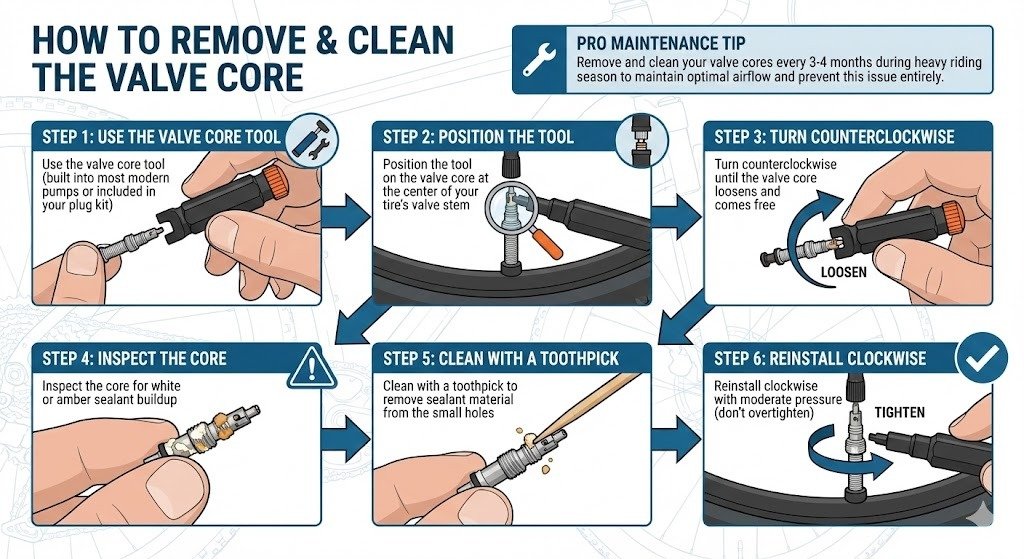
Pro Maintenance Tip: Remove and clean your valve cores every 3-4 months during heavy riding season to maintain optimal airflow and prevent this issue entirely.
CO2 Cartridges vs. Hand Pump: Technical Comparison
| ⚡CO2 Cartridge System | 💪High-Volume Hand Pump |
|---|---|
| ✓ Advantages • Rapid inflation (30 seconds to full pressure) • High volume helps seat tight beads immediately • Sealant distribution accelerated through pressure • Lightweight and compact ✗ Disadvantages • Single-use cartridge (one shot only) • CO2 expands with temperature change (pressure drops) • Can freeze sealant, reducing seal effectiveness • Limited pressure control | ✓ Advantages • Unlimited inflation attempts • No freezing effect on sealant • Precise pressure control• Reusable indefinitely ✗ Disadvantages • Slower inflation (2-3 minutes) • Difficult after 100 miles of riding • May not generate enough pressure for tight beads • Heavier than CO2 |
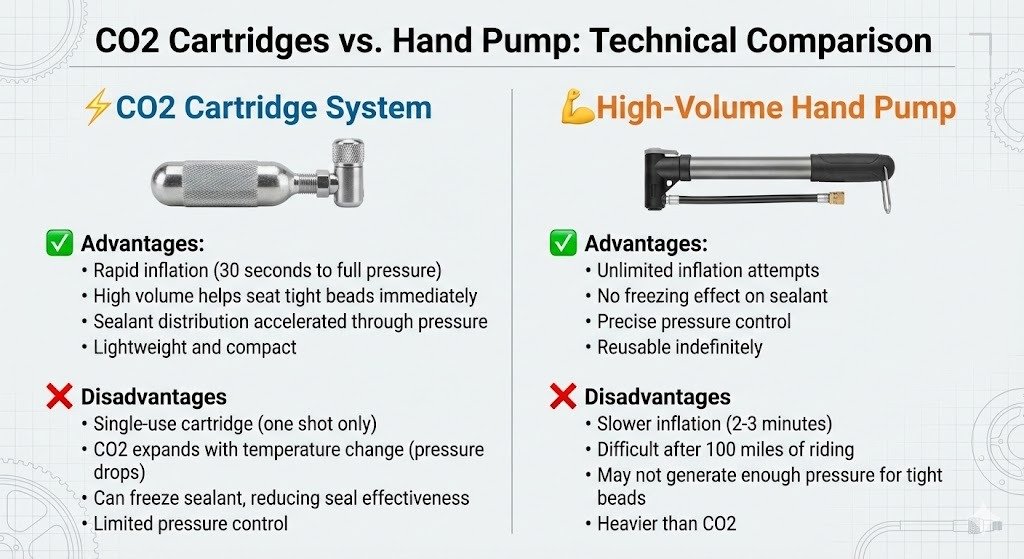
Expert Recommendation:Carry one CO2 cartridge for optimal bead seating, plus a compact hand pump as backup. This combination ensures you never get stranded regardless of circumstances.
Emergency Tube Installation for Catastrophic Failure
When the puncture is too large for a plug (sidewall cuts, multiple punctures), installing a traditional tube becomes necessary. While not ideal, this method allows you to limp home safely:
- Break One Bead: Push the tire bead toward the center rim using your thumbs in circular motions until one side is fully loose and separated from the rim.
- Remove Valve Core & Drain Sealant: Use the valve core tool to remove the core. Allow sealant to drain into a small bag. This prevents mess and protects your tube.
- Insert Tube: Slightly inflate the tube (5 psi) to give it shape. Insert the valve through the rim hole, then carefully tuck the tube completely inside the tire.
- Reseat the Bead: Working clockwise, push the loose bead back onto the rim using your hands. Inflate slowly while checking that the tube hasn’t pinched between bead and rim.
Important: After returning home, replace this tube with a new one and thoroughly clean the tire’s interior of sealant residue before reinstalling tubeless setup. Sealant-contaminated tubes may develop valve issues within weeks.
Expert Q&A: Common Questions Answered
Q: How long does a rubber plug repair last?
A: Properly installed plugs combined with sealant are considered permanent repairs. Testing by tire manufacturers shows these repairs lasting the life of the tire. However, monitor the repair periodically (monthly) by visual inspection and pressure checks. The plug + sealant combination becomes stronger over time as sealant fully cures.
Q: Can I use a plug on multiple punctures in one tire?
A: Yes, but with limitations. One additional plug can often be installed successfully (maintain 3+ inches spacing between plugs). More than two plugs in one tire indicates structural compromise—replace the tire for safety. This is especially important for front wheels where tire failure creates serious crash risk.
Q: Will I lose air pressure slowly with a plugged tire?
A: No. When properly installed, plugs create an airtight seal equivalent to an unmounted tire valve. You should experience zero pressure loss over 24 hours. If you notice slow pressure loss (more than 2 psi per week), the installation was incomplete—reinstall using the same process.
Q: Should I trim the plug tails sticking out?
A: Not immediately. Leave them visible for 24-48 hours—they help identify the repair site for future inspection. They naturally wear down with riding within a few weeks and don’t affect performance. If desired, trim with scissors after 24 hours once you’ve verified the seal is holding.
Conclusion: You’re Ready for the Road
Tubeless punctures are manageable roadside repairs with the correct knowledge and tools. This proven method—drawn from three decades of professional mechanical work and refined through thousands of roadside applications—takes less than 5 minutes and requires no special skills.
Verify your saddlebag contains the essential kit before your next ride. The confidence of knowing you can handle a flat independently transforms how you experience long rides. Whether you’re a weekend warrior or ultra-endurance athlete, this technique will get you home safely every time.