
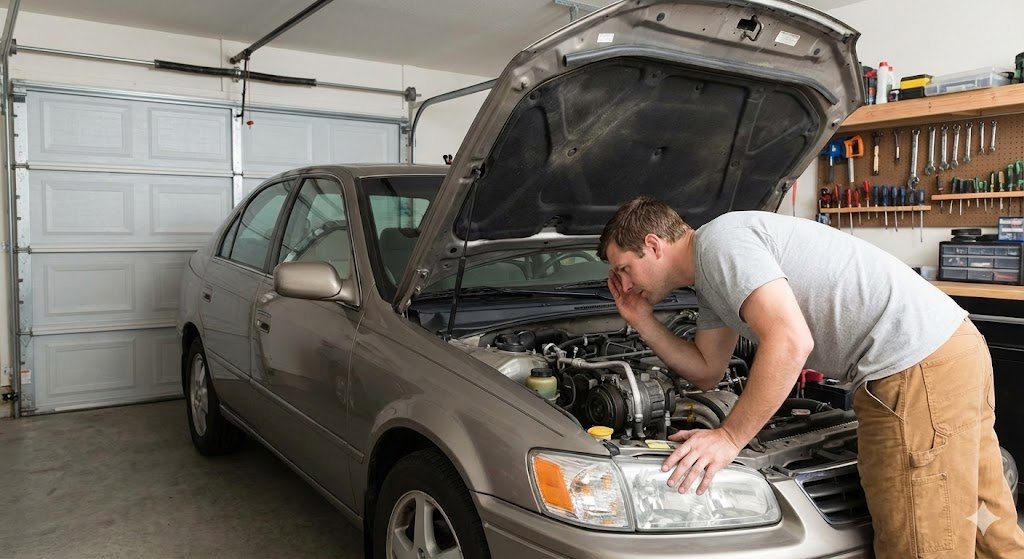
Last July I sat in a parking lot with the engine running, AC on max, and air coming out of the vents that felt like a hair dryer. I did the classic denial routine turned the knob colder (as if that helps), switched recirc on and off, and even blamed the sun. Eventually I accepted the obvious: if the Car AC System can’t move heat out of the cabin, it’s going to punish you. Here’s the troubleshooting path I wish I’d followed from minute one simple checks first, then the “okay, this is real” stuff like UV Dye Detection and compressor decisions.
The day my vents turned into a toaster (and what that told me)
With the kind of heat we’re dealing with right now, the last thing you want is an AC that’s blowing nothing but hot air.
That was me on a hot summer day, stuck in traffic, with my AC not working and the vents blasting air that felt hotter than outside. I did the usual thing first: I twisted the knobs, changed modes, and hit recirculate like it owed me money. Nothing. That’s when I learned my first real rule of car AC troubleshooting: it’s usually not the knobs, it’s physics.

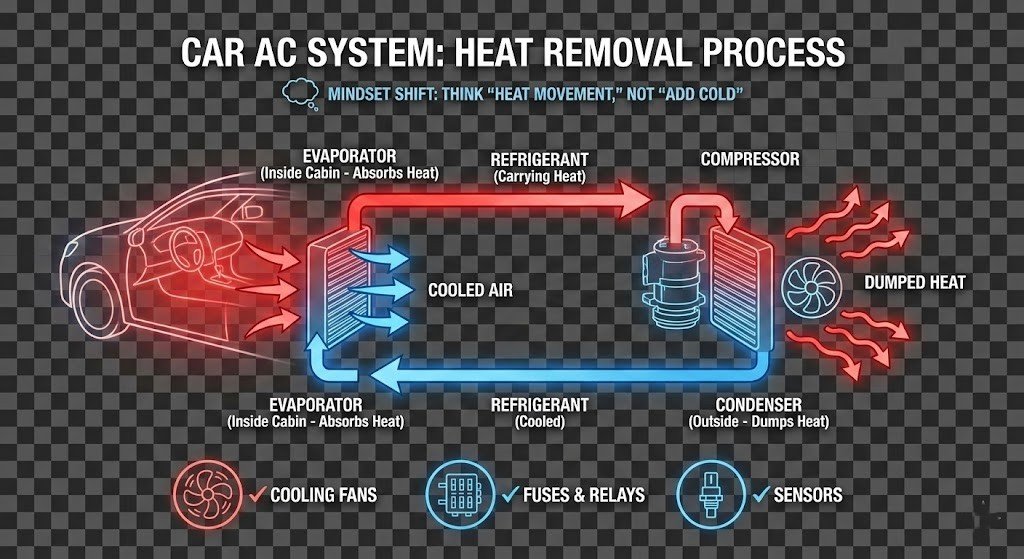
Car AC System reality check: it’s not “making cold”
The Car AC System doesn’t create cold air out of nowhere. It removes heat from the cabin and dumps it outside. So when you get “toaster vents,” it often means heat isn’t being absorbed or moved. Low refrigerant charge is a common reason—without the right amount, the system can’t absorb and remove heat, and Cooling Efficiency drops fast.
My mindset shift: test heat movement, not comfort settings
Once I stopped thinking “add cold,” I started thinking “can the system move heat?” That’s the start of Systematic Diagnosis. Before I even consider big parts like a compressor, I check the simple stuff that controls airflow and engagement.
- Cooling fans: are they spinning when the AC is on?
- Fuses and relays: any blown fuse or clicking relay issues?
- Sensors: a bad pressure sensor can keep the system from running right.
This order matters. Inspecting fans, fuses, relays, and sensors first helps avoid replacing expensive parts for no reason.
Tiny tangent: my trunk kit for sticky summer fixes
I keep a cheap flashlight and nitrile gloves in the trunk because summer breakdowns are always messier than planned. A quick look under the hood is easier when you can see, and gloves make it less gross when you’re checking a relay box or a connector.
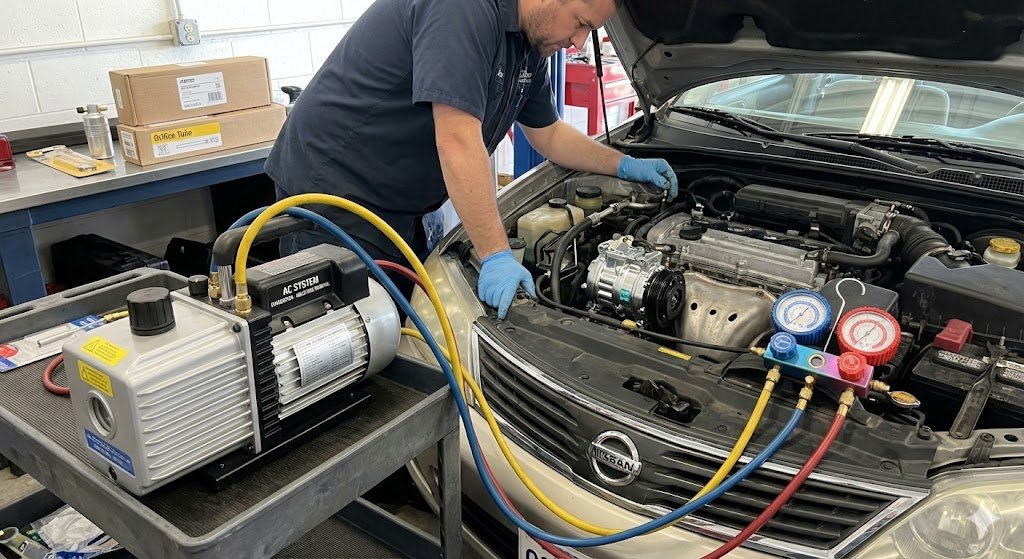
System Pressures Check: the $50 reality check
When I want a fast, no-drama AC system diagnosis, I start with a System Pressures Check. I’m simply trying to check refrigerant pressure and see if the system has enough charge to do its job.
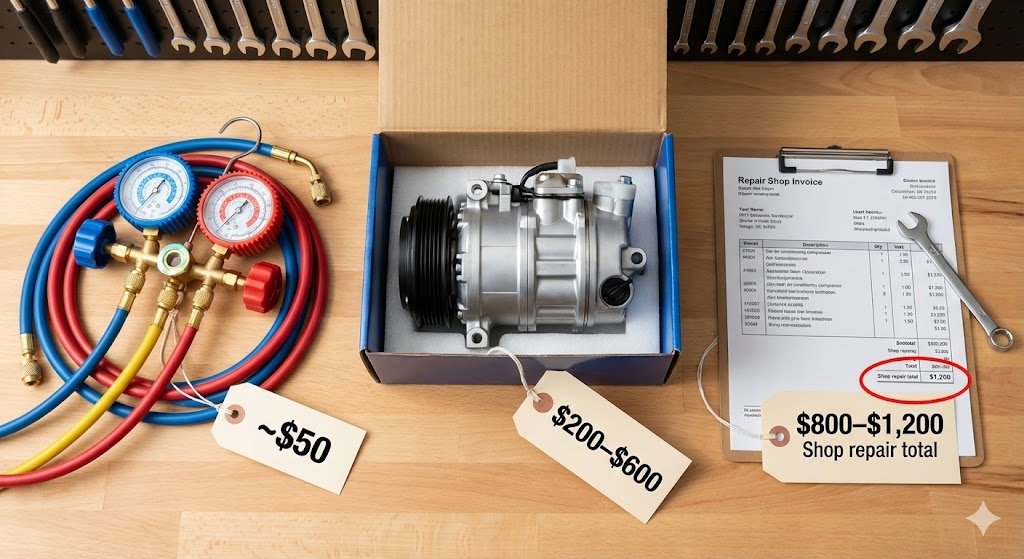
You can get a decent set for around $50.
What I’m checking
I check Refrigerant Pressure at the low-side port. I look for the cap marked “L”, usually near the AC compressor or along the firewall. If I have a Manifold Gauge Set, I’ll read both low-side and high-side pressures for a clearer picture—but even a basic low-side gauge can catch the big problems.
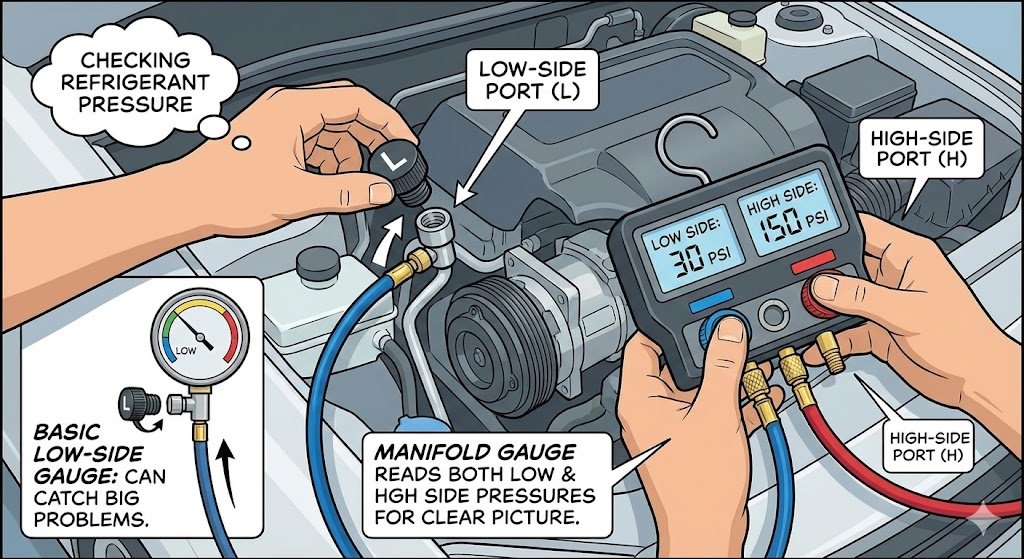
My simple routine (don’t panic at the first number)
- Start the engine and let it idle.
- Set AC to max cool and the fan to high.
- Attach the gauge to the low-pressure “L” port.
- Watch the compressor clutch: it should click on and stay engaged for a bit.
If the clutch is rapid cycling (on/off every few seconds), I treat that as another hint of Low Refrigerant Levels.
How I interpret the reading
- Near-zero or very low pressure: this usually screams Low Refrigerant Levels, often from a leak. With little refrigerant, the AC can’t absorb and remove heat, so the cabin air stays warm.
- Pressure looks “normal” but air is warm: I stop blaming refrigerant and start checking other parts—like a clogged expansion valve or a weak/bad compressor.
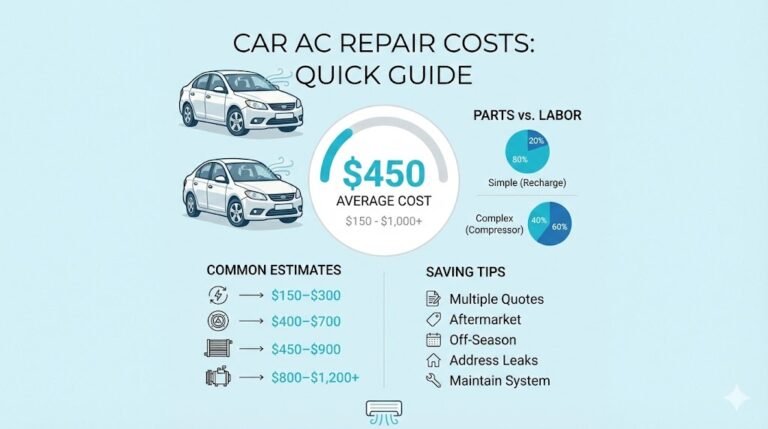
| Item | Typical cost |
|---|---|
| Gauge set / Manifold Gauge Set | ~$50 |
| New compressor (part) | $200–$600 |
| Shop repair total | $800–$1,200 |
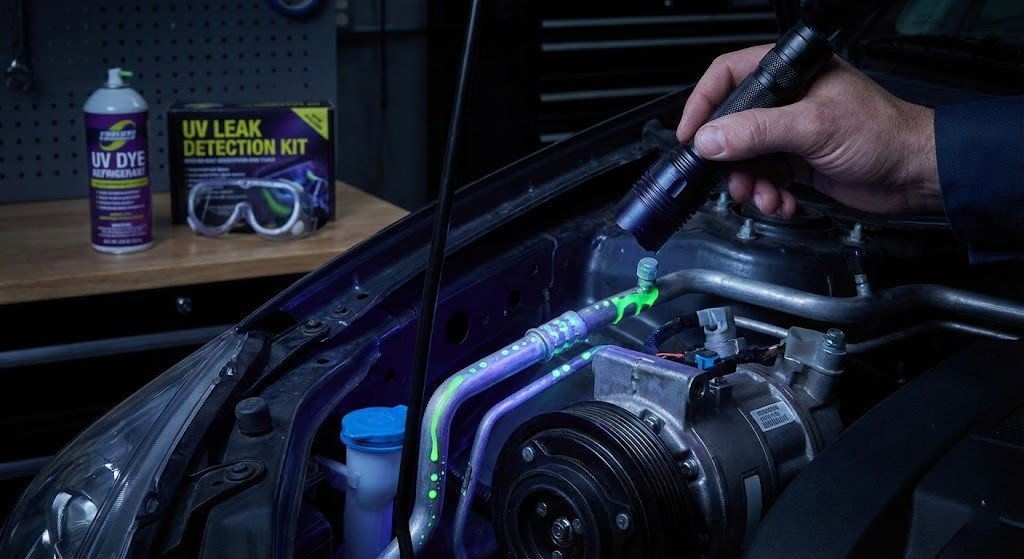
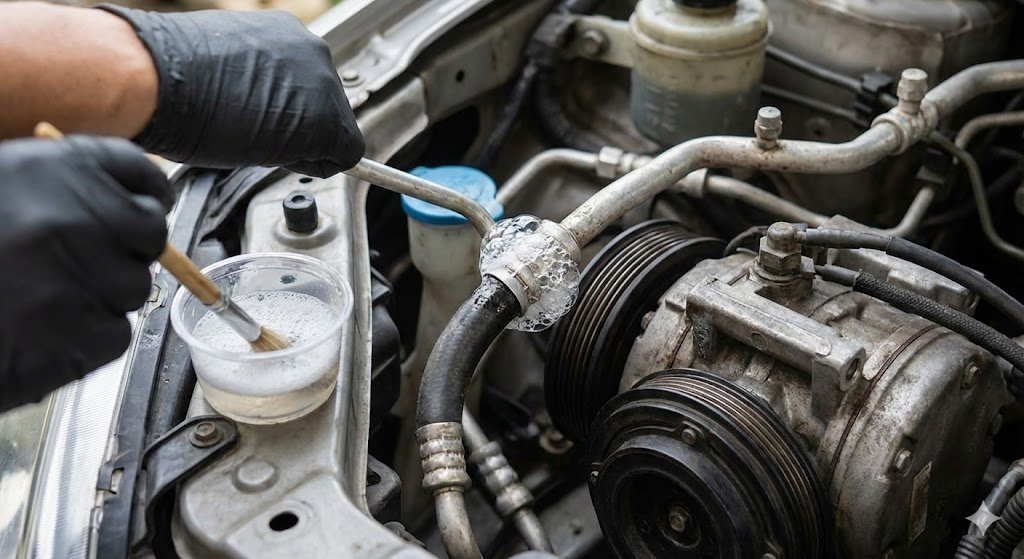
UV Leak Detection: the neon breadcrumb trail
When I’m doing car AC troubleshooting and I don’t want to guess, UV Leak Detection is my favorite “detective” step. If the system is low, I add a can of refrigerant that already includes UV dye, or I inject dye separately and then recharge. Either way, the goal is the same: set up easy UV Dye Detection so tiny Refrigerant Leaks can’t hide.
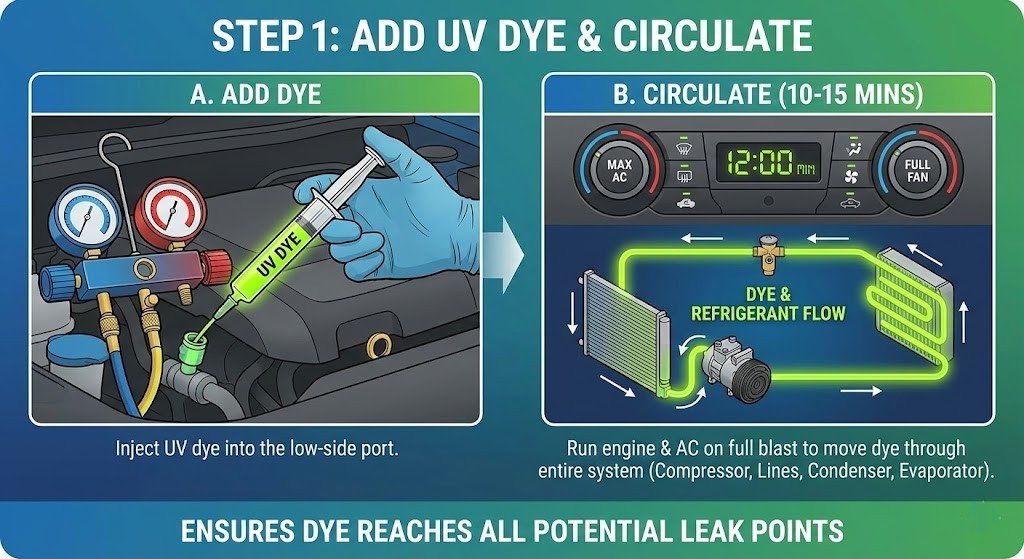
Step 1: Add dye, then circulate it
After the dye is in, I start the engine and run the AC on full blast for 10–15 minutes. That run time matters because it gives the refrigerant and dye time to move through the whole system—compressor, lines, condenser, and the evaporator circuit.
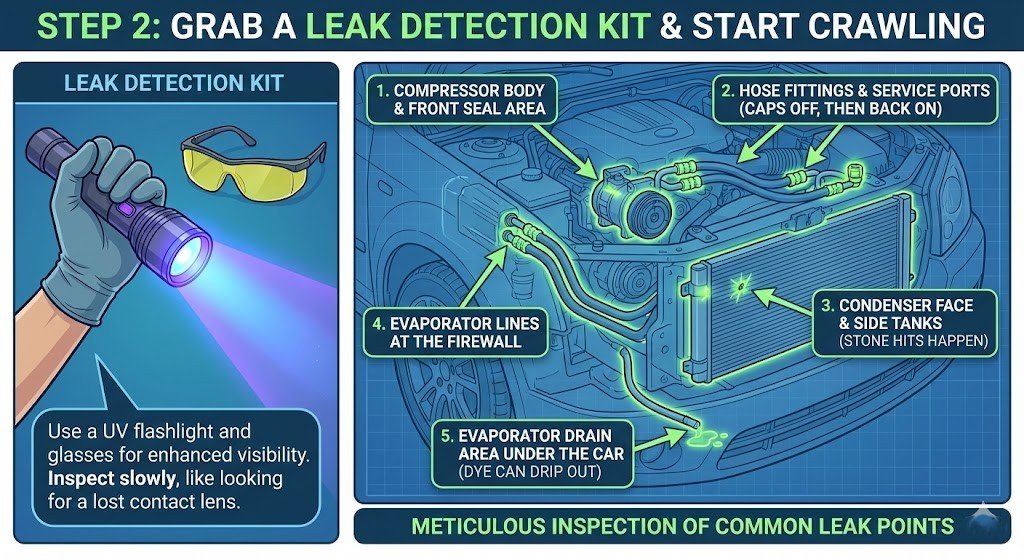
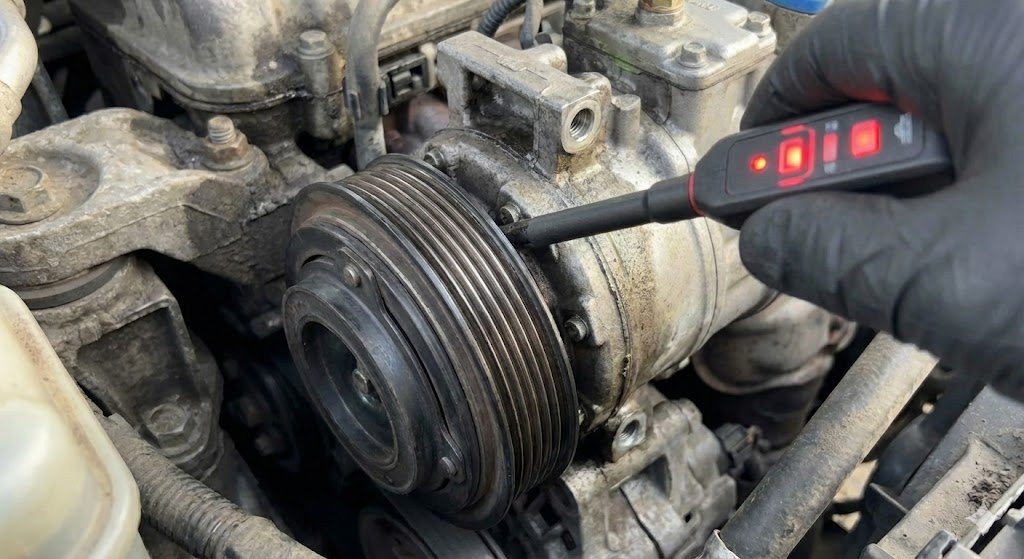
Step 2: Grab a Leak Detection Kit and start crawling
I use a simple Leak Detection Kit: a UV flashlight and, ideally, UV glasses. Then I inspect slowly, like I dropped a contact lens in the driveway. I look first where leaks are common: fittings, seals, and hose crimps.
- Compressor body and front seal area
- Hose fittings and service ports (caps off, then back on)
- Condenser face and side tanks (stone hits happen)
- Evaporator lines at the firewall
- Evaporator drain area under the car (dye can drip out if the evaporator leaks)
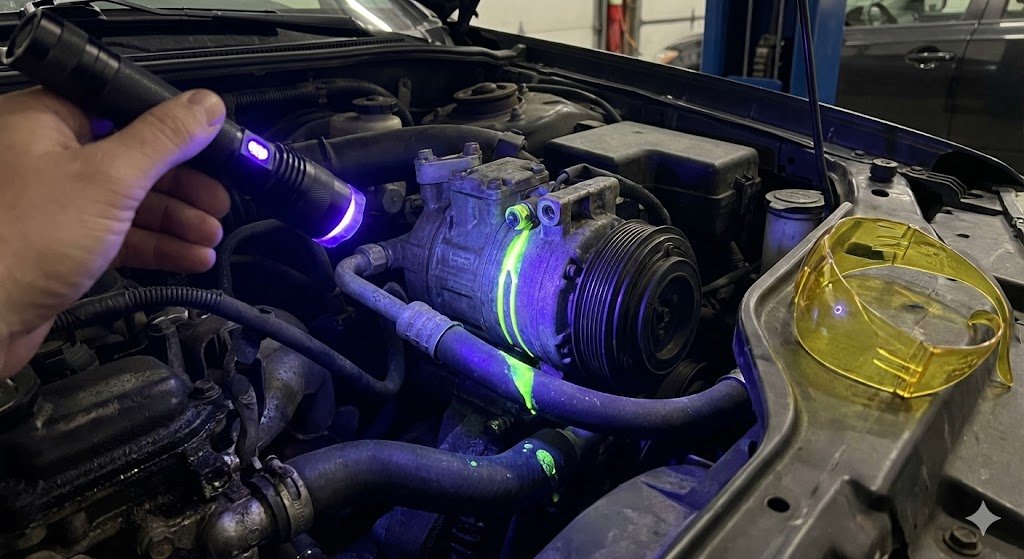
What I expect to see under UV light
With the UV light on, I’m looking for a clear, fresh trail right at the source—not just oily grime. The payoff is obvious:
Under the UV light, any leaks will glow a bright yellow green color where the dye escapes.
If I see that bright yellow‑green glow, I’ve got my leak location, not a hunch.
Old-school leak hunting: ears, bubbles, and a little patience
Systematic Diagnosis for Refrigerant Leaks: the “quiet garage” test
When my Car AC System starts cooling weakly, I assume low refrigerant first—and low refrigerant is usually caused by Refrigerant Leaks, not “normal use.” Before I grab a full Leak Detection Kit, I do the simplest check: I pull the car into a quiet garage or driveway, let the AC run, and I stop talking. Then I listen closely around AC lines, fittings, and the compressor area. A faint hiss is my cue to slow down and search inch by inch, because that sound often means refrigerant is escaping.
Soapy water bubbles: DIY leak pinpointing
Next, I mix a small cup of soapy water (dish soap works) and brush or spray it on the most likely leak points. If there’s a leak, the escaping refrigerant will make bubbles right at the source. This is especially useful when UV dye doesn’t show up clearly, or the leak is tucked behind a bracket where I can’t get a good light angle.
- Hose connections and crimped fittings
- Service ports and valve cores
- Line joints near the condenser and firewall
- Around the compressor body and front snout
Common gotcha: Compressor Seals at the front of the compressor
One spot I don’t skip is the front of the compressor. It’s a common failure point as seals wear or the housing ages, and catching it early can save time, money, and a full system recharge later.
A common place for leaks is right at the front of the compressor, where the seals or housing can wear out over time.
If I want extra confirmation, I’ll use an electronic sniffer as another option, but the ears-and-bubbles method keeps my Systematic Diagnosis simple and DIY-friendly.
Faulty AC Compressor decisions I didn’t want to make
When I stop “topping off” and get serious about a Faulty AC Compressor
I used to treat weak cooling like a small problem: add a little refrigerant and move on. But during Compressor Troubleshooting, I learned that “topping off” is pointless if the Faulty Compressor is leaking at the seals, worn out inside, or the AC Compressor Clutch is slipping or not engaging. If the compressor is leaking or has fully failed, replacement becomes the grown-up move, even if I don’t like the price tag.
New vs rebuilt: the gamble I don’t take
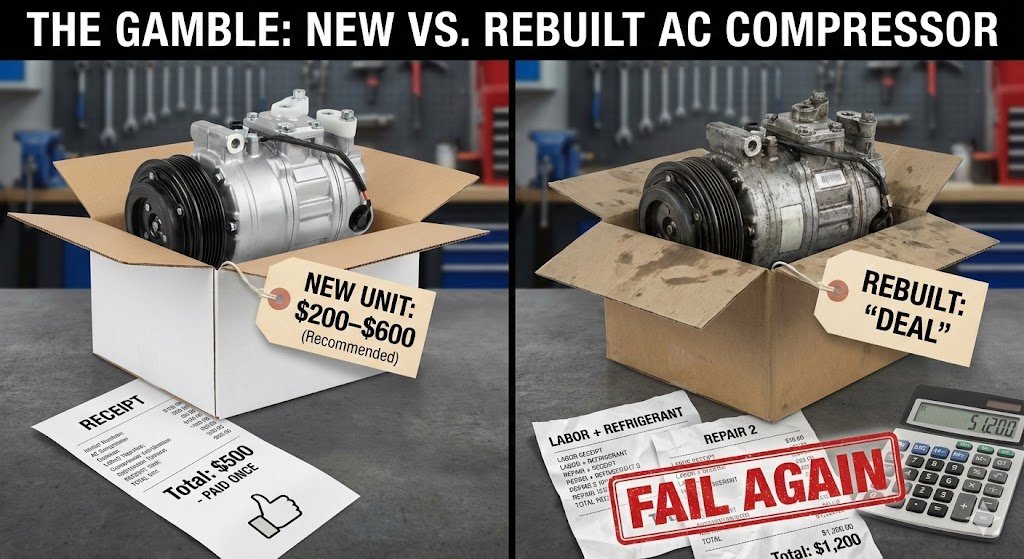
It’s strongly recommended to install a brand new unit rather than a rebuilt one.
I’ve seen rebuilt compressors look like a deal, then fail again in just a few months. That “savings” disappears fast when I’m paying labor and refrigerant twice. I’d rather pay once for a new unit and be done with it. For context, a new compressor is often $200–$600, while a shop repair (parts, labor, refrigerant) can land around $800–$1,200.
The boring step that protects the system: vacuum it
After the new compressor goes in, I evacuate the system with a vacuum pump for about 1 to 1.5 hours. I connect my Vacuum Pump Hoses, then pull vacuum on the gauges before recharging so I don’t introduce air. This matters because trapped air and moisture can cause corrosion and weak cooling.
Extra parts I consider when the system is opened
- AC Accumulator Drier: if it fails, moisture or loose desiccant can damage the system.
- Orifice tube/expansion valve: clogs from contaminants can create pressure problems that look like compressor issues.
Final test + my ‘don’t trust it yet’ two-day rule
After any Car AC System work—vacuum, leak fix, compressor swap, and a correct recharge—my final step in AC system diagnosis is simple: I run the AC on full blast and wait. Within a few minutes, the air should turn cold and the cabin should cool down noticeably. More important than the first cold hit is consistency: it should stay cold even as the engine warms up and the day gets hotter.
Still Not Sure? Check Components before blaming refrigerant
If the clutch won’t engage or the air never gets cold, I pause before I add anything else. I Check Components that cause the same symptoms as low charge: fans, fuses, relays, sensors, and Pressure Switches. A clutch that won’t click on is a voltage problem until proven otherwise, so I use a voltmeter at the compressor connector to confirm power and ground. If voltage is missing, I trace back through the relay, fuse, and pressure switch inputs instead of guessing. This is where a lot of Common Car Issues hide.
My two-day rule (don’t trust it yet)
Just remember to keep an eye on it for the next few days.
I call it fixed only after two days of normal driving. If it blows cold on day one but turns warm again, I assume there’s still a leak or something didn’t seal. That’s my cue to re-check fittings, O-rings, and any spot I touched, then confirm pressures and fan operation again.
Wild card thought experiment: if my AC were a reusable water bottle, refrigerant loss would be the slow drip you ignore until it’s suddenly empty. Don’t just refill—find the drip.
If you’re dealing with other Common Car Issues, leave a comment with what your car is doing. Stay cool and safe on those hot days.
TL;DR: Start with a System Pressures Check using a manifold gauge set. If pressure is low, add UV dye to find refrigerant leaks (UV light + glasses, or soapy water + listening for hiss). Fix the leak before recharging. If the faulty AC compressor is leaking/failed, replace with a new unit, pull vacuum 1–1.5 hours, then recharge to spec. Re-test and monitor for a few days.