
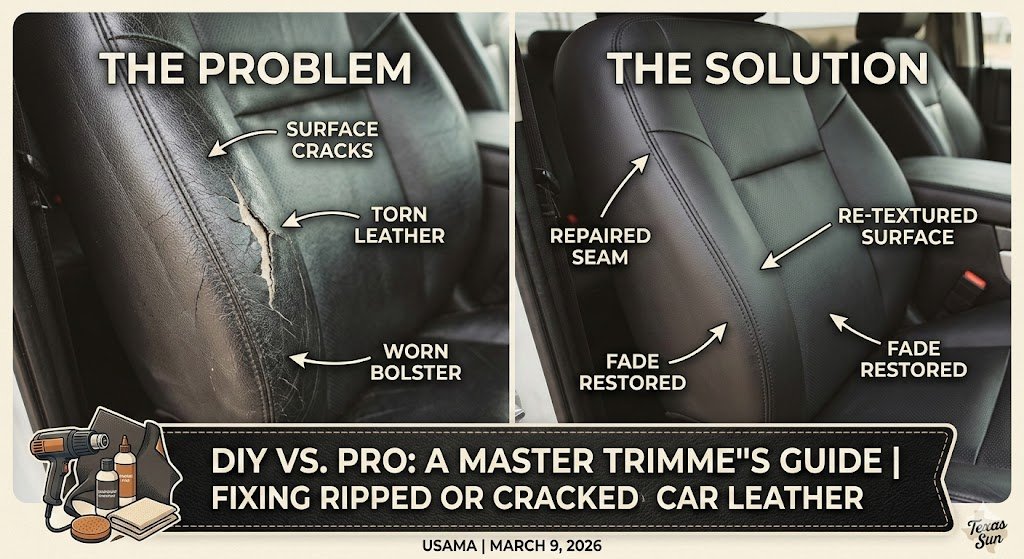
A straight-shooting guide from a master trimmer: when you can fix it yourself with a $20 kit, and when you need to call a pro.
The Quick Answer
✓DIY-able: Surface cracks, small tears under 1 inch, and sun-faded leather
✗Call a Pro: Tears over 2 inches, rips on high-stress seams, or when foam padding is exposed
First Things First: What Kind of “Leather” Do You Actually Have?
Here’s something most articles won’t tell you: 90% of modern truck and SUV “leather” isn’t traditional leather at all. It’s corrected-grain leather with a polyurethane topcoat—basically leather with a plastic protective layer.
This matters because the repair approach is completely different:
Corrected-Grain (Most Trucks)
- Uniform texture, matte finish
- F-150 King Ranch, Silverado High Country
- Water beads up on surface
- Easier DIY repairs
Full Aniline (Luxury SUVs)
- Natural grain, soft feel
- Range Rover, high-end Mercedes
- Water absorbs into leather
- Professional repair recommended
⚠️ Dave, Real Talk:
In our Dallas shop, the number one mistake we see is customers using saddle soap or mink oil on modern automotive leather. These products are designed for boots and horse tack—they’ll destroy the protective topcoat on your truck seats within months.
The DIY Assessment: Can You Fix It Yourself?
Before you spend $25 at AutoZone, do this 60-second test:
Measure the Damage
Tears under 1 inch on flat surfaces = DIY territory. Over 2 inches or on a seam = call a pro.
Check the Foam
Can you see yellow foam padding? If yes, you need professional backing material—a DIY kit won’t cut it.
Location Matters
Driver’s bolster (where you slide in/out) = high stress zone = usually needs pro repair. Center of seat = lower stress = better DIY candidate.
The DIY Repair Process (When Appropriate)
If your damage passed the test above, here’s the process we’d recommend:
What You’ll Need:
- Leather repair compound – We recommend SEM or ColorBond brand (not the cheap $8 kits)
- Backing fabric – Canvas or denim patch (often included in better kits)
- Leather cleaner – pH-balanced, ammonia-free (Lexol is solid)
- Matte-finish conditioner – Critical for avoiding that greasy “armor all” look
- Heat gun or hair dryer – For curing the compound
💡 Pro Tip:
Never use household glass cleaner on your seats. The ammonia strips the protective topcoat, which causes the leather to dry rot within a year. We see this constantly in Texas vehicles.
Step-by-Step:
- Clean thoroughly – Use leather cleaner, not soap. Let dry completely (20 minutes minimum).
- Trim loose edges – Carefully trim any frayed leather edges with sharp scissors.
- Insert backing – Slide the backing fabric under the tear using tweezers. This gives the repair something to bond to.
- Apply compound in thin layers – This is where most DIYers mess up. Three thin layers are better than one thick layer. Let each layer dry before applying the next.
- Heat cure – Use a hair dryer on medium heat, 6 inches away, for 2-3 minutes per layer.
- Texture match – Use a grain pad (included in better kits) to press texture into the final layer while still warm.
- Condition – After 24 hours, apply a matte-finish conditioner to blend the repair.
When to Call a Professional (And What It’ll Cost)
Let’s be honst about when DIY isn’t the answer:
| Damage Type | Typical Cost | Verdict |
|---|---|---|
| Surface cracks/crazing | $150-250 | Try DIY first |
| Small tear (<1″) | $75-150 | DIY possible |
| Large tear (2″+) | $200-400 | Call a pro |
| Bolster wear/tear | $300-500 | Definitely pro |
| Full seat recover | $500-1200 | Pro only |
⚠️ Red Flag Alert:
Any shop that quotes you over the phone without seeing the damage is guessing. A legit trimmer needs to see the leather type, damage extent, and color-match requirements before giving an accurate quote.
Prevention: Protecting Your Investment in the Texas Sun
UV damage is the #1 killer of leather interiors in Texas, California, Florida, and Arizona. Here’s how to fight back:
- Windshield sun shade – The $15 investment that saves you $500+ in repairs. Use it. Every time.
- Condition every 60-90 days – More in summer. Use a UV-protectant conditioner, not a shine product.
- Ceramic window tint – Not just for looks. Quality ceramic tint blocks 99% of UV while staying legal.
- Park smart – Garage, covered parking, or at minimum, point the windshield away from direct afternoon sun.